In special effects makeup, the nose often defines a character. A slight bend, a wider bridge, a hooked silhouette, or an exaggerated tip can instantly reshape a character’s personality. From fantasy elves and goblin thieves to historical figures and distorted horror villains, a fake nose prosthetic plays a powerful role in storytelling.
But how do SFX artists actually create these ultra-realistic nose appliances that look like real skin, photograph beautifully and hold up through hours on set? The process isn’t just about sculpting a shape; it’s a blend of anatomy study, advanced techniques, material science and artistic instinct.
Let’s get to know the complete journey of designing a fake nose prosthetic, the professional way – even if you’re a beginner.
Why Prosthetic Makeup Is Necessary for Designing a Fake Nose?
SFX makeup often involves characters with completely different facial shapes, features and identities. Every character, whether human, creature, fantasy, or historical, needs a nose design that matches their personality. These changes can’t be created with just color, shadows, or highlights.
When a character needs a wider bridge, a longer tip, larger nostrils, or a totally new silhouette, paint alone is not enough. That’s where prosthetics come in. A fake nose prosthetic adds an actual 3D structure and fake skin that sits on top of the actor’s real nose, allowing artists to reshape it completely.
Prosthetic makeup lets SFX artists build new forms, textures and details that look natural and move with the actor. Without it, creating different character noses, especially for creatures, villains, stylized fantasy roles, or realistic transformations, wouldn’t be possible. Prosthetics make these designs believable, consistent and film-ready.
Enroll now or book a tour to start your journey on becoming a special effects makeup expert with Cinema Makeup School in Los Angeles, CA!
How to Make a Fake Nose Prosthetic?
Creating a realistic fake nose prosthetic is a meticulous process that combines artistry, anatomy knowledge and technical skill. From capturing the actor’s exact facial structure to sculpting, molding, painting and final application, every step ensures the prosthetic looks natural, moves seamlessly and enhances the character’s personality.
The following steps break down the professional approach SFX artists use to bring believable noses to life on screen.
Step 1: The Process Begins With a Life Cast
Before sculpting any prosthetic, artists need an accurate replica of the actor’s face. This ensures the nose appliance fits perfectly and moves naturally.
A typical life casting process includes:
- Applying a safe molding material (usually alginate or skin-safe silicone) over the actor’s face.
- Covering it with plaster bandages for structure.
- Casting the positive face (a solid 3D copy of the actor’s actual face created from the mold) in plaster or Ultracal.
This 3D model becomes the foundation for sculpting. Without it, even a beautifully designed nose won’t sit right, causing edges to lift, expressions to distort, or worse – actor discomfort on set.
Step 2: Understanding Anatomy and Character Intent
1) Facial Anatomy
Before sculpting a fake nose prosthetic, SFX artists study the actor’s facial anatomy in detail. This includes the bone structure, cartilage, nostril shape and skin texture. Understanding these elements ensures that the prosthetic integrates naturally with the actor’s face, moves correctly with expressions and maintains comfort on set.
2) Character Intent
Alongside anatomy, the prosthetic must reflect the character’s personality, age and story. A witch may require a long, hooked nose with dramatic textures, while a fairytale prince might need a smooth, straight bridge. Creature or fantasy characters may demand flared nostrils or unusual shapes.
Considering the character’s intent ensures that the fake nose prosthetic not only fits the actor’s face but also enhances the storytelling and brings the character to life on screen.
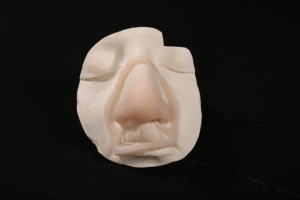
Step 3: Sculpting the Nose with Clay
With the life cast ready, apply a thin layer of oil-based clay, such as Monster Clay or Chavant, over the nose area.
- Begin by blocking out the basic shape, following the natural anatomy of the actor’s face.
- Focus on the bridge, tip and nostrils, gradually adding or removing clay to achieve the desired proportions.
- Use fingers or sculpting tools to refine curves, angles and subtle contours, keeping the edges feather-thin so the prosthetic will blend seamlessly.
For better accuracy, constantly check the sculpt from multiple angles to ensure symmetry. Refer to images or references of the character’s nose type to match the intended design.
Check Out: What Kind of Clay Is Best for SFX Sculpting?
Step 4: Refining Skin Texture
Real skin isn’t perfectly smooth – it has pores, scars, subtle bumps and slight asymmetry. Once the basic shape of the nose is sculpted, it’s time to add these micro-details to make the prosthetic look alive.
For these details, artists use:
- Stippling sponges
- Texture stamps
- Toothbrushes
- Plastic wrap
- Alcohol for surface blending
- Custom sculpting tools
During this phase, every pore matters. When a nose is shot in close-up under HD or 4K cameras, poor texture becomes very noticeable. Accurate texture is what creates a realistic appearance.
Step 5: Mold Making – Turning the Sculpt Into a Real Appliance
Once the clay sculpture is finalized, the next step is creating a mold. This is a “negative” version of the sculpt, made using strong materials like Ultracal, fiberglass, or epoxy. The mold is extremely important because it will be used to make all the final prosthetic noses.
The mold captures every detail of the sculpt, including textures like pores, wrinkles and fine lines. It also allows you to cast the prosthetic in professional materials such as silicone, foam latex, or gelatin, ensuring the final piece looks realistic.
A good mold guarantees that each prosthetic will fit the actor perfectly, every time. Even a small air bubble or mistake during mold making can ruin the prosthetic, so precision and care are essential at this stage.
Learn Why Every Serious Makeup Artist Should Learn Mold-Making Techniques
Step 6: Trimming Edging & Pre-Painting
Now, remove the prosthetic from the mold and begin preparing it for application. Trim and feather the edges carefully, removing any extra material or flashing. Then, pre-paint the prosthetic to match the actor’s skin tone. Pre-painting saves time on set and ensures consistent color under studio lighting.
Fake nose prosthetics often need several layers of color and painting before they look like real skin. You can add small details like veins, freckles and slight color variations to help the nose blend naturally with the actor’s face. Taking the time to do this carefully makes the prosthetic look realistic and ensures it moves and performs well on camera.
Enroll now or book a tour to start your journey on becoming a special effects makeup expert with Cinema Makeup School in Los Angeles, CA!
Step 7: Final Painting and Blending on the Actor
Apply the final colors and details directly on the actor’s face. This ensures that the nose matches the actor’s natural skin tone perfectly and blends seamlessly with surrounding features.
Explore How Concept & Color Theory Boost Your Creature Design Skills
Step 8: Adhesion and Application
Use medical-grade adhesives, such as Pros-Aide or spirit gum, to secure the appliance. Apply the adhesive carefully to both the prosthetic edges and the actor’s skin, then press the prosthetic in place.
Learn Prosthetic Makeup at Cinema Makeup School
When imagination meets skill, characters come to life. Take it further at Cinema Makeup School. Here, you’ll learn a full range of prosthetic and SFX makeup techniques – from subtle facial enhancements and realistic injuries to complete creature, monster and fantasy transformations.
Master life casting, sculpting, molding, painting and seamless on-set application with hands-on guidance from industry professionals. You can also explore our YouTube channel for tutorials, behind-the-scenes content, student creations and our podcast series.
Commonly Used Materials for Fake Nose Prosthetic Application
- Adhesives: Pros-Aide or spirit gum to securely attach the prosthetic.
- Barrier Products: Skin prep sprays or lotions to protect the actor’s skin.
- Paints and Pigments: Alcohol-based, silicone, or grease paints for realistic skin tones.
- Blending Materials: Liquid latex or silicone gel to smooth edges and hide seams.
- Tools and Accessories: Brushes, spatulas, sponges and tweezers for precise application.
Enroll now or book a tour and gain the confidence, skills to work on real-world film, television and creative projects.