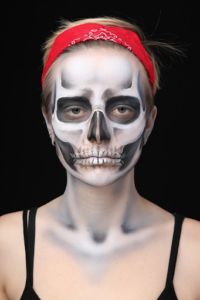
Skull makeup has always held a strong place in horror looks. It is simple, bold and works for many characters – undead creatures, ghostly figures, cursed pirates, or even stylized fantasy designs. When you mix skull art with airbrush makeup, the results can be smooth, clean and very striking. Airbrushing helps you create sharp shadows, soft blends and deep contrast.
This blog walks you through the full idea behind airbrush skull makeup, how it works, why artists love it and how you can master it even if you are still learning.
Airbrush Skull Makeup Anatomy
Before you begin spraying, it helps to understand the basic shapes that make a skull look real. You do not need deep anatomy knowledge, but knowing a few main points will guide your shading and help you create more convincing special effects makeup. A skull stands out through the eye sockets, cheek hollows, nose cavity, jawline, with the teeth area and the structure of the forehead.
When you understand where these forms appear on a real face, it becomes easier to build shadows and highlights in the right places. This is what makes airbrush skull makeup look natural. Instead of following the lines of a reference image alone, you allow the person’s bone structure to guide the shapes. This gives the final look more depth, balance and believability.
How Do You Choose the Right Airbrush Tools and Colors?
For airbrush skull makeup, the tools you work with make a big difference in how smooth and controlled your results look. Most artists rely on a few basic items that keep the process simple and clean.
You will usually need:
- A double-action airbrush that allows you to control both air and product flow
- A small, steady compressor that gives even pressure
- Airbrush makeup in black, white and grey for the main structure
- Optional soft browns or muted tones if you want an aged or weathered look
When choosing airbrush makeup, it is important to think about how long the look needs to last. Alcohol-based formulas give stronger wear for long shoots or events, while water-based options are softer on the skin and easier to remove at the end of the day. Select the type that suits both the model and the purpose of the makeup.
Check out: Water-Based vs. Alcohol-Based Airbrush Makeup
How to Do Airbrush Skull Makeup the Right Way?
Creating an airbrush skull look involves layering color carefully to build depth, shape and realistic shadows. By following a structured process, you can transform a blank face into a striking skull design, making each feature, from eye sockets to jawline, look natural and three-dimensional. The steps below break down the process so you can achieve professional results, whether for film, photoshoots, or Halloween.
1. Prepare the Skin and Setup
Start with clean, dry skin so the makeup settles evenly. A light primer can help if the skin is oily or textured. Set up your airbrush, compressor and colors before you begin and make sure your lighting clearly shows all angles of the face.
2. Create a Soft White Base
Begin by spraying a thin white layer over the face. Work in gentle, even layers so the base does not look thick. This soft coat helps every dark shadow stand out and gives you a clean surface to work on.
3. Map Out the Skull Structure
Take a moment to visualize the skull shapes. Look at the person’s own bone structure and gently mark where the eye sockets, cheek hollows and jaw will fall. A light touch of grey can guide your shading while still keeping the shapes soft and easy to adjust.
4. Build the Main Shadows
This is where the skull begins to take shape. Instead of rushing, build the darker areas slowly so they stay soft and smooth. Begin by shaping these main areas:
- Eye Sockets: Spray dark grey or black around the eyes, deepening the edges while keeping the outer areas soft. Let the shape follow the natural curve under the brow so the sockets look sunken and real.
- Cheek Hollows: Spray lightly beneath the cheekbones, following the natural angle of the bone. Keep the top edge soft and deepen the lower side a little more to create the hollow effect.
- Nose Cavity: Outline the cavity with a fine spray, then fill it slowly. Blend the edges into the cheeks so the shape looks natural, not flat.
- Jaw and Teeth Area: Lightly spray shadows from the upper lip downward to suggest the tooth spaces. Use soft lines so the jaw looks more like bone structure and less like painted stripes.
5. Shape and Strengthen the Jawline
Deepen the shadows along the jaw and under the chin. Soft layers beneath the jawbone help create the illusion of separation between the skull and the neck. Keep the lines diffused so they blend naturally.
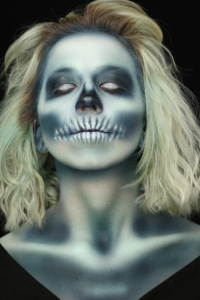
6. Add Depth Across the Face
Once the main shapes are set, go back and build more depth where needed. Areas like the inner corners of the eyes, sides of the nose and the temples benefit from slightly darker shading. Slow layering gives the skull a lifelike sense of depth.
7. Highlight the High Points
Use white to bring back light to the top areas of the face – the forehead, cheekbones, nose bridge and jaw edges. Highlights should be sprayed very softly so they merge into the shadows around them. This contrast gives the skull its three-dimensional look.
8. Add Details and Texture
This step brings character into the design. Lower the airbrush pressure and create soft cracks, thin lines, or faint textures across the forehead, jaw, or temple areas. You can add scattered speckles or uneven shading if you want the skull to feel aged or worn. These small touches add realism without overpowering the base design.
9. Extend the Makeup to the Neck or Body
If you want a complete horror look, continue the airbrush work down the neck or collarbones. Adding shadows under the bones, or hinting at ribs and spine shapes, makes the character more dramatic and complete.
10. Review and Refine Each Area
Take a step back and check the face from different angles. Airbrush work should look soft, balanced and even. Fix any uneven patches, smooth out harsh edges, or deepen any areas that look lighter than expected.
11. Set the Makeup for Long Wear
Finish with a gentle setting spray designed for airbrush makeup. Hold it at a distance so it settles lightly on the skin. This keeps the design in place through long hours of movement, sweat, or filming.
Here is the complete tutorial of PRIDE Skull Makeup!
Learn Airbrush Makeup at Cinema Makeup School
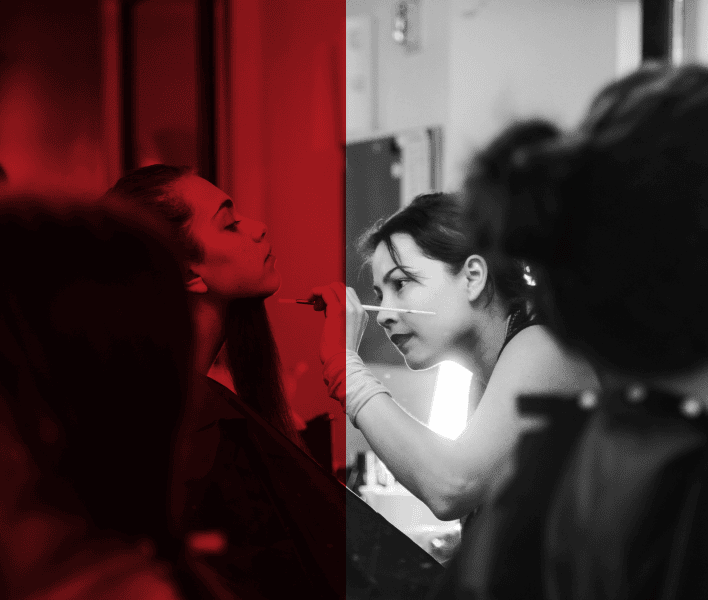
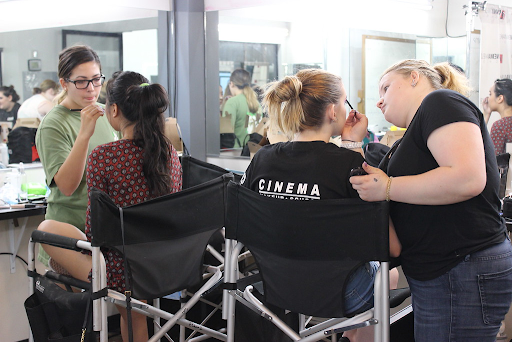
If you want to take your makeup skills to the next level, Cinema Makeup School offers professional training in special effects makeup. Our courses are designed for beginners and aspiring artists who want hands-on experience with real tools, materials and techniques used in the film and entertainment industry.
You will learn how to:
- Work confidently with airbrush tools and compressors
- Build realistic shadows and highlights
- Apply professional-grade airbrush makeup for long-lasting results
- Add fine details, textures and finishing touches to your designs
- Understand bone structure and facial anatomy for more realistic effects
Our expert instructors guide you through every step, ensuring you gain practical skills and confidence. Whether your goal is film, TV, photoshoots, or Halloween events, our courses provide the foundation to create professional-quality SFX makeup looks.
Book a tour of Cinema Makeup School today and start mastering the art of airbrush makeup!
Related Articles:
Must-Have Special Effects Makeup Tools Every Artist Should Own
Airbrush Makeup Artist Career Roadmap
How to Create Realistic Wounds and Scars with Prosthetics?
How to Handle and Maintain Airbrush Tools?
Working with an airbrush requires patience, control and proper care. Even the best makeup designs can be affected if the tools are not handled correctly. Here’s how to get the most from your airbrush setup.
1) Holding the Airbrush
Hold the airbrush like a pen, with a comfortable grip that allows precise movement. Avoid gripping too tightly; gentle control helps you create smooth lines, soft gradients and subtle shadows. Use your other hand to steady the model’s face if needed, especially when working near delicate areas like the eyes or nose.
2) Controlling Air Pressure
Adjust the compressor pressure according to the effect you want. Lower pressure gives soft shading and fine details, while higher pressure covers larger areas quickly. Practice on paper or a test surface before applying to the skin, so you get a feel for the spray and flow.
3) Cleaning Between Colors
Clean the airbrush thoroughly when switching colors. Even a small amount of leftover paint can change the next color’s tone. Flush the system with water for water-based makeup or the recommended cleaner for alcohol-based formulas. Regular cleaning prevents clogging and keeps your lines smooth.
4) Maintaining the Equipment
At the end of each session, disassemble and clean the airbrush completely. Check the nozzle, needle and paint cup for residue. Store your compressor and airbrush in a dry, dust-free space to protect them from damage. A well-maintained airbrush lasts longer and performs more consistently.
5) Practice and Patience
Handling an airbrush takes practice. Spend time learning how different angles, distances and pressures affect the spray. The more you practice, the more confident you will become and the smoother your SFX makeup will look.