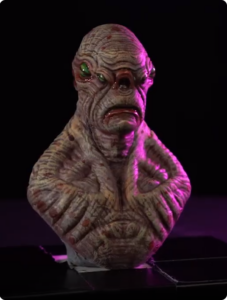
Ever wondered how those jaw-dropping creatures from your favorite sci-fi or horror films are brought to life? Well, it’s not magic; it’s the art of Special Effects Makeup, where masterful creature design meets hands-on technique using materials like latex, silicone and detailed prosthetics.
Behind every snarling beast, ancient alien, or mythical monster is a skilled SFX artist who knows how to fuse creativity with material science. Dreaming of designing creatures that look like they walked straight off a movie set?
Let’s pull back the curtain on creature creation and show you how it’s done.
Crafting Creatures: Transforming Concepts into Reality
Creating a believable creature isn’t just about wild imagination, it’s about bringing it to life with physical and digital artistry.
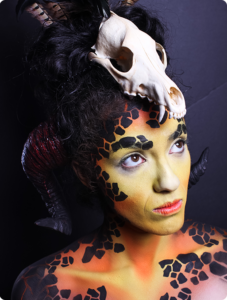
In the makeup and film industry, creature design involves a fusion of sculpting, painting, prosthetics application and, increasingly, digital enhancement. And the secret weapons? Latex, silicone and prosthetics.
These materials offer the flexibility, texture and realism required to transform actors into otherworldly beings – whether for big-screen blockbusters, haunted attractions, or gaming promos.
But how exactly do you go from idea to full-blown beast?
Check Out: How to Create Realistic Wounds and Scars with Prosthetics?
How to Design a Creature Using Latex, Silicone & Prosthetics?
Step 1: Creature Concept & Design Sketch
Before you touch any material, you need a concept. Start with rough sketches of your creature. Think about:
- Backstory: Where does it live? What does it eat? What’s its purpose?
- Anatomy: Is it humanoid? Insect-like? Hybrid?
- Silhouette: Strong shapes help make creatures memorable.
This is your blueprint. Most makeup artists start digitally with tools like Photoshop or Procreate to refine ideas quickly.
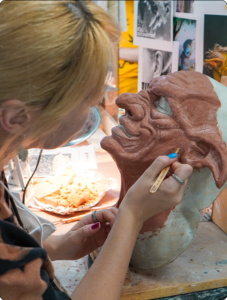
Step 2: Sculpting the Creature Maquette
Once the concept is approved, it’s time to sculpt a creature maquette – a scale model that brings your 2D concept into 3D form.
Materials & Tools:
- Chavant NSP clay for sculpting
- Wire armature for structure
- Loop tools and rakes for shaping
This is where you build the form, define muscles and add textures like scales, skin folds, horns, etc.
Tips:
- Focus on dynamic poses
- Balance realism with creativity
- Studied animal anatomy for reference
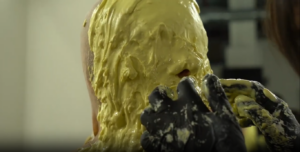
Step 3: Mold Making & Casting
Now that the sculpture is complete, you’ll create a mold around it – this is how your final latex or silicone pieces will be shaped.
For Latex:
- Mold is made with plaster or stone
- Liquid latex is poured in, slushed and left to dry
- Ideal for flexible, lightweight masks or skin
For Silicone:
- Use platinum-cure silicone for realistic skin texture
- Requires precise mixing and professional-grade molds
- Results in durable, flesh-like prosthetics
Comparison Tip:
- Latex = lightweight, budget-friendly, great for big builds
- Silicone = hyper-realistic, skin-like and great for close-up shots
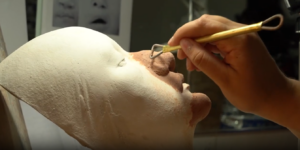
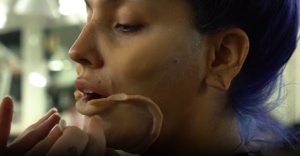
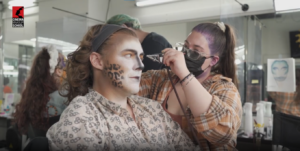
Step 4: Prosthetic Application
This is where the creature comes to life on the actor.
Steps:
- Clean and prep the actor’s skin
- Apply adhesives (like Pros-Aide or Telesis)
- Blending edges using alcohol or blending tools
- Paint using PAX paints, alcohol-based colors, or airbrush
- Add final textures, blood, dirt, or shine
Silicone prosthetics feel real and move with the actor’s expressions, while latex pieces are more suited for larger costume sections.
Step 5: Final Touches & Camera-Ready Finish
Once the prosthetic is applied:
- Improve your creation with hair punching, add detailed veining, or achieve a glossy finish using glycerin.
- Use contacts and dentures for realism
- Test under lights and camera to ensure everything reads well
Why Latex, Silicone and Prosthetics?
- Latex Creature Builds: Liquid latex is flexible, lightweight and ideal for creating skin textures, wounds, or adding layered detail to your character. It’s a go-to for fantasy creatures that require stretch and movement.
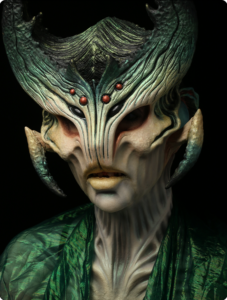
- Silicone-Based Creatures: Silicone offers a more skin-like, translucent finish. It’s heavier, more durable and perfect for creating realistic, fleshy appearances – think aliens or mutated humans with intricate facial structures.
- Prosthetics: These are the game-changers. Prosthetics help modify the actor’s appearance – elongate noses, change cheekbones, add horns or gills, while keeping the look believable on camera.
Together, these elements make creature characters not only visually powerful but also performance-ready.
Want to see the creature design process in action? Watch the full tutorial on YouTube –
Where to Learn the Art of Creature Design?
If this creative journey excites you, then professional training is your next step. Cinema Makeup School, which is part of the broader educational institution known as Cinema Art College Corporation, offers one of the most immersive and industry-relevant programs in Special Effects Makeup – Creature Concept Design Program.
This three-week intensive (120 clock hours) combines both digital and physical creature design, giving students a full-spectrum experience from concept art to sculpted maquettes.
Here’s a breakdown of the key learning outcomes from this program:
1. Digital FX Makeup
In this track, students learn how to design a creature concept that looks camera-ready. The program covers topics such as photo retouching, concept art development and using tools like Photoshop while working with a Wacom tablet to bring the ideas to life.
Skills and techniques covered:
- Working with a Wacom drawing tablet
- Photoshop portrait retouching
- Concept art development and quick turnaround concept creation
- Collaging layers and overlaying textures
- Image manipulation and recoloring
- Photo manipulation and more
2. Creature Maquette Sculpting
Bring your creature to life! This part of the program introduces clay sculpting and armature building, teaching you how to physically model your concept.
Core skills developed in this track include:
- Concept artistry and constructing an armature
- Working with Chavant NSP clay
- Sculpting anatomical details
- Adding creature features like scales, horns and other unique traits
- Stylizing hair, layering clothing and adding texture
- Building expressive, dynamic poses

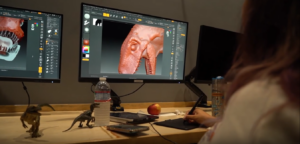
3. ZBrush Digital Design
Take your physical sculpting into the digital space. With ZBrush, students learn to digitally sculpt detailed busts of characters, complete with accessories, hair and textured finishes.
Skills built in this track include:
- Digital sculpting using a Wacom tablet
- Mastering ZBrush tools and subtools
- Working with geometry and mesh control
- Polypainting techniques for adding color and detail
- Hair brushing and refining fine features
- Surface finishing for professional-grade digital models
Get Inspired with More Reads:
How Cinema Makeup School’s Bootcamps and Workshops Empower You to Master SFX Makeup?
How Hard Is It to Learn Airbrushing?
SFX vs Prosthetic Makeup: What is the Difference?
Sculpt the Unseen, Design the Unbelievable!
Creature design is where imagination meets precision – an exhilarating mix of storytelling, sculpting, digital artistry and prosthetic magic. If you’re dreaming up a terrifying alien or a mythical beast, understanding the materials and techniques behind latex, silicone and prosthetics is key to turning those visions into reality.
With the right training, tools and creative mindset, you can step into special effects makeup and begin crafting creatures that captivate, terrify and inspire. The journey from sketch to screen begins with one decision: to start.
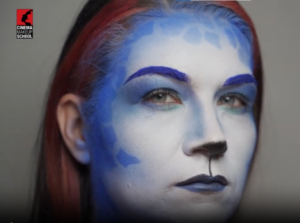
When it comes to transforming an actor into a character of a different age, special effects makeup (SFX makeup) is the magic behind the scenes. Aging makeup isn’t just about adding wrinkles – it’s a meticulous process that brings old age to life.
Whether you’re working on a movie set, a TV show, or a theater production, understanding the essential SFX techniques for aging effects will give your characters a believable and realistic appearance.
In this blog, we’ll discuss these techniques, explain how they work and show you how to create stunning aging transformations.
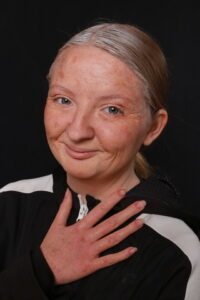
Aging Makeup: Must-Know Special Effects Techniques
1. Preparing the Canvas: Skin Care and Preparation
First, it’s important to start with a clean, moisturized base. Aging makeup often involves layering products on top of the skin, so it’s essential to hydrate and prep the skin. Apply a moisturizer to create a smooth surface for your makeup application. If the skin isn’t prepped correctly, the makeup may not adhere well, leading to an uneven finish.
Quick Tip: Use a primer designed for aging skin to create an ideal canvas. This ensures that the makeup lasts longer and stays fresh throughout the shoot.
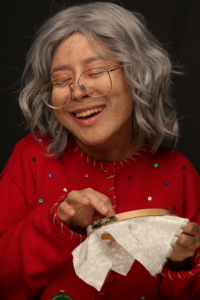
2. The Power of Age Spots and Liver Spots
To take old age makeup to the next level, you can’t forget the power of age spots and liver spots. These give your character the authenticity of someone who’s lived a full life.
Use SFX makeup products like special effects pigments, face paints, or even powdered eyeshadows in darker shades to mimic the uneven pigmentation of age spots. Blend these carefully, focusing on the areas where aging spots most often appear, like the forehead, hands and cheeks.
Helpful Hint: Don’t overdo it. Adding a few small details in the right places can make your character look older, but it won’t look too fake or exaggerated.
3. Shading and Highlighting
Shading and highlighting are key to creating depth in aging makeup. As people age, their skin naturally loses volume and certain areas, like the cheeks, temples and under the eyes, sink in. To mimic this, you’ll need to use contouring techniques to create the illusion of hollowed-out areas. Use darker shades for shadowing and lighter shades for highlighting the high points of the face.
Insider Advice: Apply a lighter foundation or highlighter to the high points of the face to emphasize areas that still maintain prominence with age.
4. Eyes and Lips: The Telltale Signs of Age
Aging isn’t just about the skin. The eyes and lips tell a story, too. As we age, the skin around the eyes becomes looser and the lips lose volume. You can create this illusion with special effects makeup by lightly darkening the under-eye area to mimic shadows from drooping skin. Use a lip liner to enhance the natural shape of the lips and then apply lipstick in a more muted, less vibrant color to recreate the fading of lip color with age.
Expert Insight: Avoid making the lips too dark, as this can make the aging effect look overdone. A subtle color goes a long way.
5. Creating the Look of Thin, Frail Skin with Translucent Powders
As we age, skin becomes thinner and veins become more visible. To create this effect, you can use translucent powders to set your makeup, giving it a lighter, more delicate finish. For even more realism, apply a light wash of blue or greenish makeup around the temples and under the eyes to mimic the appearance of veins showing through thinning skin.
Pro-Level Advice: Use a fine, translucent setting powder to lock your aging makeup in place without making the skin look cakey or unnatural.
6. Hair Color and Texture: Don’t Forget the Grays!
While makeup can create the illusion of old skin, you can’t forget about the hair. No matter if you’re working with a wig or applying temporary color to natural hair, graying or thinning hair can dramatically change a character’s appearance. Use a mixture of white, gray and silver hair color sprays to add that silver sheen. For thinning hair, use a texturizing powder or even a special effects hair product designed to create the illusion of balding or receding hairlines.
Must-Know Technique: Use a root touch-up spray for an easy way to mimic gray hair along the hairline or temples.
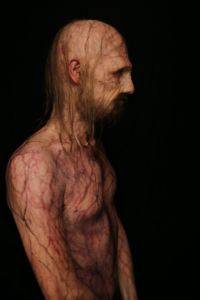
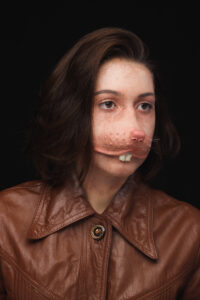
7. Using Silicone Prosthetics for Aging Effects in SFX Makeup
Silicone prosthetics are a game-changer when it comes to aging makeup in special effects (SFX). Unlike latex, silicone is more flexible and breathable, making it ideal for creating realistic aging effects that move naturally with the skin. From wrinkled brows, crow’s feet to sagging jowls, silicone prosthetics can give a truly lifelike appearance.
Creative Development Tip: Always remember to use prosthetic adhesive designed for silicone when applying these pieces and be sure to blend the edges seamlessly into the skin to avoid visible lines.
Creative Suggestion: How to Create Realistic Wounds and Scars with Prosthetics?
8. Finishing Touches: Setting the Aging Makeup
Once you’ve applied all your aging techniques, it’s crucial to lock everything in place. Since special effects makeup often involves multiple layers and products, using a setting spray specifically formulated for SFX makeup will help keep your look intact all day.
Pro Tip: Always set your makeup with a fine mist of setting spray to prevent cracking or fading throughout the day.
To enhance your aging makeup skills, check out our YouTube tutorial on SFX and prosthetics –
It’s a great way to explore advanced techniques that can elevate your aging effects.
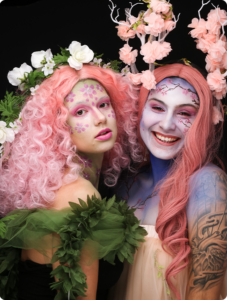
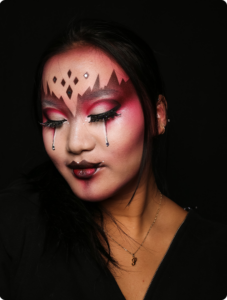
Role of Aging Makeup in Different Genres: Horror, Fantasy and Drama
Aging makeup isn’t just about creating realistic portrayals of old age. It plays a crucial role in enhancing characters across different genres, adding depth and dimension to your storytelling. Here’s how old age makeup impacts various film genres:
Horror: Old-age makeup is used to transform characters into terrifying ancient creatures, monstrous elders, or other unsettling figures. In horror films, the aging effect can amplify a character’s sinister or eerie presence, making them more menacing.
- Example: Use exaggerated wrinkles, deep-set eyes and dramatic sagging skin to create a sense of fear or horror in a character.
Fantasy: In fantasy genres, aging can portray timeless characters like wizards, immortals, or ancient beings who have lived for centuries. The goal is to suggest wisdom and experience without transforming too harshly.
- Example: Apply subtle aging effects like crow’s feet, gray hair and gentle lines to portray the wisdom that comes with age in a fantastical setting.
Drama: In dramas, aging effects contribute to the realism of a character’s life journey. The subtle transformation showcases the passage of time and life experiences, making characters more relatable and believable.
- Example: Use natural aging techniques such as light wrinkles, slightly hollowed cheeks and subtle skin texture changes to convey the passage of time.
Pro Tip: Adjusting Aging Effects Based on Genre
- For Fantasy or Horror Films: Increase the intensity of aging features like deep wrinkles, exaggerated age spots and more noticeable sagging. This creates a more dramatic or supernatural appearance.
- For Dramas: Keep the aging effects subtle and natural. Focus on light shading around the eyes and cheeks to show age, but avoid exaggerating wrinkles or other signs of aging unless the character’s life has been particularly harsh.
Temporary Aging: How to Achieve Quick Aging Effects for Short Scenes?
If you need to create aging effects for a short scene or a fast transformation, here are some quick techniques:
- Use Latex or Silicone: Latex works well for fast, temporary wrinkles and sagging effects, but silicone is a better choice for more realistic and flexible results that last longer.
- Apply with a Brush: Use a brush to apply latex or silicone directly to the skin, layering it to create wrinkles, age spots and thinning skin.
- Add Texture for Realism: Layer the material to create more pronounced lines or skin changes, achieving a natural aging effect quickly for brief scenes.
Transform Your Passion into Profession at Cinema Makeup School
Are you prepared to transform your SFX makeup skills and push your creativity further? At Cinema Makeup School, backed by Cinema Art College Corporation, you’ll learn from top industry professionals, gain hands-on experience and master the techniques that will set you apart in the SFX makeup industry.
Why Us?
- Expert instructors with real-world experience in top films and TV.
- Hands-on training with professional-grade tools and materials.
- Build an impressive portfolio showcasing your best work, giving you the edge in auditions and job opportunities.
- Financial assistance is available to help make your education more affordable.
So, what are you waiting for? Grab your brushes and tools, because you’re about to dive into the art of special effects makeup – where transformation happens, one detail at a time!
Related Articles –
How Cinema Makeup School’s Bootcamps and Workshops Empower You to Master SFX Makeup?
How to Avoid Common SFX Makeup Mistakes?
SFX vs Prosthetic Makeup: What is the Difference?
Incorporating special effects techniques to create aging makeup is a powerful way to bring realism and depth to your characters. Embrace the artistry of old age makeup and let your creativity shine through every detail!
When it comes to movie magic, special effects makeup has always been the secret weapon behind the most memorable characters on screen. From grotesque monsters to out-of-this-world aliens, SFX artists have relied on hands-on sculpting to bring the unimaginable to life. But here’s the thing: the game is changing.
Welcome to the era of 3D printed prosthetics!
Gone are the days when makeup artists had to spend hours meticulously sculpting prosthetic pieces by hand – though that’s still part of the artistry. Today, 3D printing technology is revolutionizing the way prosthetics are created, opening up new possibilities for speed, precision and creativity.
Let’s break down how this cutting-edge technology is transforming movie makeup and why it’s becoming a must-have tool for every special effects artist.
Check Out: How To Become a Makeup Artist for Films?
Evolution of Prosthetics: From Clay to Code
For years, special effects artists have relied on traditional sculpting techniques to create prosthetic pieces by hand. These hands-on methods, using clay, silicone, latex and foam – were the foundation of many iconic movie looks.
But as technology advanced, so did the tools used by SFX artists. Enter 3D modeling and 3D printing, which are reshaping the way prosthetics are designed, produced and applied on set.
What’s the secret sauce?
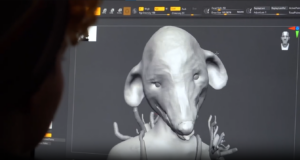
The combination of 3D sculpting software like ZBrush and the precision of 3D printers. ZBrush allows artists to sculpt their designs in a virtual environment, providing unparalleled detail and flexibility before a single physical piece is created.
Afterward, the design is sent to a 3D printer, which can accurately reproduce the prosthetic in high detail. The result? A more efficient, precise and versatile prosthetic creation process.
3D Sculpting in ZBrush: Real Power Behind the Prosthetics
It’s no surprise that ZBrush has become the go-to tool for SFX artists. This powerful 3D sculpting software allows artists to craft intricate details – whether it’s the folds of alien skin, the texture of a monster’s scales or the fine details on a character’s prosthetic face.
The beauty of ZBrush sculpting lies in its versatility. Artists can build their prosthetic designs from scratch, adjusting geometry, polypaint and even hair textures with incredible ease.
By using ZBrush for character sculpting, artists can create hyper realistic and fantastical designs that weren’t possible with traditional methods. Imagine sculpting intricate wrinkles, detailed veins and realistic textures, all at a digital level of precision.
That’s the magic of ZBrush sculpting and it’s exactly what makes 3D printed prosthetics so revolutionary in the movie makeup.
Also, read SFX vs Prosthetic Makeup: What is the Difference?
Why 3D Printed Prosthetics Are Changing Movie Makeup Forever?
So, how exactly are 3D printed prosthetics changing the industry? Let’s break it down:
1. Speed and Efficiency
In traditional prosthetic creation, sculpting, molding and casting can take days, sometimes even weeks, to perfect. With 3D printing, the entire process is streamlined.
Once the design is complete in 3D model design software, a prosthetic can be printed in a matter of hours, drastically reducing production time. This means more time for fine-tuning and getting the perfect look on set.
2. Unmatched Precision
One of the biggest advantages of 3D printed prosthetics is the level of detail they can capture. With 3D printing, every crease, texture and nuance in the design is reproduced with startling accuracy. This opens up endless possibilities for prosthetics that would have been impossible to achieve by hand.
3. Customization and Creativity
3D printing allows for complete customization. Want a prosthetic that fits a specific actor’s face? No problem. Need a set of prosthetic wings with intricate veins and textures? Done.
The flexibility of 3D printing means that prosthetics can be tailor-made for each project, allowing for more imaginative and complex designs. And since the design is digital, it can be modified quickly and easily.
4. Cost-Effective Production
While the initial investment in 3D printing technology may seem high, it’s ultimately a cost-effective solution for production studios. Its efficiency and speed save both time and money.
Additionally, 3D printers produce less waste than traditional methods, as the materials are used more efficiently and can be recycled.
See how artists work on 3D modeling software to create prosthetics: https://www.youtube.com/watch?v=1rYAP8HSk7g
Software Meets Sculpture: The Workflow of a Modern SFX Artist
The combination of ZBrush and 3D printing isn’t just about convenience, it’s about unlocking possibilities that were once out of reach.
- Digital Sculpting in ZBrush – This is where the magic begins. With ZBrush, artists create highly detailed digital models. They can sculpt in real-time, making modifications as they go and experiment with texture, expression & even color.
- 3D Model Design & Preparation for Printing – After the digital sculpture is complete, it’s time to prepare the file for printing. This step ensures the model is compatible with the 3D printer and that it will print in the correct proportions and dimensions. Artists can also break the model into separate pieces for easy assembly and painting once printed.
- 3D Printing & Final Touches – Now, the prosthetics are printed. The 3D printer creates each piece with amazing accuracy, capturing the smallest details. Once the prosthetic is printed, it’s cleaned, finished and painted, often with the same techniques used in traditional SFX makeup – bringing the digital design to life.
Learn How to Avoid Common SFX Makeup Mistakes?
Cinema Makeup School: Perfect Place for ZBrush Mastery
Step into the cutting-edge realm of special effects at Cinema Makeup School, a proud part of the Cinema Art College Corporation. We’re committed to shaping the next generation of SFX artists by blending traditional techniques with the latest digital innovations.
Our ZBrush Training Course doesn’t just teach you to use industry-standard tools, it empowers you to seamlessly integrate time-honored sculpting with the power of modern technology, ensuring you’re always ahead of the curve.

Embrace the future of movie makeup and let your creativity run wild. Enroll now!
FAQs
1. What Software Do Designers Use for 3D Modeling?
Designers use various software tools for 3D modeling, but the most popular and industry-standard software is ZBrush. ZBrush is widely used for its powerful digital sculpting tools, making it ideal for creating highly detailed models and intricate textures.
Other commonly used 3D modeling software includes Maya, Blender and 3ds Max, each offering unique features for different aspects of 3D design.
2. What If I Can’t Afford the Full Cost of the SFX Course?
We offer financial assistance to help make your education more affordable. Check out the details here!
3. What Makes ZBrush Different from Other 3D Modeling Software?
Unlike other 3D modeling software, ZBrush focuses on digital sculpting, offering a more intuitive approach for creating organic shapes and detailed textures. Its unique ability to handle millions of polygons lets artists create intricate designs that are perfect for special effects.
Special effects makeup (SFX) is a dynamic art that combines both creativity and technical skill.
If you’re passionate about transforming faces and bodies into stunning characters or creatures, Cinema Makeup School, part of the broader educational institution named Cinema Art College Corporation offers comprehensive learning paths; Workshops and boot camps.
These programs are designed to equip you with the essential skills and knowledge to excel in special effects makeup.
Let’s dive into how these two learning formats – Workshops and Bootcamps – can help you master the art of SFX makeup.
Workshops: Explore Specialized SFX Techniques
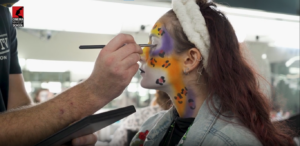
1. Airbrush Makeup Course
Airbrush makeup is a vital skill for creating flawless textures, seamless gradients and intricate designs in special effects makeup. In this workshop, students will learn how to apply a smooth, flawless complexion and use airbrush techniques to contour and reshape the body with precision.
Key Skills You’ll Develop:
- Single-action airbrush assembly and maintenance: Learn how to properly assemble and maintain your airbrush tools for long-lasting performance.
- Color theory: Understand how to mix colors to create realistic effects, gradients and textures.
- Airbrushed gradients and smooth complexions: Perfect the art of seamless application for flawless finishes.
- Contouring and detailing: Use airbrush techniques to sculpt and add depth to your designs.
- Stencils and masking: Experiment with stencils for intricate patterns and masking to define areas of focus.
- Animal patterning: Learn to create realistic animal textures, fur and skin patterns.
This 1-week course consists of 40 clock hours of hands-on training, giving you the expertise to apply airbrush makeup with precision and creativity.
Watch this video & see how professionals create flawless airbrush makeup.
https://youtu.be/DnuDuhy7NEo?si=AtnuxbHPWnchuirq
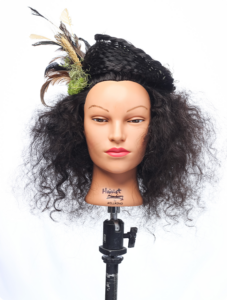
2. Photographic Hairstyling
Hairstyling is an essential element in special effects makeup, as it helps bring characters to life and complements your makeup work. In this workshop, you will learn a wide range of hairstyling techniques, from creating historical hairdos to avant-garde styles, tailored for photoshoots, films and character development.
Skills and Techniques You’ll Develop:
- Sanitation and Hair Care: Learn proper sanitation practices when working with hair, ensuring your tools and techniques are always hygienic.
- Blowouts & Volume Creation: Master blow-out techniques to add volume and texture, ensuring your hairstyles have the perfect body and movement.
- Curling & Braiding: Develop the skills to create flawless curls, intricate braids and textured hair for a range of looks, from soft waves to structured twists.
- Updos & Historical Styles: Learn to style elegant updos, victory rolls, bouffants and other historical hairdos, perfect for period characters or classic looks.
- Avant-Garde Styling: Explore creative techniques in avant-garde styling, enabling you to create bold and unique hair designs for fantasy or high-fashion characters.
- Adding Hair & Teasing: Master the art of adding extensions, teasing hair and working with different hair textures to create dramatic, voluminous, or sculpted looks.
By the end of this 1-week, 40-clock-hour workshop, you’ll be able to create a diverse range of hairstyles, from classic to contemporary and avant-garde, giving you the confidence to tackle any character creation or film project.
3. ZBrush Training Course
In this 1-week, 40-clock-hour workshop, you will learn the essential techniques for digital sculpting using ZBrush to create detailed 3D models, such as characters, creatures and props. You will apply your physical sculpting knowledge to the digital realm and master the following:
- Digital Sculpting with Wacom Tablet: Sculpt your character bust with dynamic expressions and intricate details.
- Using ZBrush Tools & Subtools: Learn to use ZBrush tools and subtools to add complexity to your designs.
- Geometry, Meshes & Polypaint: Master the essentials of digital geometry, meshes and applying polypaint to your models.
- Adding Digital Hair & Accessories: Create detailed hair, textures and accessories, like horns or other features, to enhance your designs.
- Preparing for 3D Printing or Prosthetics: Learn to optimize your digital sculptures for 3D printing or integration with practical prosthetic applications.
- Surface Finishing: Use advanced techniques for adding finishing touches to textures, giving your models a polished and realistic appearance.
Ready to level up your digital sculpting? Dive into this ZBrush guide and transform your skills. Watch now –
4. Creature Maquette Sculpting
The Creature Maquette Sculpting workshop focuses on creating detailed, miniature models of creatures, characters and monsters.
In this course, you’ll gain hands-on experience using professional sculpting tools and materials to bring your concept designs to life in 3D.
In this workshop, you will:
- Sculpt anatomy, textures and details like scales and horns.
- Learn how to construct a strong armature and work with Chavant NSP clay for sculpting.
- Develop creature features such as stylized hair, layered clothing and unique characteristics like claws or spikes.
- Use professional sculpting tools and techniques that will be applied in future courses.
- Bring your creature to life by posing it dynamically and adding expression.
5. Creative Colors and Concepts
This 1-week, 35 clock-hour workshop focuses on the artistic side of special effects makeup, helping you develop creative concepts for characters and creatures.
In this workshop track, you will:
- Learn anatomy to create accurate character and creature designs.
- Understand color theory to mix and apply colors for both realistic and fantastical effects.
- Develop concept art to visualize your ideas and bring them to life.
- Focus on creature design, applying your knowledge to create unique, believable creatures.
- Master paint application techniques to enhance your designs with texture, depth and detail.
Check out the full guide on YouTube to master color theory and concept design –
https://youtu.be/1-OSK8qJf78?si=HsW3ITCesggkyKbm

6. Digital FX
In the 1-week, 40-clock-hour Digital FX workshop, you’ll learn how to combine digital effects with practical makeup and prosthetics.
Throughout this workshop, you will:
- Master professional retouching techniques to elevate your images.
- Work with flawless photo manipulation tools to create high-quality digital effects.
- Develop concept art for creatures, focusing on a quick turnaround.
- Learn how to effectively collage layers, overlay textures and recolor images to seamlessly integrate with practical makeup effects.
- Use Photoshop for portrait retouching, image manipulation and digital design.
Bootcamps: Intensive, In-Depth Learning
For those looking for a more immersive, hands-on experience, our boot camps provide in-depth, professional training in core areas of special effects makeup.
These intensive programs are designed for students who want to specialize in key areas of SFX makeup, such as character design and prosthetics.
1. Character Makeup
The Character Makeup is an intensive, 1-week, 35-clock-hour program that focuses on transforming actors into characters using advanced makeup and prosthetics techniques.
Here’s what you’ll master:
- Creating realistic bruises, black eyes, cuts, scrapes, scars, burns, bullet holes, and exit wounds.
- Using Pros-Aide and tattoo transfers to achieve lifelike injury effects.
- Aging skin with alcohol paints, powder, and stretch-and-stipple latex techniques.
- Staining teeth and graying hair for believable aging transformations.
- Applying and blending gelatin, silicone, and foam latex prosthetics.
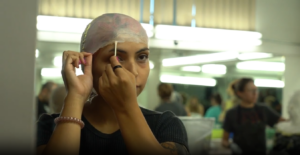
- Mastering bald cap application and blending for latex and vinyl caps.
- Styling and laying lace facial hair and beards by hand and with lace pieces.
- Following best practices for safety and handling of transfer materials.
- Building a portfolio that showcases your expertise in character transformations.
Want to see how incredible character makeup transforms a person into something totally new? Check out the full guide and witness the magic unfold –
https://youtu.be/CQATP_WwE8U?si=8p6sM3zOl6BNIClx

2. Prosthetic Makeup
Prosthetic Makeup Course is a 1-week, 35-clock-hour program that provides hands-on experience in applying and painting prosthetics, covering essential techniques to set you apart in the SFX industry.
During the course, you’ll focus on:
- Applying Pros-Aide and tattoo transfers for realistic wounds and scars.
- Mastering the application and painting of gelatin prosthetics for injuries and skin effects.
- Applying and painting silicone prosthetics to achieve high realism in facial transformations.
- Gaining expertise in applying and blending small and large foam latex prosthetics.
- Developing advanced painting techniques to enhance the natural appearance of prosthetics.
- Following a daily hands-on plan covering safety, transfers, and application of various materials.
- Building a professional portfolio showcasing your prosthetic makeup skills.
Related Articles:
How Hard Is It to Learn Airbrushing?
How to Avoid Common SFX Makeup Mistakes?
What is the Difference Between Movie and Stage Makeup?
Why Our Workshops and Bootcamps Stand Out!
- Comprehensive Curriculum: Both boot camps and workshops cover all essential topics needed to become a skilled SFX makeup artist, from airbrush techniques to prosthetics and digital effects.
- Hands-on Training: Gain real-world experience by working on actual projects that will help you build a professional portfolio to showcase your talent.
- Expert Instruction: Learn from seasoned industry professionals with extensive experience in Hollywood and beyond, ensuring you’re getting the best education possible.
- Makeup Kit Included: Our courses include a comprehensive makeup kit, so you can start practicing and perfecting your skills from day one.
- Financing Options Available: Cinema Makeup School offers flexible financing options, making it easier for you to invest in your future as an SFX makeup artist.
With expert guidance and hands-on experience, both workshops and boot camps offer the perfect foundation to launch your career in SFX makeup.
Are you ready to advance your special effects makeup skills?
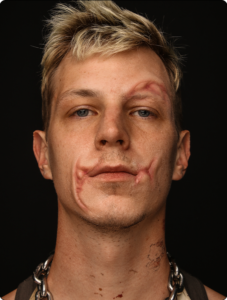
Whether you’re preparing for a film set, a Halloween costume or a theatrical production, knowing how to create prosthetic wounds and scars will elevate your makeup artistry to a whole new level.
In this guide, we’ll walk you through the process of creating realistic prosthetic wounds and scars, using techniques that range from fake skin makeup to detailed burn scar prosthetics.
By the end, you’ll have the skills and confidence to create stunning prosthetic designs!
What Are Prosthetic Wounds and Scars?
Before we dive into the guide to creating prosthetic scars and wounds, let’s clarify what they are. Prosthetic wounds and scars are 3D makeup effects designed to mimic the appearance of injuries, burns, cuts, or old scars.
These prosthetics are typically made from materials like latex, silicone, or foam and they allow makeup artists to create lifelike effects that look extremely realistic on the skin.
Materials You Will Need for Prosthetic Wounds and Scars
To create high-quality prosthetic wounds and scars, you’ll need a range of specialized materials. Here’s a list of essentials:
- Liquid Latex or Silicone: Ideal for building skin textures and layering for realism.
- Gelatin or 3D Transfer Material: Great for creating flexible and lifelike wounds.
- Fake Blood: Choose between coagulated blood, stage blood and fresh blood for different effects.
- Prosthetic Adhesive (Pros-Aide): Ensures your prosthetics stay in place.
- Alcohol-Activated Paints: Perfect for adding realistic skin tones and depth.
- Sealer and Powder: To mattify and set your prosthetics for long wear.
- Molding Tools and Brushes: For sculpting and blending fine details.
Pro Tip: Prosthetic makeup requires more than just materials – it’s about technique, creativity and the right tools! Check out this video for a full breakdown:
https://www.youtube.com/watch?v=eK8Wi-f3vwU
How to Make Prosthetic Wounds?
1. Sculpt and Mold the Wound Design
Begin by sculpting your desired wound shape using clay or modeling wax. Depending on the type of wound – cuts, burns, lacerations, or even stab wounds, you’ll want to adjust your sculpting techniques accordingly.
Use fine sculpting tools to create the intricate details that will make your wound come alive. Pay special attention to creating depth, jagged edges and irregularities in texture, as real wounds often have uneven and rough surfaces.
Tip: Reference real wounds for accuracy. Look at images of cuts, bruises and scabs to capture the natural texture and irregularities.
2. Create the Mold and Cast
Once your sculpture is complete, it’s time to create a mold. This mold will be used to form the prosthetic material. Depending on your material choice, use silicone or plaster to make a mold of the sculpted wound.
After the mold has set, you can cast the prosthetic using materials like gelatin, latex, or silicone. Choose the casting material based on the desired finish:
- Gelatin: Soft, flexible and perfect for body wounds that need movement.
- Latex: Traditional and affordable, good for flexible, durable prosthetics.
- Silicone: Offers the most realistic and durable look, especially for close-up shots.
Pro Tip: Use silicone for high-definition prosthetics, particularly for close-up shots where every detail will be visible. Gelatin works well for more flexible prosthetics, such as wounds that will move with the skin.
These silicone heads look unbelievably real – see for yourself!
https://www.youtube.com/watch?v=JfOeVvz5cRQ
3. Apply the Prosthetic to the Skin
After the prosthetic is cast, it’s time to apply it to the skin. Begin by cleaning the skin thoroughly to remove any oils or dirt. This will ensure the prosthetic adheres properly.
Use a professional-grade adhesive like Pros-Aide to secure the prosthetic to the skin.
Once in place, carefully blend the edges of the prosthetic using latex or a sealer to create a smooth transition between the prosthetic and the skin.
Hack: For a more organic look, use a stipple sponge to texture the edges. This helps the prosthetic blend naturally into the skin, avoiding harsh lines.
4. Paint and Detail the Wound
To finish the prosthetic, you’ll need to paint and detail the wound. Use a combination of foundation, alcohol-based paints, or water-based makeup to match the color of the prosthetic to your skin tone.
For prosthetic wounds, focus on creating depth and realism by layering different colors: red for fresh blood, purple and blue for bruising, yellow for healing and black or dark brown for dried blood or necrosis. The more layers of color you add, the more realistic the wound will look.
Pro Tip: Add texture by using a fine sponge or stippling brush to create the appearance of torn skin or rough surfaces.
Prosthetic Wounds for Different Effects
- Burn Scar Prosthetics
Burn scars require attention to detail. Use silicone or gelatin to create a melted, uneven texture. Add shades of deep red, brown and black to enhance the charred look.
- Lacerations and Deep Cuts
Lacerations need jagged, irregular edges. Apply gelatin-based prosthetics for flexible movement and a natural look. Add layers of coagulated blood to mimic clotting.
- Bullet Holes and Entry Wounds
For gunshot wounds, create a concave prosthetic with clean, precise edges. Add singed tissue effects around the wound for realism.
Enroll Here to Learn Character Makeup for TV and Movies!
How to Make Prosthetic Scars for Film and TV?
Prosthetic scars are often used to show past injuries, character backstories, or to add dramatic effects to a scene. Creating realistic scars involves both sculpting and painting techniques. Follow this guide to make scars that will stand up to the scrutiny of film and TV production.
1. Design and Sculpt the Scar
Start by deciding what kind of scar you want to create. Is it a raised scar (keloid), a recessed scar (depressed or sunken), or an old, healed scar with irregularities?
Sculpt the scar design using wax or silicone. To create a raised scar, you can build up layers of wax or silicone to add volume, giving it a thick, bumpy appearance. For recessed scars, sculpt the area lower than the surrounding skin to create the illusion of a healed wound.
Tip: Be mindful of the direction of the scar, as real scars often follow the natural lines of the skin. For instance, facial scars may curve with the contours of the face.

2. Cast and Apply the Scar
Once you’ve sculpted your scar, cast it using silicone or latex, depending on the look you’re going for. Silicone is best for a realistic, high-definition look, especially when working with smaller, delicate scars.
Apply the cast prosthetic to the skin using a strong adhesive like Pros-Aide, ensuring it’s firmly in place.
Pro Tip: To make the prosthetic blend seamlessly with the skin, use a thin layer of pros-aide adhesive around the edges and press the scar gently into the skin.
3. Blend the Edges
To ensure the scar blends perfectly into the skin, it’s essential to blend the edges carefully. You can use a little bit of latex or silicone to help the edges dissolve into the surrounding skin.
A fine brush or a stipple sponge is ideal for gently blending out the edges, making the scar look like it’s part of the skin, rather than sitting on top of it.
Hack: If you’re working with a raised scar, use a stipple sponge around the edges to soften and texturize them for a more natural transition.
4. Add Color and Texture
The final step in creating a prosthetic scar is adding color and texture. Scars vary in color depending on how old they are, so think about the kind of scar you want to create.
Fresh scars may appear red or pink, while older scars might be more neutral, with shades of brown or gray. Use alcohol-activated paints or regular makeup to color the scar, focusing on blending the color seamlessly with the surrounding skin.
Pro Tip: For a truly realistic scar, apply different layers of colors to mimic the way real scars change over time. For instance, red for irritation, purple for healing and brown or gray for older, more faded scars.
Prosthetic Scars for Different Effects
1. Keloid Scars
Keloid scars are thick, raised and can be extremely disfiguring. They often form after a severe injury, surgery, or burn. These scars can add a dramatic, realistic touch to your makeup, especially in historical or fantasy characters.
2. Hypertrophic Scars
Hypertrophic scars are similar to keloid scars but are typically less raised and more confined to the boundaries of the injury. These scars are often red, thick and sometimes tender to the touch.
3. Stretch Marks (Atrophic Scars)
Stretch marks, or atrophic scars, are thin, indented lines often found on the skin after rapid growth or stretching, such as during pregnancy or weight gain.
4. Self-Harm Scars
Self-harm scars can range from thin, barely noticeable lines to thicker, raised scars, depending on the injury and healing process. Creating these scars requires precision to reflect the trauma realistically.
5. Surgical Scars
Surgical scars are often neat and linear but can still show signs of significant healing and trauma. These scars typically appear after medical procedures like stitches or incisions.
6. Cigarette Burns and Other Small Scars
Cigarette burns are small, round and often have a distinct, pitted look that’s perfect for creating a distressed or tortured appearance.
Check Out: Top 5 Tips for Beginner Makeup Artists

Common Mistakes to Avoid When Making Prosthetic Wounds and Scars
- Wrong Materials: Use silicone for flexibility and gelatin for simpler designs.
- Over-Sculpting: Keep details natural and avoid overcomplicating the design.
- Poor Blending: Blend edges smoothly using a stippling sponge and match skin tone.
- Too Much or Too Little Blood: Use coagulated blood for deep wounds and runny blood for fresh cuts.
- Ignoring Movement: Choose flexible materials like silicone for movable areas.
- Wrong Adhesive: Use professional prosthetic adhesive like Pros-Aide for secure attachment.
- Not Prepping Skin: Clean the skin with alcohol or soap and water before applying prosthetics.
- Lighting & Camera: Test prosthetics under different lighting to ensure realism on camera.
- Rushing Drying Time: Allow each layer to dry completely before adding another.
Become a Prosthetics Pro with Expert Training!
As part of the renowned Cinema Art College Corporation, Cinema Makeup School offers an immersive SFX Prosthetic Makeup Course designed to equip you with the skills and knowledge needed to master the art of special effects makeup.
In this hands-on course, you will learn the intricate techniques used to create realistic prosthetics for film, television and theater.
Through expert instruction and extensive practice, you’ll discover how to design, sculpt and apply prosthetic wounds, scars, burns and more using silicone – the industry-standard material for high-quality, flexible prosthetics.
Our experienced instructors will guide you through every step of the process, from creating molds and casts to painting and applying your prosthetic pieces for the most lifelike results.
Enroll today and start your journey to becoming an industry-leading prosthetic makeup artist!
Related Articles:
SFX vs Prosthetic Makeup: What is the Difference?
What is the Difference Between Movie and Stage Makeup?
How to Avoid Common SFX Makeup Mistakes?
By mastering the techniques of sculpting, molding, casting and applying prosthetics, you’ll be able to produce lifelike, jaw-dropping designs that captivate your audience.
Remember, practice makes perfect and attention to detail is key – each step from material selection to painting and blending will bring your creations to life.
Have you ever seen flawless airbrush makeup, stunning special effects, or intricate designs and thought, “This looks amazing, but is it difficult to learn?”
Many people are intrigued by the idea of airbrushing but feel unsure about how difficult it is to master. While airbrushing might seem like a skill reserved for professionals, it’s something you can learn with the right techniques and practice.
In this guide, we’ll break down everything you need to know to start your airbrush journey, from the basics to expert tips. Let’s dive in!
What Is Airbrushing?
Before going into how challenging it may be to learn, let’s first clarify what airbrushing really is:
Airbrushing is a technique that uses an air-powered spray gun to apply a fine mist of makeup, paint or dye onto a surface. It’s incredibly versatile and widely used in various fields, including:
- Beauty makeup (for a flawless finish)
- Special effects makeup (for movies, body art, and prosthetics)
- Automotive painting (to create smooth, even finishes)
- T-shirt designs (for custom artwork)
- Cake decorating (for fine details)
The beauty of airbrushing is its precision and the ability to create seamless gradients and details that traditional brushes or sponges just can’t achieve.
Whether you’re using it for makeup, art or special effects, airbrushing is all about creating smooth, beautiful and flawless results.
Is Airbrushing Hard to Learn?
Now, the real question: Is airbrushing difficult to master?
Like any skill, airbrushing has a learning curve.
But is it hard?
Not necessarily – it just takes time and practice to become comfortable and confident with the technique. It’s similar to learning to use any tool: it might feel tricky at first, but with consistent effort, you’ll get the hang of it.
Here’s a breakdown of what can make airbrushing challenging for beginners:
- Control – Figuring out the right amount of pressure to apply and when to apply, requires practice.
- Steadiness – A shaky hand can lead to uneven application and results.
- Maintenance – Airbrush guns need to be cleaned properly to avoid clogs, which can be tricky at first.
However, don’t let this discourage you! With the right approach and a little persistence, you can start seeing great results in just a few weeks.
Learn How To Become a Makeup Artist for Films?
At Cinema Makeup School, affiliated with the renowned Cinema Art College Corporation, we are here to help you with Special Effect Makeup Courses!
What is Airbrush Makeup?
Airbrush makeup is a lightweight, long-lasting foundation application technique that creates a smooth, flawless finish. It’s often used in film, TV, bridal makeup and editorial shoots because it provides a natural look that’s lightweight yet durable.
Is Airbrush Makeup Worth It?
Yes, here’s why:
- It gives you a flawless, even complexion.
- It’s lightweight and long-lasting.
- It blends seamlessly, minimizing the amount of product you need.
- It works great for all skin types (especially oily or sensitive skin).
While airbrush makeup does take practice, the results are worth it!
How Does Airbrush Makeup Work?
Instead of using traditional brushes or sponges, an airbrush gun sprays a fine mist of makeup onto the skin. This allows for buildable layers that provide great coverage without feeling heavy on the skin.
The result? A flawless, natural complexion that lasts throughout the day.
Here is how to use an Airbrush:
Step 1: Set Up Your Airbrush
- Attach the airbrush gun to the compressor.
- Add airbrush makeup.
- Adjust the pressure settings on the compressor for an optimal spray.
Step 2: Learn the Basic Motions
- Practice making circular motions to create smooth blending.
- Use dotting techniques for controlled application in areas like around the eyes or nose.
- Experiment with distance from the surface. Closer spraying provides heavier coverage, while spraying farther away creates lighter layers.
Step 3: Control Airflow and Pressure
- Too much pressure: Results in splattering, leading to uneven coverage.
- Too little pressure: Produces a weak, uneven spray.
Tip: Find the right balance of pressure to achieve the desired effect. Practice maintaining a steady hand to ensure smooth and consistent results.
Beginner-Friendly Airbrush Techniques
Once you understand the basics, it’s time to try out some beginner-friendly airbrush techniques that will help you build your skills:
1. Freehand Airbrushing
This technique is perfect for blending colors and creating soft shading. It’s commonly used in makeup and fine art applications.
2. Stencil Airbrushing
Use stencils for creating sharp lines, patterns and intricate designs. This is popular in special effects makeup, T-shirt painting and even custom art.
3. Gradient and Blending Techniques
By adjusting pressure and distance from the surface, you can create smooth color transitions. This is a must-know technique for beauty makeup, prosthetic painting and automotive design.
Check Out: Top 5 Tips for Beginner Makeup Artists
Common Mistakes New Learners Make (And How to Fix Them!)
You may make a few mistakes along the way, and that’s okay – it’s all part of learning. Let’s talk about these common errors and learn to avoid them:
-
Holding the Airbrush Too Close or Too Far
Solution: Keep a consistent distance, around 6 to 12 inches for makeup applications, and about 3 to 6 inches for detailed designs.
-
Applying Too Much Product Too Quickly
Solution: Apply light layers and build up gradually. Building up layers is simpler than removing excess product!
-
Not Cleaning the Airbrush Properly
Solution: Clean your airbrush after every use to prevent clogs and keep your tool in good working condition.
-
Not Adjusting the Air Pressure
Solution: Lower pressure works better for fine details, while higher pressure is ideal for covering large areas.
-
Using the Wrong Paint or Foundation for Airbrush
Solution: Make sure you’re using products specifically designed for airbrushing, as regular makeup or paint may clog the nozzle.
-
Not Practicing Control of the Trigger
Solution: Airbrush guns typically have a trigger to control airflow and product flow. So, practice controlling the trigger to gradually increase or decrease the amount of product being sprayed.
How Long Does It Take to Learn Airbrushing?
Short answer: A few weeks to get comfortable and a few months to master. The key to speeding up your learning process is practicing regularly. The more often you use your airbrush, the quicker you’ll become comfortable with the motions, pressure, and spray control.
Start simple with basic techniques, and as you build confidence, you can gradually move on to more complex designs.
Airbrushing Workshop: Learn the Basics in One Week!
Join as a Student to Become an Alumni: Cinema Makeup School
If you’re eager to master the art of airbrushing, choosing the right place to learn is essential.
As a part of the prominent Cinema Art College Corporation, Cinema Makeup School offers world-class training in airbrush techniques.
Our experienced instructors and state-of-the-art equipment ensure you receive top-notch education, covering everything from the fundamentals of airbrushing to advanced special effects.
The skills you acquire can help you launch a successful career in film, television, fashion or even as a personal artist.
Ready to start your journey? Join us and learn from the best!
FAQs
1. Do I need expensive equipment to start?
Not at all! We offer affordable, beginner-friendly airbrush kits that provide everything needed to get started without a hefty investment. Begin your airbrush journey without breaking the bank!
2. What’s the difference between airbrush makeup and traditional makeup?
Airbrush makeup is applied using a spray gun, delivering a fine mist for lighter, more even coverage. In contrast, traditional makeup is typically applied with brushes or sponges, offering buildable coverage.
3. Is airbrushing only for professionals?
Not at all! Airbrushing is for everyone, whether you’re a complete beginner, a hobbyist or someone looking to go professional. With a bit of practice and the right equipment, anyone can create stunning artwork, smooth finishes and intricate details. Many starter kits and tutorials make it easy to learn, so don’t be intimidated – just dive in and have fun!
If you’re reading this, you probably have a passion for SFX makeup, or are eager to learn the magic of special effects makeup.
Whether you’re creating chilling horror scenes, transforming yourself into fantasy characters, or trying your hand at dramatic, hyper-realistic wounds, there’s one thing every makeup artist needs: knowledge.
But here’s the catch: The path to mastering SFX makeup techniques isn’t always as easy as it looks. Even the most experienced artists make mistakes. It’s a natural part of the creative process, but you can avoid the same pitfalls by understanding where others often go wrong.
So, let’s talk about how to avoid the most common mistakes in SFX makeup.

Tips to Avoid Common Mistakes While Applying Special Effects Makeup
1. Skipping the Basics: Know Your Tools and Products
When you’re experimenting with special effects makeup techniques, it’s tempting to dive straight into the fun stuff, blood splatters, gory wounds, or fantastic creatures. But no matter how creative you are, every great artist needs to start with the basics.
Before you begin creating your masterpiece, get familiar with the basics: how to use latex, gelatine, face paint, prosthetics, and pigments.
Each product serves a specific purpose and applying it improperly can lead to an uneven or unnatural look. So, always test your materials on a small patch of skin to ensure there’s no irritation, and get comfortable with your tools.
Pro tip: Invest time in learning proper blending techniques. Even with simple SFX makeup ideas, blending can be the key difference between a look that feels unfinished and one that looks polished and realistic.
2. Don’t Overcomplicate: Keep It Simple, Especially in the Beginning
When you first dive into learning the SFX makeup, it’s easy to get caught up in the awe-inspiring work of professionals.
You might feel the urge to create elaborate, intricate designs with tons of detail. While it’s exciting to explore your creativity, trying to do too much too soon can backfire.
Sometimes, SFX makeup works best when it’s kept simple. A minimalist approach can be just as striking, if not more, than trying to fit too many elements into one design.
Start with the basics, things like creating wounds, bruises, or simple special effects makeup that focus on one or two techniques. From there, as your skills grow, you can gradually add complexity to your designs.
The more you practice, the more your technique will naturally improve. And remember, simpler designs often allow the finer details to stand out more effectively.
Creative Development Tip: SFX makeup ideas don’t need to be over-the-top to leave an impact. A well-crafted scar or a strategically placed blood drip can create a lasting effect without overwhelming the design. Keep it simple, and the results will speak for themselves.
Special Makeup Effects | An Inside Look ?
If you’re fascinated by movie magic and the art of transforming actors into creatures, zombies, or fantasy characters, this video is for you! It provides an insightful look into special makeup effects, from prosthetic application to advanced makeup techniques.
?️ Watch the video below:
3. Neglecting Skin Preparation and Aftercare
As SFX makeup artists, we’re so focused on the creation process that we sometimes forget the importance of skin preparation and aftercare. Special effects makeup products, like adhesives, latex, and certain paints can be tough on your skin.
To avoid irritation or discomfort, always cleanse and moisturize your skin before applying any makeup.
And after you’re done, be sure to take the time to remove your makeup properly. Harsh removal can damage your skin, so consider using makeup removers that are gentle but effective – especially when dealing with adhesives.
Helpful tip: Keep your skin hydrated! After wearing intense SFX makeup, use a good moisturizer to replenish your skin’s moisture levels.
Learn How To Become a Makeup Artist for Films?
4. Ignoring Lighting and Camera Angles
One of the most crucial, but often overlooked, elements of SFX makeup is how it interacts with lighting and camera angles. What looks incredible in person may not have the same impact on screen or under certain lighting conditions.
When experimenting with SFX makeup techniques, remember that lighting can drastically alter the way your work is perceived.
For example, designs involving shadows or intricate details may not show up the same way in photos or on stage.
Pro tip: Always test your makeup in different lighting situations before you finalize it. A few test shots can save you from surprises and ensure your SFX makeup ideas truly shine when it counts.
5. Not Giving Enough Time to Dry
We’ve all experienced it, excited to see the final result and eager to move on to the next step. But rushing through the process can be your biggest mistake when working with SFX makeup.
If you’re using latex for prosthetics, glue for fake wounds, or paint for detailed designs, make sure you allow adequate time for each layer to dry.
Applying makeup on top of a not-fully-dried surface can cause peeling, cracking, or smudging.
Important note: Plan your process and give each layer or product plenty of time to set. You’ll be surprised at how much smoother your application becomes when you’re patient with the drying process.
Here are the Top 5 Tips for Beginner Makeup Artists
Learn SFX Makeup From Basics to Advance and Avoid these Common Mistakes
It’s always better to learn techniques from professionals who can teach you every small detail that matters. When it comes to learning SFX makeup, Cinema Makeup School, which is part of a broader educational institution known as Cinema Art College Corporation, truly stands out!
Cinema Makeup School offers a specialized Special effects makeup course designed to take you from the basics to advanced techniques, ensuring you develop the skills to avoid common mistakes and become a master of the craft.
Our hands-on training covers everything you need to know to succeed in the world of special effects makeup:
- Beauty Makeup & Airbrush Techniques: Learn to create flawless beauty looks with precision airbrush techniques that bring your designs to life.

- Photographic Hairstyling: Master the art of hair styling for photoshoots, film, and live performances, ensuring your hair designs are picture-perfect.
- Character & Prosthetic Makeup: Learn prosthetics, and transform yourself or others into incredible characters, from realistic wounds to fantastical beings.

- Special Effects & Creature Maquette Sculpting: Learn to sculpt and create stunning creatures and special effects, bringing your wildest ideas to life with expert instruction.
- Digital FX & ZBrush: Gain valuable skills in using industry-standard software like ZBrush to create 3D models, enhancing your traditional SFX work with digital precision.
- Advanced Beauty Theory & Lab Techniques: Strengthen your beauty makeup skills with in-depth theory and practical lab work, preparing you for any creative challenge.
With Cinema Makeup School, you won’t just learn techniques – you’ll build the confidence to bring your most ambitious makeup ideas to life.
If you’re serious about mastering SFX makeup and avoiding the common mistakes that hold many back, it’s time to join us.
Also read Top 6 Trends in the Makeup Industry 2025
SFX makeup is a thrilling and powerful form of art, capable of transforming visions into reality. However, like any skill, it takes time, practice, and attention to detail to perfect.
By understanding and avoiding common mistakes, you can ensure that your work stands out for all the right reasons.
Keep practicing, keep experimenting, and always be open to learning. With these tips in mind, you’ll be well on your way to creating breathtaking SFX makeup that leaves a lasting impression. Happy creating!
FAQs
1. What are the most popular special effects makeup techniques?
Popular special effects makeup techniques include prosthetics, wound simulation, creature design and aging effects often used in film and theater for dramatic transformations.
2. What are some creative SFX makeup ideas for beginners?
Beginner SFX makeup ideas include creating bruises, scars and simple wounds. Try more complex designs like fantasy creatures and realistic injuries as you grow.
3. How do special effects makeup artists create realistic injuries?
Realistic injuries are created using prosthetics, blending techniques and materials like latex and gelatin. Mastering these SFX makeup techniques is essential for lifelike results.
4. Why is it important to test my SFX makeup in different lighting?
Lighting can drastically change how your makeup appears. Testing your makeup under different lighting ensures your designs look as intended, preventing any surprises on camera or stage when using SFX makeup techniques.
Ever wondered how your favorite movie monsters, superheroes, or gruesome injuries come to life on screen? The secret lies in two powerful techniques: SFX makeup and Prosthetic makeup. While often confused, these methods have distinct purposes and techniques that define their use in the entertainment industry.
Let’s break them down to understand their meaning, applications, and differences.
What is SFX Makeup?
Special Effects Makeup is an essential technique used in the film, television, theater, and photography industries to create visually striking and sometimes shocking illusions that enhance storytelling.
It’s a creative and technical art form where makeup artists use a variety of materials and methods to alter a person’s appearance, often to create wounds, injuries, fantasy characters, or transformations that go far beyond what traditional makeup can achieve.
SFX makeup can range from simple bruises or cuts to more complex effects such as burns, scars, and even fantastical creatures like zombies or monsters. It is often referred to as “transformational makeup” because of its ability to drastically change a person’s appearance.
Learn Creature Maquette Sculpting here!
Techniques Used in SFX Makeup:
1. Bruising and Wounds – These effects involve the use of paints, wax, or silicone to create highly detailed and convincing injuries.
These could range from minor cuts to major lacerations, with the makeup artist using colors and textures that mimic bruising, swelling, and scarring to give the illusion of real damage to the skin.
2. Aging Makeup – Aging effects involve creating realistic wrinkles, age spots, and sagging skin. This can be achieved through various techniques like latex application, painting, or stippling.
SFX Makeup Artists often use prosthetics or gel products to create the appearance of skin aging, giving characters the look of someone many years older.
3. Burn Effects – Burns and other skin injuries are commonly made using materials like gelatin, silicone, or special gels that mimic different degrees of burns, from first-degree redness to the gruesome appearance of third-degree burns.
These techniques often require the careful layering of materials to build texture and depth.
4. Zombie and Gore Effects – Liquid latex, fake blood, and tissue paper are some of the essential materials used for gruesome effects, such as creating zombies or monstrous gore.
These effects are frequently used in horror movies and TV shows, with makeup artists combining blood splatter, rotting skin, and decayed tissue to create lifelike zombie transformations or gruesome injury scenes.
5. Bald Caps & Body Painting – SFX makeup also extends to full-body transformations, such as using bald caps to give characters a hairless look, or body painting to create entire scenes or patterns on the skin.
This is often used for body-modification characters or dramatic, over-the-top costumes.
Enroll in the Character Makeup Course to Create Stunning Characters!
What is Prosthetic Makeup?
Prosthetic makeup is a more specialized subset of special effects makeup. It involves the creation of pre-sculpted and molded pieces that are then applied to an actor’s skin to alter their appearance dramatically.
These prosthetic appliances are usually made from materials like foam latex, silicone, or gelatin, and can be used to create a vast range of effects, from subtle enhancements to full-body transformations.
Common Uses of Prosthetic Makeup:
- Character Transformations – Prosthetic makeup is often used in films and TV shows to transform actors into creatures, aliens, or fantasy beings. This could include everything from animalistic features to completely alien or monster-like transformations.
- Facial Enhancements – Prosthetics are used to enhance specific facial features, such as creating larger noses, exaggerated chins, or transforming cheekbones. This allows actors to take on a completely different appearance while still allowing their acting talent to shine through.
- Full-Body Suits – In some high-budget films, full-body prosthetic suits are used to completely alter the actor’s form. These suits could be used for everything from creating superhero costumes to turning an actor into a completely different being or creature.
- Hyper-Realistic Aging – Prosthetic makeup can be used to create highly detailed and hyper-realistic aging effects. Prosthetic aging involves the application of finely crafted pieces that replicate the true texture and appearance of aged skin, adding wrinkles, sagging, and age spots that look incredibly lifelike.
- Monster & Sci-Fi Effects – For high-budget productions that require intricate details, prosthetics provide the ability to craft highly detailed and durable effects. This includes creating realistic monsters, aliens, and robots that would be impossible to achieve with traditional makeup techniques alone.
Prosthetic Makeup Process:
Creating prosthetic makeup is a more labor-intensive process than standard SFX techniques. It typically involves several steps, including:
- Sculpting: The artist sculpts the prosthetic piece using clay or other materials to match the intended design.
- Molding: Once the sculpture is complete, a mold is made, often using silicone or latex, to create a precise replica of the sculpted piece.
- Painting and Detailing: After the prosthetic piece is cast and cleaned, it’s painted with special makeup paints to match the desired color and texture. Artists may use airbrushes, sponges, or brushes to carefully detail the piece.
- Application: The prosthetic is then applied to the actor’s skin using adhesives, and the seams are blended to make the transformation seamless.
Key Differences Between SFX and Prosthetic Makeup:
| Feature | SFX Makeup | Prosthetic Makeup |
| Definition | Makeup effects applied directly to the skin for transformations and injuries | Pre-made prosthetic pieces applied to change facial or body features |
| Materials Used | Liquid latex, wax, paints, gelatin, silicone | Foam latex, silicone, gelatin, resin |
| Application | Hand-applied directly onto the actor’s skin | Requires molds, sculpting, and fitting |
| Time Requirement | Quicker to apply, can be done on set | Requires pre-production work, longer application time |
| Complexity | Simpler techniques like wounds, scars, and burns | Involves lifecasting, sculpting, and detailed painting |
? Quick Communication Tip:
Understanding the difference between SFX makeup and prosthetic makeup is crucial. Recognizing which technique to use in different situations will help you create the most effective and realistic effects for your project.
Where to Learn SFX and Prosthetic Makeup?
If you’re passionate about bringing your wildest creative visions to life, there’s no better place to start than at Cinema Makeup School! Whether you’re drawn to creating jaw-dropping special effects or transforming actors with stunning prosthetics, we’ve got you covered.
As part of Cinema Art College Corp, Cinema Makeup School offers hands-on training, expert mentorship, and real-world industry experience to prepare students for careers in film and theater.
Why settle for the ordinary when you can learn from the best?
Our expert-led SFX Makeup Course is designed to give you the hands-on experience and industry insights you need to excel.
Ready to take the next step? Apply here and start your journey with us!
Exclusive Deal!
Don’t miss out on our 5-Day CRASH COURSE in Character Makeup! This immersive, hands-on session will give you the tools and techniques to create jaw-dropping characters, from the ground up.
Choose your preferred dates and get started!
? Special Offer: Bundle & Save!
- $1500 for the Character Makeup Crash Course (Materials included!)
- $3000 for the Character + Prosthetics Crash Course (Materials included!)
Spots are limited, so secure your place today!
Related Articles:
Top 5 Tips for Beginner Makeup Artists
How To Become a Makeup Artist for Films?
Top 6 Trends in the Makeup Industry 2025
SFX and prosthetic makeup are two powerful techniques that play a crucial role in bringing characters, monsters, and dramatic transformations to life on screen. While both share a common goal of altering appearances for storytelling, they differ significantly in their approach and application.
Both techniques demand creativity, technical skill, and a deep understanding of how materials can be manipulated to mimic reality. With the right tools, techniques, and creativity, you can bring any character or creature to life in a way that captivates and thrills audiences.
Have you ever wondered why actors look so different on stage compared to how they look on the big screen? If you’ve been to a live theatre show, you’ve probably noticed how bold and dramatic the actors’ makeup is.
But if you’ve watched a movie, the makeup seems a lot more natural and subtle, even when it’s for a character with intense special effects. There’s actually a big difference between makeup for the stage and makeup for movies, and it all has to do with how both mediums are viewed and how makeup helps bring the characters to life.
Let’s go through the key differences between theatre stage makeup and movie makeup, and understand how each one is tailored to its specific medium.
| Aspect | Stage Makeup | Movie Makeup |
| Purpose | Bold and exaggerated for visibility in large spaces | Subtle and realistic for up-close shots |
| Lighting | Harsh, direct lighting on stage | Controlled lighting for different effects |
| Products Used | Thick foundations, greasepaint, bold colors | HD foundation, airbrush makeup, fine powders |
| Techniques | Layering, strong contouring, exaggerated features | Light contouring, precise application |
| Durability | Long-lasting, resistant to sweat and heat | Long-lasting, but often touched up during shoots |
| Special Effects | Prosthetics, exaggerated transformations | Realistic prosthetics, digital effects |
Now, let’s understand the difference in detail:
Difference Between Movie Makeup and Theatre Stage Makeup
1. The Influence of Lighting: The Biggest Game-Changer
One of the biggest differences between stage and movie makeup comes down to lighting conditions.
Stage Makeup: Built to Withstand Harsh Lights
Theater productions use intense, direct lighting, often with multiple sources, including spotlights and colored gels. These lights tend to wash out facial features, making actors look flat and lifeless from the audience’s perspective. To counteract this, stage makeup needs:
✔ Bold colors to enhance facial features
✔ Heavy contouring to define bone structure
✔ Matte finishes to prevent shine under hot lights
Since audience members can be sitting far away, makeup artists exaggerate features – think darker brows, deeper contour, and more vibrant lip colors – so the actor’s expression remains readable even from the last row.
Movie Makeup: Precision for the Camera
Film and television rely on high-definition cameras that pick up every detail, including pores, wrinkles, and texture. Unlike stage lights, movie lighting is often softer, more controlled, and more natural – which means makeup must look flawless up close.
Movie makeup techniques focus on:
✔ Subtle, natural-looking finishes to avoid looking cakey on camera
✔ Blended contouring rather than harsh lines
✔ HD and airbrush makeup to create a smooth, skin-like appearance
✔ Oil-control techniques to reduce shine for long shooting hours
Since cameras capture everything, a heavy-handed approach (like that used in theater) would look overdone and unnatural on film.
2. Application Techniques: Bold vs. Seamless
Stage Makeup: Strong, Defined Features
Stage makeup artists use thicker foundations, darker contours, and vibrant pigments to ensure actors don’t look washed out.
- Powders and creams work well because they hold up under hot stage lights.
- Exaggerated eyeliner and blush help bring life to the face.
- Fake facial hair and prosthetics are sometimes used for character roles but must be durable enough for hours of wear.
Since actors don’t get close-ups, blending isn’t as critical as in film. The goal is visibility rather than realism.
Movie Makeup: High-Definition Perfection
On camera, makeup must appear as natural as possible.
- Airbrushed foundation is a common technique to create flawless, lightweight coverage.
- Blending is everything—visible makeup lines can ruin a close-up shot.
- Prosthetics and SFX makeup need extreme precision because cameras pick up even the smallest imperfections.
Film makeup artists must also consider continuity – scenes are shot out of order, so an actor’s look must be perfectly replicated every time.
3. Sweat, Tears, and Durability
Stage Makeup: Built to Last
Performers sweat under hot lights, and their makeup must endure hours of movement, expression, and costume changes.
✔ Long-wearing, sweat-proof formulas are essential.
✔ Powder setting prevents shine and keeps everything in place.
✔ Sealing sprays lock in makeup for an entire performance.
Since there are no retakes in live theater, makeup must be applied once and last all night without touch-ups.
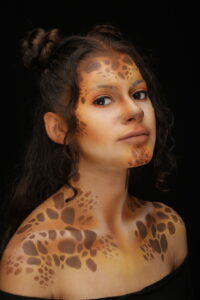
Movie Makeup: Constant Touch-Ups
Unlike theater, film actors have the luxury of makeup artists on set for regular touch-ups.
✔ Lighter, more breathable products allow for frequent reapplication.
✔ Matte-finish and oil-control techniques help actors stay fresh on camera.
✔ CGI-friendly makeup is sometimes needed to allow digital effects to blend seamlessly.
Since film productions involve multiple takes and long hours, on-set maintenance is a crucial part of a makeup artist’s job.
4. Special Effects and Character Transformations
Both theater and film use SFX makeup for fantasy, horror, and period pieces, but the execution is vastly different.
Stage SFX: Bold and Durable
- Large latex prosthetics (like scars, noses, or aging effects) are common.
- Thick layers of blood or dirt must be visible to the audience.
- Designs must hold up under hot lights and long performances.
Example: The Phantom’s mask in The Phantom of the Opera is an example of stage prosthetics designed for visibility from far away.
Film SFX: Hyper-Realistic Detail
- Silicone prosthetics are preferred for their realistic texture.
- Seamless blending is required to make effects look natural in close-ups.
- CGI integration may enhance practical effects.
Example: The zombie makeup in The Walking Dead relies on fine detail, intricate blending, and multiple layers to look terrifying up close.
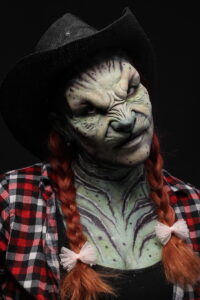
5. The Role of Makeup Artists in Each Industry
Theater Makeup Artists:
✔ Work backstage in fast-paced environments
✔ Must apply makeup quickly between scenes
✔ Have to train actors to do their own makeup (especially in smaller productions)
Film Makeup Artists:
✔ Work on set all day for touch-ups and continuity
✔ Collaborate with directors and cinematographers to ensure lighting complements makeup
✔ Specialize in hyper-realistic or special effects makeup for close up shots
The skill set overlaps, but theater artists focus on bold application and endurance, while film artists emphasize detail, realism, and adaptability.
Which One Should You Learn?
If you’re passionate about bold, expressive looks and love the energy of live performances, stage makeup is a fantastic skill to master.
If you prefer precision, realism, and cinematic transformations, then film makeup is the way to go.
Cinema Makeup School, which is part of a broader educational institution Cinema Art College Corp, offers hands-on training, expert mentorship, and real-world industry experience to equip students for careers in film and theater. The instructors are working professionals who bring years of experience to the classroom.
Whether you dream of working behind the scenes on a blockbuster film or transforming actors on a Broadway stage, mastering both stage and film makeup will give you a competitive edge in the industry.
Cinema Makeup School offers an SFX Makeup Course and more comprehensive programs as well where you’ll learn the advanced techniques needed to create incredible characters. You would dive into prosthetics, character makeup, airbrush techniques, and even digital tools like ZBrush for crafting 3D designs.
Ready to Become a Pro?
If you’re passionate about makeup artistry, check out the diploma programs, courses, and workshops at Cinema Makeup School and start your journey into the field of professional makeup!
Enroll Today and bring your artistic vision to life!
FAQ
Q1: Can I learn both stage and movie makeup at the same time?
Yes, many makeup schools, including Cinema Makeup School, offer programs that teach skill sets and techniques that can be applied to both stage and movie makeup. Learning both disciplines can give you a competitive edge in the industry, as you’ll be prepared to work on a wide range of projects, from theater productions to blockbuster films.
Q2: How do makeup artists ensure continuity in movie makeup?
In film, maintaining continuity is crucial because scenes are often shot out of order. Makeup artists keep detailed records of every actor’s makeup look, using reference photos to replicate the same look consistently across multiple takes or shoots. They also use special techniques like airbrush makeup for smooth, lasting coverage that can withstand long shooting hours.
Q3: Why do stage makeup artists use such bold contouring?
Stage makeup artists use bold contouring to define facial features and create a dramatic look that is visible even from far away. Strong highlights and shadows help to accentuate the actor’s expressions under the intense stage lighting, ensuring that their face doesn’t appear flat or washed out.
Do you dream of turning your passion for makeup into a thriving freelance career? Becoming a freelance makeup artist gives you the freedom to work on exciting projects, be your own boss, and express your creativity.
Whether you want to work in film, television, fashion, or bridal makeup, this guide will take you through the essential steps to start and succeed as a freelance makeup artist.
1. Learn the Art of Makeup
Before stepping into the freelance world, you need to master makeup techniques. There are different fields in makeup artistry, such as:
- Beauty & Glamour Makeup – Ideal for weddings, photoshoots, and personal clients.
- Special Effects (SFX) Makeup – Perfect for film, TV, and theater productions.
- Editorial & Fashion Makeup – Focuses on high-fashion looks for magazines and runways.
Enrolling in a professional makeup school like Cinema Makeup School, which is part of Cinema Art College Corp, can provide hands-on training, expert mentorship, and industry exposure.
Under the innovative leadership of Cinema Art College Corp, the school is expanding its programs beyond SFX makeup, introducing cutting-edge courses in 3D scanning, 3D modeling, and 3D printing. These advancements will open new creative possibilities for students, equipping them with future-ready skills for the evolving entertainment industry.
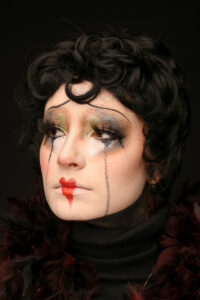
2. Build Your Makeup Kit
Your makeup kit is your toolbox, and intelligently investing in quality products is crucial. Here’s what you’ll need:
- Foundation & Concealers (variety of shades for different skin tones)
- Eyeshadow Palettes (neutral and vibrant colors)
- Lipsticks & Glosses
- Brushes & Sponges
- Skincare Essentials (primers, moisturizers, setting sprays)
- Special Effects Tools (prosthetics, latex, adhesives, fake blood for SFX makeup)
Cinema Makeup School offers a Prosthetic Makeup course where you can learn the complex art of realism. This lab course teaches you to create silicone facial prosthetics that blend seamlessly into the skin. Ideal for anyone aspiring to work in an SFX lab or become a well-rounded, on-set makeup artist or production studio lab technician.
Remember, hygiene is key! Always keep your brushes and tools clean to maintain a professional reputation.
3. Gain Experience & Practice
Practice makes perfect! Try out different looks on yourself, friends, and family. You can also volunteer or find trade-for-print work opportunities in:
- Local fashion shows
- Student films or indie movie productions
- Photoshoots with upcoming photographers
- Theater productions
The more experience you gain, the more confident and skilled you’ll become.
4. Build a Stunning Portfolio
A strong portfolio is your resume in the makeup industry. Here’s how to create one:
- Work with professional photographers to get high-quality images
- Showcase different styles (bridal, editorial, special effects, glam, etc.)
- Create a digital portfolio or a website to display your work
- Regularly update your portfolio with fresh looks and projects
5. Set Up Your Business
As a freelancer, you’ll be running your own business. Here’s what you need to do:
- Register Your Business – Check local licensing requirements for freelancers
- Set Your Rates Properly – Research industry standards & consider your experience level
- Invest in Marketing Your Brand – Create a professional website and business cards
- Get Business Insurance – Protect yourself against potential liabilities
6. Promote Yourself & Find Clients
Marketing & Branding are key to landing gigs and growing your business. Use these strategies:
- Social Media Presence – Post makeup transformations, tutorials, and behind-the-scenes content on Instagram, TikTok, and Facebook
- Network with Industry Professionals – Connect with photographers, models, stylists, and filmmakers
- Offer Discounts or Referral Programs – Encourage word-of-mouth recommendations
- List Yourself on Freelance Platforms – Websites like Backstage, Mandy Network, and Production Hub, can help attract new clients
Completing a makeup artist course at Cinema Makeup School can open doors to opportunities across various industries! Our training ensures you have industry-level professionalism and top-notch makeup skills, making you job-ready for Film, TV, Fashion, and more.
7. Keep Learning & Stay Updated
The beauty and special effects industries evolve constantly, and staying updated with trends is crucial. Keep improving your skills by:
- Attending makeup workshops, seminars, and master classes
- Seeking internships, mentorships, and apprenticeships from top artists
- Experimenting with new techniques, products, and technologies
- Learning about industry trends, especially in special effects and film makeup.
Cinema Makeup School offers specialized workshops and bootcamps in Airbrush, Photographic Hairstyling, ZBrush, Creature Maquette Sculpting, Concept & Color, and Digital FX. These courses provide hands-on training and expert guidance to help you refine your skills and advance your career in makeup artistry.

Creative Development Tip: Social media platforms like Instagram, TikTok, or Pinterest can serve as both inspiration and a testing ground for new looks. Engage with fellow artists, gather feedback, and refine your makeup techniques over time.
8. Deliver Outstanding Service & Build Your Reputation
Your reputation as a freelance makeup artist will determine your success. Make sure to:
- Be punctual and professional
- Listen to your clients’ needs and customize their looks
- Maintain excellent hygiene and sanitization practices
- Always be polite and approachable
Happy clients will recommend and refer you to others, helping you build a strong network and a successful career.
Becoming a freelance makeup artist takes passion, dedication, and business skills. If you’re serious about professional training, Cinema Makeup School & Cinema Art College Corp. are here to help you begin that journey! Enroll in our courses today and turn your passion into a profession!
Frequently Asked Question
1. How do I stay updated on techniques and trends?
Stay updated by watching tutorials, taking specialized workshops, experimenting with new products, and following industry experts on social media or YouTube. Join online communities where professionals share techniques and tips for beauty and SFX makeup. Also, attend trade shows or conventions to network, learn emerging trends, and test the latest tools in the market.
2. How do I create a strong portfolio for SFX?
Practice consistently, photograph high-quality before-and-afters, and showcase creative transformations or prosthetic work.
3. How can a freelance makeup artist cultivate long-term client relationships?
Clear and prompt communication builds trust and professionalism. Respond quickly to inquiries, follow up after gigs, and show courtesy. This helps turn one-time clients into loyal customers who refer your services to others.