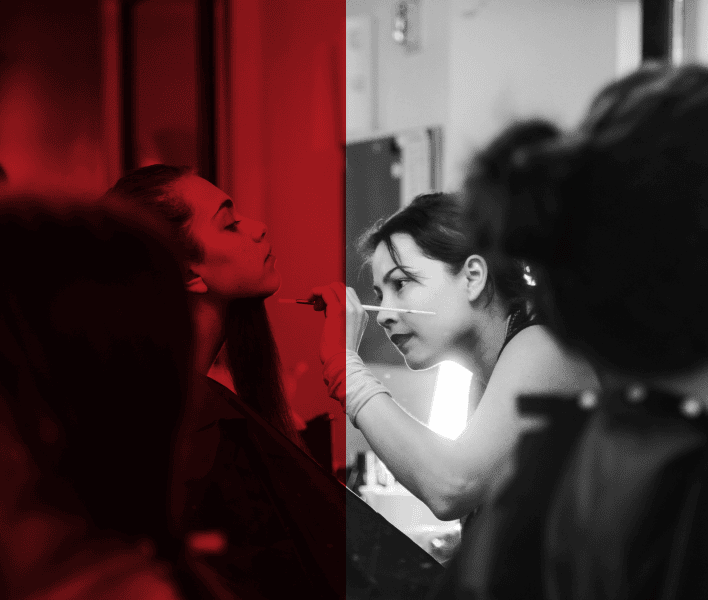
In many film and television scenes, injuries often appear only briefly, yet they must look believable enough to support the story. Among these effects, gunshot wounds are some of the most frequently used and most closely examined on camera. Whether it’s a close-up of a character collapsing or a wide shot where the injury is partially obscured, the makeup must hold up under different lighting conditions, camera angles and shooting styles.
Creating a realistic gunshot wound isn’t just about adding fake blood or a darkened spot on the skin. It involves understanding how real ballistic injuries behave, how skin reacts to penetration and how different calibers or distances affect the appearance of the wound. These details guide a special effects makeup artist in deciding what to sculpt, how to color the surrounding tissue and how to place textures that appear natural on screen.
Let’s continue by exploring how to create fake gunshot wound makeup from start to finish, using special effects makeup.
Anatomy of Gunshot Wounds
Before starting any application, it’s helpful to understand how gunshot injuries generally appear. The realism of fake bullet hole makeup depends on knowing basic anatomy, the depth of the wound and the type of weapon or impact you are trying to represent. Entry wounds are usually small, circular, or slightly uneven, with darker edges that suggest gunpowder marks.
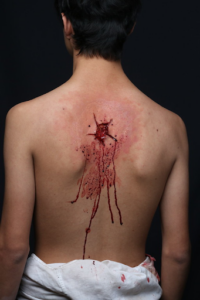
They may show limited bleeding at the center but often have subtle bruising, swelling, or abrasions around the area. Exit wounds, on the other hand, are typically larger and more irregular because the force pushes outward. These wounds often show torn skin, heavier blood pooling and more visible tissue disruption.
It’s also important to remember that no two gunshot wounds look the same. Distance, angle, location on the body and even clothing can change the final appearance, so the makeup design should always match the needs of the scene or script.
Also read How to Create Realistic Wounds and Scars with Prosthetics?
Commonly Used SFX Materials for Gunshot Wound Makeup
Choosing the right materials makes the process much easier and helps the wound look more believable.
Basic Materials:
- Cream paints or alcohol-activated palettes: Used for bruising, redness and shading around the wound.
- Liquid latex: Helps create raised edges or small tears in the skin.
- Gelatin or silicone: Good for building more realistic, flexible wound shapes.
- Scar wax or modeling wax: Useful for creating quick bullet hole shapes or adding small details.
- Fake blood (thin and thick types): Adds bleeding, pooling and finishing detail.
- Stipple sponges: Help add broken skin texture or subtle bruising.
- Bruise wheels: Provides a range of colors for fresh or older injuries.
- Setting powder: Keeps everything in place during filming.
These materials help you control volume, depth, color changes and the overall appearance of the wound, making it suitable for both close-up shots and wider scenes.
Check Out: Foam Latex vs Silicone: Choosing the Right Material for SFX Prosthetics
How to Make a Gunshot Wound with Special Effects Makeup?
Creating a believable gunshot wound involves building structure, shaping depth and applying color in a way that reads naturally on camera. The goal is not only to make the wound look realistic up close, but also to ensure it holds up under different lighting conditions and movement. The steps below break down the process from skin preparation to finishing details.
1. Prepare the Skin
Before applying any products, make sure the skin is clean and completely dry. Remove any oils, sweat, or makeup so the materials can adhere properly. Avoid using moisturizer, as it can stop latex, wax, or silicone from sticking to the skin. If the look needs to last for a long time, you can use a barrier spray to protect the skin and improve durability.
Preparing the skin well helps prevent peeling and ensures the wound stays in place throughout filming.
2. Map the Gunshot Wound Placement
Decide where the fake bullet hole will be placed and no matter if it will serve as an entry wound, an exit wound, or both. Think about the angle of impact, the character’s movement and any clothing that might touch or cover the area. It’s also useful to consider how closely the camera will show the injury, as close-up shots usually require more detail than wider shots.
After identifying the exact spot, lightly mark the area with a nude or pale-colored pencil so you have a clear guide that won’t show through the makeup.
3. Create the Basic Wound Shape
To build the foundation of the gunshot wound, start by choosing the material you want to work with. You can use scar wax, which is simple to shape and good for basic wounds. Liquid latex mixed with a small amount of cotton or tissue is helpful when you want to create skin that looks torn or slightly lifted. Gelatin or silicone offers the most flexible and realistic results, making them ideal for shots that require more detail or close-up work.
How to Shape It:
- Place a small amount of wax, latex, or silicone on the skin to form a tiny raised area.
- Blend the edges smoothly into the skin so there are no harsh lines.
- Press a small opening in the center using a tool, cotton swab, or a fingertip dipped in petroleum jelly to prevent sticking.
- Make sure the opening clearly resembles the entry point of the wound.
4. Add Depth and Texture
Gunshot wounds don’t look like neat circles – they usually have torn, uneven edges. To create this effect, gently roughen the edges with a sculpting tool and lift small sections to make the skin look uneven. You can also add tiny breaks or lines to mimic torn tissue.
If you’re working with latex, apply several thin layers and let each one dry before adding the next. These small details help the wound look more realistic, especially in close-up shots.
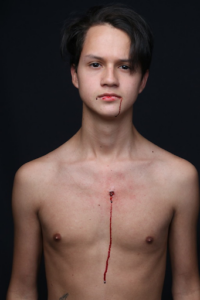
5. Add Color to the Wound and Surrounding Skin
When you are doing fake gunshot wound makeup, adding the right colors is what makes the injury look believable. Begin by filling the inside of the wound with a red-brown base to create depth. Layer darker reds or burgundy to show fresh blood and use deep brown or a little charcoal in the center to show burning or trauma.
Color Theory for Gunshot Wound Makeup:
| Wound Area | Recommended Colors | Purpose |
|---|---|---|
| Outer Bruising | Purple, yellow, green | Mimic swelling + trauma |
| Entry Hole Edges | Deep brown, maroon | Simulate burned flesh |
| Inner Cavity | Black, dark red | Add depth + shadow |
| Fresh Blood | Bright red | Recent bleeding |
| Older Blood | Dark red, brown | Clotted or dried blood |
Avoid using pure black; mixed dark tones look more realistic. Blend everything outward so the wound smoothly connects with the skin.
Next, shade the surrounding skin to show bruising and swelling. Use yellows and greens for early bruising, purples and blues for deeper tissue damage and soft reds to show irritation. Build the colors slowly, using circular motions or a stipple sponge to get a natural, uneven skin texture.
6. Add Blood and Finishing Details
Start by adding blood carefully – thin blood works well for light drips or smears, while thick blood helps create pooling inside the wound. Use a darker shade in the center to add depth. Apply slowly and build it up, as it’s always easier to add more than to remove too much.
You can also flick a small amount of blood with a brush to create subtle splatter if the scene calls for it. For extra realism, enhance the area with small details: add a slight shine using glycerin or a silicone-based product to mimic moisture, sprinkle a little coffee grounds or charcoal to suggest debris and place tiny highlights along the edges with a lighter skin tone to make the skin look raised and swollen.
Learn What Do SFX Makeup Artists Use for Fake Blood?
7. Set the Makeup
After the wound looks complete, lightly powder only the areas that need to stay matte so the skin doesn’t shine on camera. Avoid powdering the blood because it will lose its natural shine. If the makeup needs to last through long hours of filming, finish by sealing the entire area with a setting spray or an alcohol-based sealer. This helps the fake gunshot wound stay in place during movement, sweat and changing temperatures.
Keep Learning:
Now, we’ve covered almost every step needed to create realistic gunshot wound makeup. However, in special effects makeup, even small tips, subtle techniques, or tiny adjustments can make a significant difference in how the final effect appears on camera. This is why ongoing practice and proper SFX makeup training are essential.
Cinema Makeup School is renowned for providing hands-on, professional courses that help aspiring artists master these advanced techniques and take their skills to the next level. Learning in a structured environment allows artists to experiment safely, receive feedback from experienced instructors and understand how small changes in color, texture, or placement can dramatically improve realism.
Continuous training also keeps artists updated on new materials, tools and methods used in the industry, ensuring their work remains professional and camera-ready for film, television, or special projects. Take a tour of our special effects makeup school to explore more techniques and continue advancing your skills.
To see how our instructors teach and how our students create realistic SFX looks, check out our YouTube channel.
Tips to Make Gunshot Wound Makeup Look Real on Camera
1) Check the wound under the actual filming lights: Once the makeup is done, place the actor under the lighting used for the scene. This helps you see whether colors look too light, too dark, or washed out.
2) Take a quick test photo or video: Cameras often pick up things the eye doesn’t catch – such as harsh lines, uneven blending, or shine. A test shot helps you see what needs fixing.
3) Make sure the makeup moves well with the skin: Ask the actor to turn, breathe deeply, or bend. If latex or wax lifts, fix it before recording begins.
4) Check how the wound looks against the contrast colors: Dark clothing can make the wound look lighter, while bright clothing can make it appear darker. Adjust color slightly to balance the contrast.