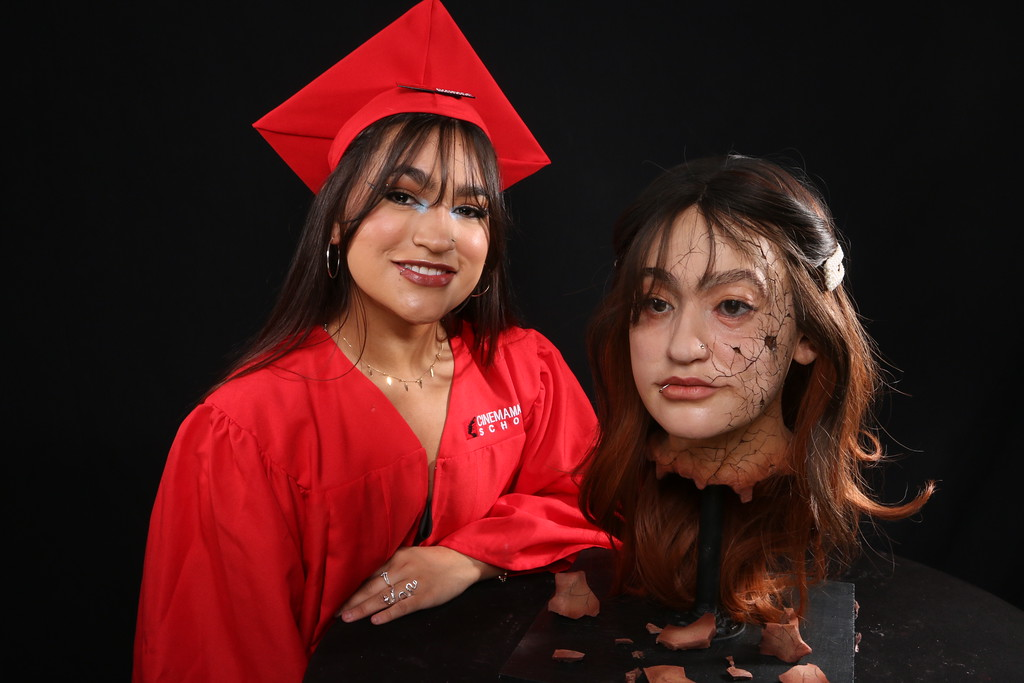
Creating a convincing face distortion effect is where technical skill meets pure imagination in special effects makeup. This effect involves physically altering the structure of the face to create something unsettling, dramatic and completely outside natural anatomy.
From warped features in horror productions to extreme character transformations in film and editorial work, distortion effects are designed to challenge what the audience perceives as real. They demand a strong understanding of materials, anatomy and blending techniques to ensure every edge, texture and detail holds up under close-up camera work.
Let’s understand the step-by-step workflow and material application that make a facial distortion effect look believable.
What Does a Facial Distortion Effect Actually Mean?
Special effects makeup artists use prosthetic appliances, liquid latex, silicone, foam latex and advanced paint work to make the human face appear warped, torn, split, or physically altered beyond its natural anatomy. This is what is broadly referred to as a Face Distortion Effect.
These techniques are used across horror, creature and theatrical productions where transforming the face is central to the character or scene. Achieving a convincing result requires a working knowledge of anatomy, material behavior, sculpting and color matching so the application integrates seamlessly with the performer’s skin and holds up under professional camera and lighting conditions.
Different Types of Facial Distortion Effects
Facial distortion in SFX makeup includes a range of techniques that alter the face through splitting, tearing, melting, or extreme deformation. Each type requires a different combination of materials, application methods and artistic approach to achieve a believable result on camera. Understanding these variations helps artists choose the right technique based on the character, genre and level of transformation required.
1. Split Face Effect
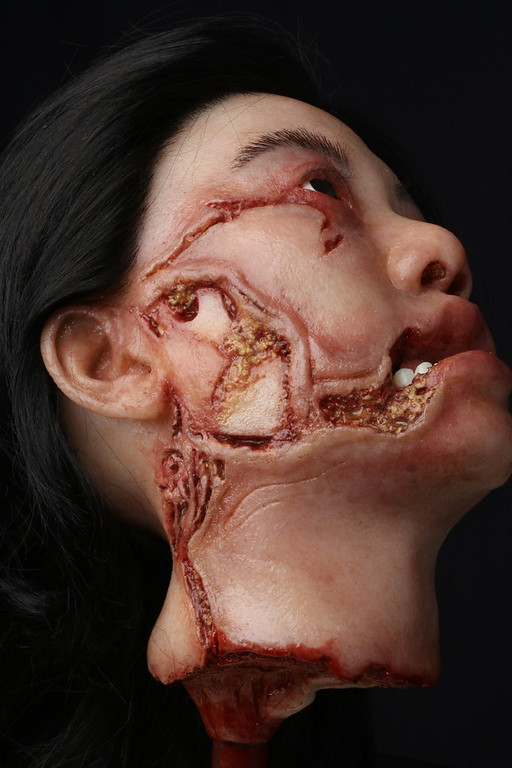
The Split Face Effect creates the illusion that the face has been divided straight down the middle, exposing raw muscle and bone. Used widely in psychological horror and sci-fi genres, the most critical skill here is seam blending, making the appliance edge disappear entirely into the performer’s skin for a result that is nearly impossible to distinguish from reality on camera.
2. Biting Effect
The Biting Effect simulates a savage bite or flesh tear where a section of the face appears missing or shredded. This effect is created using prosthetics like silicone or foam latex alongside professional blood simulation products and demands anatomical accuracy in both structure and placement. It is a staple technique in zombie films and survival horror productions.
3. Grotesque Effect
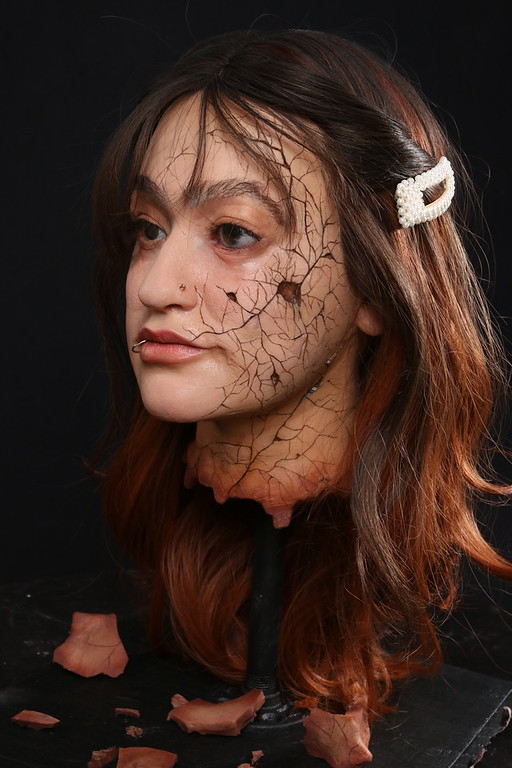
When the face appears severely deformed, with unnatural growths, distorted features, or an exaggerated creature-like appearance, it is classified as a Grotesque Effect. It is achieved using facial prosthetics, encapsulated silicone and multi-layered airbrush paint work, requiring a firm grasp of anatomy, sculpture and color theory to produce a result that reads convincingly on camera.
4. Melting Face Effect
The Melting Face Effect gives the appearance that the skin is dissolving or sliding off the bone. Achieved using gravity-pulled latex builds and tinted gelatin drips, it is a popular choice for supernatural horror and villain transformations where texture and color gradation are everything.
5. Torn Skin Effect
This effect creates the illusion that the outer layer of the face has been peeled or ripped back, exposing underlying tissue or veins. Torn Skin Effect is achieved using thin foam latex sheets, carefully applied at precise angles to simulate lifted or separated skin. It is then detailed with layered flesh tones, shadows and texturing to enhance depth and realism.
Executed through advanced SFX lab techniques, this effect requires precision, patience and a strong understanding of professional materials. It is widely used in body horror and supernatural thriller productions where realistic skin trauma and anatomical distortion are essential to the overall character design.
Step-by-Step Guide to Create a Distorted Face Effect
Creating a distorted face effect in special effects makeup requires a combination of creativity, anatomical knowledge and mastery of professional materials. While each look varies depending on its complexity, the following steps outline a workflow commonly used by SFX artists to achieve a realistic and visually striking result.
Step 1 – Concept & Design:
Start by gathering reference images and creating sketches of your concept. Focus on which facial features you want to exaggerate, warp, or distort, such as the eyes, mouth, cheeks, or forehead. For prosthetic-based designs, sculpt the appliance in clay over a life cast of the performer’s face.
This ensures that the distorted features align with the performer’s anatomy while creating a dramatic, unnatural effect. At this stage, the goal is to visualize the final distortion clearly before moving on to materials and application.
Step 2 – Materials & Mold Preparation:
Decide whether your design will use prosthetic appliances or direct application techniques. If using prosthetics, create a mold from your sculpt using plaster, Ultracal, or silicone. This mold will be used to cast the final appliance in foam latex, silicone, or gelatin.
For direct application, prepare materials like liquid latex, gelatin, or silicone, which can be layered and shaped directly on the performer’s face. Planning the materials carefully ensures that the effect can achieve the desired warped or torn appearance safely and realistically.
Step 3 – Build & Shape the Distortion:
For prosthetic designs, cast the appliance in the chosen material, trim the edges carefully and add texture to emphasize the distorted features. For direct application techniques, layer your material onto the skin and manipulate it with sculpting tools, brushes, or fingers to pull, stretch, fold, or bulge the features.
Asymmetry is crucial, as perfectly symmetrical distortions often appear unnatural. This step establishes the physical form that will create the illusion of a convincingly distorted face.
Step 4 – Skin Preparation:
Properly preparing the performer’s skin is essential. Clean and dry the face thoroughly, then apply a skin-safe barrier to protect against irritation from adhesives or materials. Mark key placement points for prosthetic appliances or designate zones for direct application. Ensuring the performer can move naturally without disturbing the effect is critical for both comfort and realism.
Step 5 – Application & Blending:
Apply prosthetic appliances with a professional adhesive, starting from the center and working outward, blending the edges carefully with tools or thinners to make seams invisible. For direct application, shape and refine the materials while they set, stretching or folding areas to enhance the warped appearance.
Pay close attention to transition points so that the distorted regions merge seamlessly with the performer’s natural skin, creating a unified and believable effect.
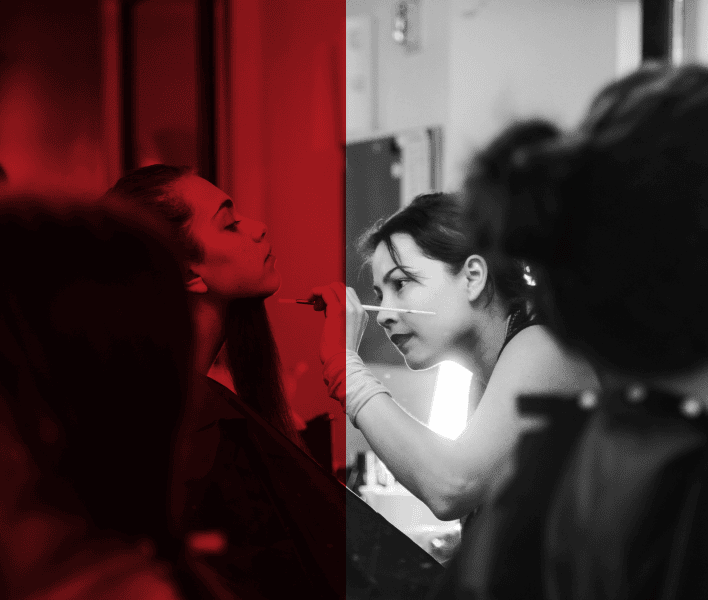
Step 6 – Painting & Detailing:
The final stage is to bring the distorted face to life. Match the performer’s skin tone using PAX paint, alcohol-activated palettes, or an airbrush and create depth with shadows and highlights to accentuate exaggerated or unnatural contours.
Add veins, bruising, blood, or torn flesh textures for added realism. Finally, seal the makeup with a compatible fixative to protect it from movement, sweat and heat on set, ensuring the effect remains durable and camera-ready.
Learn Why Every Serious Makeup Artist Should Learn Mold-Making Techniques
Pro Tips for Lasting and Realistic Makeup Results
- Always use a life cast of your specific performer – generic mannequin heads produce poor-fitting appliances that lift and peel on set.
- Thin your edges as much as possible during trimming, as feathered edges blend invisibly; thick ones never do.
- Build color in transparent layers rather than applying opaque paint in one pass.
- Seal all painted surfaces with a compatible sealer to protect the look from sweat, movement & lighting heat.
- Test your face distortion effect under the actual lighting conditions of the shoot before the production day.
Note: If creating impressive, screen-ready SFX makeup effects like facial distortion is your goal, professional training is essential. The right program gives you hands-on experience, material knowledge & the industry network to build a real career.
Explore SFX makeup courses at Cinema Makeup School and start building the skills needed for real on-set work. Our students graduate with industry-ready skills, guided by experienced instructors who provide hands-on training and prepare them for professional production environments.
Ready to begin your journey at Cinema Makeup School? Apply now for the course that fits your goals.
Related Articles –
5 Skills Every SFX Makeup Artist Should Master for Monsterpalooza
How SFX Artists Build & Apply Ear Prosthetics?
Easy Alien Makeup Ideas for Beginners
Frequently Asked Questions
Q1. What materials are best for a beginner attempting a Facial Distortion Effect?
Beginner SFX artists should start with liquid latex and tissue to practice building basic textures and simple distortion effects, such as raised surfaces, stretched skin, or uneven facial contours. As their skills improve, they can progress to pre-made foam latex appliances or gelatin-based prosthetics for more advanced and controlled facial distortion.
Q2. Can a Face Distortion Effect be removed safely?
Yes. Use a professional adhesive remover such as Detachol or isopropyl myristate to break down the bond gently. Never pull a prosthetic off dry skin.
Q3. Which Facial Distortion Effect is best for a first-time SFX project?
The Torn Skin Effect or a basic Biting Effect are ideal starting points. Both can be achieved with accessible materials and teach the foundational blending and painting skills that carry across all other distortion techniques. As your confidence grows, you can progress toward a more complex look.
Want to experience our training environment firsthand? Book a campus tour in person or schedule a virtual tour if you can’t visit Los Angeles.