In special effects makeup, facial structure plays a major role in character transformation. A single prosthetic can completely change how an actor appears on screen. From witches and goblins to elderly characters and fantasy creatures, the long-nose prosthetic has remained one of the most widely used prosthetic appliances in film, television, theater and cosplay makeup.
However, creating a believable prosthetic nose involves far more than simply extending the shape outward with clay. A professional-quality sculpt must feel anatomically connected to the actor’s face, move naturally during performance and remain convincing under HD cameras and strong production lighting. Every curve, edge, wrinkle and contour affects whether the appliance looks realistic or fake.
Let’s explore the process of sculpting a realistic long-nose prosthetic, from understanding facial anatomy and building the primary shape to refining texture, edges and overall realism for professional-level character makeup.
Facial Anatomy for Long Nose Prosthetic Sculpting
Before sculpting a long prosthetic nose, artists must first study how the natural nose is structured and how it connects to the rest of the face. Understanding anatomy helps the prosthetic appear believable rather than like an artificial extension attached to the skin.
Professional sculptors usually begin by observing real faces from multiple angles, especially side profiles. The table below explains the main facial areas artists study before sculpting.
| Facial Area | What Artists Should Study |
| Nose Bridge | Observe the width, height and angle of the bridge from front and side views. |
| Nose Tip | Study how the tip curves, droops, or projects outward naturally. |
| Nostrils | Examine nostril size, spacing and direction on real faces. |
| Cartilage Structure | Notice how the lower nose appears softer than the upper bridge area. |
| Cheek Transitions | Observe how the nose blends smoothly into the cheeks. |
| Upper Lip Relationship | Study the distance and angle between the nose and upper lip. |
| Side Profile | Analyze how the nose shape reads from profile angles. |
| Natural Asymmetry | Look for slight unevenness in real noses and facial features. |
Learn Why SFX Makeup Artists Should Study Human Anatomy for Sculpting Realistic Prosthetics.
Which Characters Commonly Use Long Nose Prosthetics
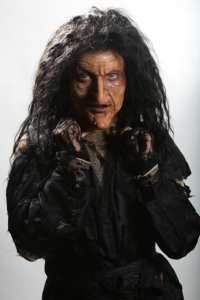
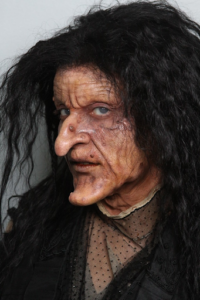
- Witch Characters: These designs often feature hooked bridges, drooping tips, sharp nostrils and aged texture to create a sinister or mystical appearance. The silhouette usually becomes more exaggerated from the side profile to make the character instantly recognizable on camera or stage.
- Goblins and Fantasy Creatures: Fantasy creatures often use elongated or distorted nose designs to create a non-human appearance. Goblin prosthetics may feature enlarged nostrils, crooked bridges, sharp curves, or uneven cartilage shapes to make the character appear more aggressive, mischievous, or creature-like.
- Elderly Character Makeup: As people age, the cartilage in the nose can appear longer and softer over time. Prosthetic artists often use subtle long-nose prosthetic designs in old-age makeup to recreate these natural anatomical changes.
- Villains and Dark Characters: Sharp or elongated facial features can create a more intimidating appearance in villain makeup. A narrow bridge, downward tip, or asymmetrical shape may help make the character appear colder, more severe, or psychologically unsettling.
- Historical and Period Characters: Some historical transformations require nose prosthetics to match portraits, sculptures, or real individuals from specific time periods. In these cases, artists sculpt prosthetics that closely resemble the facial structure of the reference subject while still fitting naturally on the actor’s face.
- Stylized Theater and Cosplay Characters: Theater productions and cosplay makeup often use more exaggerated nose prosthetics because the designs must remain visible from a distance or match iconic fictional characters.
Tip: Mastering these types of character transformations requires more than basic sculpting techniques. Artists must learn how to combine anatomy study, prosthetic design, mold-making, texture detailing, painting and appliance application to create believable on-screen results.
Cinema Makeup School offers professional training programs in special effects makeup that cover prosthetic sculpting, mold-making, character design, appliance application, painting techniques, lifecasting and production-focused makeup workflows used throughout the film, television and entertainment industries.
The programs are taught by experienced SFX instructors and are designed to help aspiring artists build practical industry-relevant skills.
Apply here to start developing hands-on special effects makeup skills used in film & television. Alternatively, book a tour here.
Related Articles –
Why Your Sculpt Looks Great in Clay but Fails in Mold?
How Makeup Tests Help Finalize Character Looks?
How SFX Artists Build & Apply Ear Prosthetics?
How to Create a Realistic Long Nose Prosthetic
Creating a realistic long prosthetic nose requires careful planning, anatomy study, sculpting control, edge refinement and realistic surface detailing to make the appliance appear believable on camera. The following steps cover the complete sculpting workflow, from preparing the lifecast and building the primary forms to refining texture, blending edges and casting the final prosthetic.
Step 1: Prepare the Lifecast
Start by preparing a clean lifecast of the actor or model. A lifecast provides an accurate replica of the face, allowing you to sculpt directly onto the correct facial anatomy. This helps you understand how the nose connects to the cheeks, forehead, nostrils and upper lip area.
Even small proportion mistakes can become highly noticeable under HD cameras or side-profile lighting, so make sure the lifecast surface is clean and properly prepared before applying clay. This helps the clay adhere smoothly during sculpting.
Step 2: Study References and Plan the Shape
Before adding clay, study reference images, anatomy photos, side profiles and character concepts to understand how the final nose should appear. Avoid sculpting entirely from imagination because reference study helps create more believable shapes and proportions.
At this stage, decide:
- how exaggerated the nose should become,
- whether the tip should droop or extend outward,
- how sharp or soft the bridge should appear,
- and how the prosthetic supports the overall character design.
Planning the shape beforehand helps prevent overbuilding and makes the sculpting process easier to control later.
Step 3: Apply Clay and Block Out the Main Structure
Once the design is planned, apply oil-based clay directly onto the nose area of the lifecast. Begin with larger clay forms first instead of focusing on fine details immediately.
As you sculpt, continuously add, remove and reshape the clay while checking the form from multiple angles. Focus on building the overall length, bridge shape, nostril placement and profile silhouette before refining smaller details.
Keep the surrounding anatomy visually connected to the prosthetic throughout the sculpt, especially around the cheeks and upper lip, so the final long prosthetic nose appears natural and balanced.
Check Out: What Kind of Clay Is Best for SFX Sculpting?
Step 4: Refine the Shape and Facial Transitions
After the main structure feels balanced, refine the sculpt into cleaner anatomical forms by shaping the bridge, defining the nostrils and developing the tip structure more carefully.
Focus on how the prosthetic blends into the surrounding facial areas. The sides of the nose should transition naturally into the cheeks and upper face without looking abruptly attached. Use loop tools, spatulas and clay shapers to smooth the forms and refine the sculpture.
Step 5: Sculpt the Cartilage and Nostril Areas
Once the larger forms are complete, focus on the softer structural areas of the nose, including the cartilage, nostrils and tip.
These areas require careful sculpting because stiff nostrils or unnatural curves can quickly make the prosthetic appear fake under close-up shots.
Step 6: Thin and Blend the Edges
Edge work is one of the most important parts of prosthetic sculpting. Thick edges often expose the appliance immediately once makeup and lighting are added.
To avoid this, gradually feather the clay outward until the prosthetic visually disappears into the lifecast. The transition should appear smooth enough that the viewer cannot easily identify where the appliance begins or ends.
Take your time during this stage because subtle blending greatly improves realism during final application.
Step 7: Add Skin Texture and Surface Detail
Once the sculpt feels structurally complete, begin adding texture to the surface. Real skin contains pores, wrinkles, compression lines and tiny irregularities that help break up smooth surfaces under HD cameras.
Carefully sculpt skin pores, fine wrinkles, crease lines and natural imperfections to create realistic surface detail. Use sponges, stipple tools, brushes, or fine-detail sculpting instruments to build realistic texture gradually.
Avoid overtexturing because excessive detail can make the prosthetic appear unnatural or overly stylized.
Note: Adjust the texture style depending on the character design.
Step 8: Inspect the Sculpt From Every Angle
Before molding begins, inspect the sculpture carefully from front, side and three-quarter views. Since long nose prosthetics rely heavily on silhouette, the profile shape must appear balanced and believable from every angle.
Check:
- bridge flow,
- nostril shape,
- edge smoothness,
- facial balance,
- and overall proportions.
Make final clay adjustments before moving into the mold-making stage.
Step 9: Mold and Cast the Prosthetic
Once the sculpture is finalized, begin the mold-making process using materials such as Ultracal or plaster stone to capture the sculpt detail accurately.
After the mold cures, cast the final prosthetic in silicone, foam latex, or gelatin, depending on the desired finish and flexibility. Silicone is commonly used in film and television because it closely mimics the movement and translucency of real skin.
Schedule a campus tour to explore the classrooms, studios and hands-on learning spaces used for professional special effects makeup training.