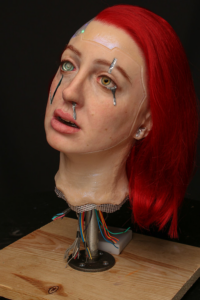
Live Action Role-Playing, commonly known as LARP, is where imagination steps off the page and into real life. Instead of simply describing a character, players physically bring them to life using costumes, body language, voice and, most importantly, special effects makeup.
Whether you’re stepping onto a medieval battlefield, entering a dark fantasy realm, or surviving a post-apocalyptic wasteland, the right character makeup helps sell the illusion. In LARP, makeup isn’t about looking flawless or fashionable. It’s about storytelling, realism and total immersion. Well-executed SFX makeup adds history, emotion and depth to every character you portray.
Let’s break down the types of character makeup that are truly essential for LARP:
Why Does SFX Makeup Matters So Much in LARP?
In LARP, how a character looks is just as important as costume and performance. Special effects makeup helps players look like the characters they are playing, which makes the game feel more believable for everyone.
SFX makeup also helps show a character’s background and role without needing explanation. Scars can show that a character has fought many battles. Dark or tired eyes can suggest magic, illness, or corruption. Dirt, bruises, or worn skin can show that a character has lived through difficult conditions. These visual details help other players quickly understand the character during gameplay.
LARP events often last many hours and are held outdoors. SFX makeup can stay longer on the skin, move naturally with facial expressions and hold up against sweat, heat and light weather changes. This allows players to stay focused on the game instead of fixing their makeup.
Learn How to Make SFX Makeup Last Longer on Skin?
Different Types of Character Makeup for LARP
LARP characters come from many backgrounds, roles and settings. Makeup helps define these characters clearly so other players can understand them at a glance. Below are the most common types of character makeup used in LARP and how each one works.
1. Fantasy Makeup
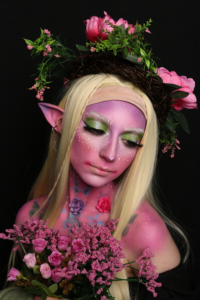
Fantasy races are very common in LARP and each race has a distinct makeup style. These looks help separate one race from another and make characters easy to recognize during play.

Elf makeup: Highlights clean and balanced features. Artists often use light contouring to sharpen cheekbones and define the face without making it look heavy. Skin tones are kept smooth and even, sometimes with a slight glow to give a magical feel. Eye shading is usually soft and natural.
Orc and goblin makeup: These characters require rough and bold makeup styles. Skin colors such as green, gray, or brown are commonly used to move away from a human appearance. Uneven tones, dirt effects and darker shadows help create a worn and aggressive look. Scars, cracks and rough textures are often added to suggest a life filled with fights and hard living.
Dwarf makeup: It supports strong and sturdy facial features. Dark shading around the jawline and nose helps make the face look broader and more solid. Light dirt, soot, or grease effects are often added to suggest work with tools, stone, or metal. Beards are an important part of dwarf characters and makeup around the beard area helps blend real or fake hair smoothly into the skin.
2. Warrior and Fighter Makeup
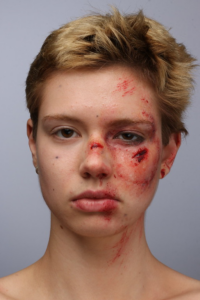
Many LARP characters take part in combat roles such as warriors, guards, or mercenaries. Their makeup should suggest strength, experience and physical effort without becoming distracting.
Enroll now or book a tour to start your journey on becoming a special effects makeup expert with Cinema Makeup School in Los Angeles, CA!
Battle makeup usually stays simple. Light brown and gray tones are blended into the skin to create dirt and sweat effects. These details help show long hours spent training or fighting. A slight shine on the forehead or nose can suggest heat and movement.
Scars are one of the most common features in warrior makeup. A small raised scar on the cheek or eyebrow can show past battles. Bruising or redness around the eyes or jawline may suggest recent fights, but these effects should stay soft so they do not pull attention away from the role-play.
Check out: How Makeup Artists Create Realistic Black Eyes for Fight Scenes?
3. Evil Character Makeup
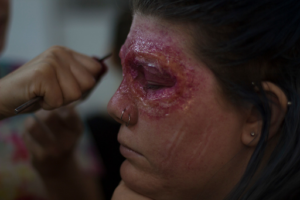
Evil characters play an important role in LARP by creating conflict and challenges during gameplay. Their makeup usually looks stronger and darker than other character styles, but it should still be comfortable and safe to wear for long hours.
Necromancers and dark mages: These characters often use pale or faded skin tones to show a connection to dark magic. Dark shading under the eyes and deeper contouring can make the face appear tired. Light vein details or small markings may be added to suggest damage caused by magic.
Demons and corrupted characters: Demon makeup commonly uses darker colors such as red, black, or deep purple. Strong shading around the eyes and cheekbones helps create a sharp and non-human appearance. Small prosthetic pieces like horns or ridges can add more detail, but even without prosthetics, proper use of highlights and shadows can make the character look changed and intimidating.

4. Undead and Horror Character Makeup
Undead characters are popular in horror-based games. These looks depend more on color and shading than on realistic wounds.
Zombie makeup uses uneven skin tones, dark circles under the eyes and hollowed cheeks. Mixing green, gray and purple shades creates a sick and unhealthy appearance. The goal is to suggest decay without heavy gore.
Vampire makeup is usually cleaner and more controlled. Pale skin, strong contouring and sharp eye details help create a cold and dangerous look. A small amount of red around the lips or eyes can suggest feeding without being overdone.
Skeleton or cursed bone characters rely on painted shadows. Dark areas around the eyes and cheekbones help create the illusion of hollow bone structure. These designs should be clear from a distance so they are easy to recognize during play.
5. Historical and Realistic Character Makeup
Some LARP games are based on history or realistic settings. In these cases, makeup should look natural and practical.
Medieval and historical characters: Makeup for historical roles stays minimal. Clean skin, soft tones and light shading help create a natural appearance. Dirt effects are often used for farmers, travelers, or soldiers. Heavy makeup is usually avoided to keep the look accurate for the time period.
Post-apocalyptic characters: Post-apocalyptic makeup shows damage and survival. Dusty skin, darkened eyes and cracked lips suggest long-term hardship. Smudges of oil, ash, or grime help make the character look worn and practical. These effects work best when combined with damaged clothing and gear.
6. Magical and Mystical Character Makeup
Some characters rely on magic rather than weapons. Their makeup helps show power and purpose.
Enroll now or book a tour to start your journey on becoming a special effects makeup expert with Cinema Makeup School in Los Angeles, CA!
Runes, symbols, or markings can be painted on the face or temples to represent spells or abilities. These designs should be neat and balanced, so they look intentional. Soft metallic tones, gentle highlights, or light color washes can also suggest magic. Using too much color or shine can make the makeup distracting, so balance is important.
Related Articles –
Gunshot Wound Makeup Techniques
How to Work with Latex, Silicone and Prosthetics Safely?
Arrow Wound SFX Makeup Techniques
Learn to Create These Characters with Professional SFX Makeup Training
Creating strong and believable LARP characters requires more than basic face paint. To build skills in character design, special effects makeup and prosthetic application, proper training makes a big difference.
At Cinema Makeup School, students learn professional SFX makeup techniques used in film, television and live performance. The training covers essential skills such as sculpting, mold-making and applying prosthetics. These skills help artists create durable, comfortable and visually clear character looks suitable for long wear, including LARP events.
Learning SFX makeup in a structured environment helps artists understand skin safety, product use and how to design makeup that supports movement and performance. This kind of training is useful not only for LARP but also for cosplay, stage work and screen-based character makeup.
Visit our YouTube channel to see practical character makeup techniques, prosthetic applications and special effects makeup processes used for live performance and storytelling.
Enroll now or book a tour to start your journey on becoming a special effects makeup expert with Cinema Makeup School in Los Angeles, CA!
Scar wax is one of those staple products every SFX makeup artist relies on – whether you’re crafting subtle scratches or building dramatic wounds for film, cosplay, or haunted attractions. It’s versatile, moldable and easy to manipulate when you know what you’re working with. But what many beginners don’t realize is that not all scar wax is the same.
Different types of scar wax perform differently depending on the look you’re trying to create, the conditions you’re working in and the level of durability you need. In this blog, we’re breaking down the most common scar wax types, their uses in special effects makeup and how to apply each one correctly for realistic, film-ready results.
In this blog, you’ll learn about the different types of scar wax, how each one performs which formulas work best for specific SFX makeup effects.
What Exactly Is Scar Wax in SFX Makeup?
Scar wax is a soft, pliable modeling compound used to build 3D effects directly on the skin. Artists rely on it to create scars, cuts, lumps, deformities, raised wounds even to subtly reshape facial features. Its biggest advantage is its flexibility – you can sculpt it into almost anything. But because SFX makeup must perform in real time and move naturally with the actor’s skin, the type and quality of the wax you choose can dramatically affect the final result.
Some waxes blend seamlessly, others hold their shape better under heat or heavy movement, some are formulated for ultra-detailed sculpting work. Once you understand these differences, your entire application process becomes smoother, faster and far more effective.
Why Choosing the Right Type of Scar Wax Matters?
If you’ve ever applied wax that melted, cracked, lifted, or refused to blend, the issue likely wasn’t your technique; it was the type of wax.
Here’s what different wax formulas affect:
- Blendability: how easily edges smooth into the skin
- Firmness: how much structure the wax can hold
- Heat resistance: crucial for long shoots or hot locations
- Durability: important for wear under prosthetics, costumes, or sweat
- Texture: some waxes are smoother, others more putty-like
Types of Scar Wax Used in SFX Makeup
Scar wax comes in several types – traditional, hard, silicone-based, gel-based synthetic putty – each designed for specific effects. Some are soft and easy to blend, while others hold shape for detailed or high-movement areas. Choosing the right type ensures realistic, durable professional-looking SFX results.
1. Traditional Scar Wax (Standard Modeling Wax)
This is the most widely used type of scar wax in special effects makeup, making it ideal for both beginners and professionals. It features a soft, pliable texture that excels at sculpting raised scars, crafting cuts and wounds, creating quick character looks is especially useful for practice makeup or classroom training.
Typically made from petroleum jelly, microcrystalline wax oils, this combination provides a smooth, moldable consistency that warms easily in the hands. To apply it effectively, it’s normal for the wax to feel a little tacky; simply wet your fingers with lotion, alcohol, or petroleum jelly while shaping to achieve smooth, skin-like results.
If you’re new to SFX makeup, traditional scar wax offers the easiest starting point for learning application techniques and mastering realistic special effects.
Enroll now or book a tour to start your journey on becoming a special effects makeup expert with Cinema Makeup School in Los Angeles, CA!
2. Hard Scar Wax (Firm Modeling Wax)
It is similar to the traditional formula but with greater stiffness. It holds shape much better and doesn’t collapse under pressure. Artists who create precisely sculpted shapes often prefer this version.
Best for:
- Long, deep gash wounds
- Nose or chin reshaping
- Pronounced bone-like structures
- High-heat environments
Hard wax doesn’t blend as easily as softer options, but the stability makes it ideal for detailed work. It also stays intact longer on areas with more movement, like around the mouth or forehead.
Check out: How to Create Realistic Wounds and Scars with Prosthetics?
3. Silicone-Based Scar Wax (Silicone Putty)
This wax is quickly gaining popularity in SFX makeup for its impressive performance and versatility. Silicone formulas remain flexible as the skin moves, delivering natural, skin-like textures that look particularly realistic on camera. This flexibility and resilience make silicone scar wax an ideal choice for film and television, as well as for creating high-detail wounds and effects that need to withstand sweaty or humid environments.
It blends seamlessly into the skin and typically requires less sealing, thanks to the silicone’s ability to mimic real skin’s elasticity. Once fully set, silicone scar wax locks into place and holds its shape firmly, making it highly reliable for professional special effects work.
4. Gel-Based Scar Wax (Soft Gelatin Wax)
Gelatin-based scar materials have been used for decades because they melt down easily, reset quickly and create extremely soft, organic shapes. They also take texture very well.
Best for:
- Burns and melted skin effects
- Torn flesh looks
- Swollen skin
- Zombie makeup
- Organic, uneven textures
Gel scar wax is a favourite among SFX makeup artists for its unique properties and realistic effects. When first applied, gel wax is warm and easily workable, allowing artists to sculpt it into fleshy, irregular shapes that mimic real skin. This material is especially useful for gory makeup looks because gelatin-based wax can achieve a level of depth, shine realism.
Enroll now or book a tour to start your journey on becoming a special effects makeup expert with Cinema Makeup School in Los Angeles, CA!
5. Synthetic Putty Wax (Hybrid Wax/Putty Compounds)
It combines the easy sculpting qualities of traditional wax with the strength and durability of putty. This unique blend results in an exceptionally versatile product, making it perfect for quick on-set touch-ups, creating stable wounds that stay in place under costumes, or achieving effects that demand both firmness and seamless blending.
Its moldable yet non-sticky texture is favoured by many professionals, as it can withstand long workdays without losing its shape or reliability. For artists who want a dependable, all-purpose product that performs predictably across different special effects scenarios, synthetic putty wax is often the top choice.
Want Better Control Over Your Scar Wax Creations?
Getting comfortable with scar wax is all about understanding how it behaves under your hands and on the skin. Small adjustments make a huge difference. The pressure you use while sculpting, the warmth of your fingers, the amount of lubricant during blending, even how you paint the finished wound all affect the final result.
Take a tour of Cinema Makeup School and explore how our instructors teach scar wax handling, wound-building techniques and advanced SFX skills used in film, television live events. Our courses provide hands-on experience with different types of wax, sculpting tools, blending methods, painting techniques to create realistic wounds, scars and character effects.
Students receive training from professional instructors who actively work on real film and TV projects, giving practical insight into industry-standard workflows and professional applications of special effects makeup.
Related Articles –
How to Make SFX Makeup Last Longer on Skin?
Must-Have Special Effects Makeup Tools Every Artist Should Own
How to Work with Latex, Silicone and Prosthetics Safely?
Which Type of Scar Wax Should You Use?
1) For beginners: Traditional scar wax is a good choice. It is easy to work with, can be shaped without much difficulty and is suitable for practicing scar wax application on various skin types.
2) For precise sculpting: Hard wax or synthetic putty gives you stability and sharp detail.
3) For hot or sweaty locations: Silicone scar wax remains stable and does not lose its shape, making it a reliable option when working in high temperatures.
4) For gory, melted, or organic textures: Gel-based wax brings your scar wax makeup ideas to life with realistic, fleshy depth.
5: For long film shoots: Silicone or firm putty waxes last longest without touch-ups.
Enroll now or book a tour to start your journey on becoming a special effects makeup expert with Cinema Makeup School in Los Angeles, CA!
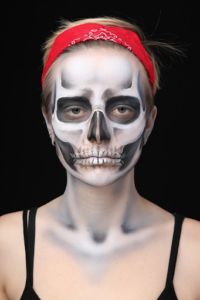
Skull makeup has always held a strong place in horror looks. It is simple, bold and works for many characters – undead creatures, ghostly figures, cursed pirates, or even stylized fantasy designs. When you mix skull art with airbrush makeup, the results can be smooth, clean and very striking. Airbrushing helps you create sharp shadows, soft blends and deep contrast.
This blog walks you through the full idea behind airbrush skull makeup, how it works, why artists love it and how you can master it even if you are still learning.
Airbrush Skull Makeup Anatomy
Before you begin spraying, it helps to understand the basic shapes that make a skull look real. You do not need deep anatomy knowledge, but knowing a few main points will guide your shading and help you create more convincing special effects makeup. A skull stands out through the eye sockets, cheek hollows, nose cavity, jawline, with the teeth area and the structure of the forehead.
When you understand where these forms appear on a real face, it becomes easier to build shadows and highlights in the right places. This is what makes airbrush skull makeup look natural. Instead of following the lines of a reference image alone, you allow the person’s bone structure to guide the shapes. This gives the final look more depth, balance and believability.
How Do You Choose the Right Airbrush Tools and Colors?
For airbrush skull makeup, the tools you work with make a big difference in how smooth and controlled your results look. Most artists rely on a few basic items that keep the process simple and clean.
You will usually need:
- A double-action airbrush that allows you to control both air and product flow
- A small, steady compressor that gives even pressure
- Airbrush makeup in black, white and grey for the main structure
- Optional soft browns or muted tones if you want an aged or weathered look
When choosing airbrush makeup, it is important to think about how long the look needs to last. Alcohol-based formulas give stronger wear for long shoots or events, while water-based options are softer on the skin and easier to remove at the end of the day. Select the type that suits both the model and the purpose of the makeup.
Check out: Water-Based vs. Alcohol-Based Airbrush Makeup
How to Do Airbrush Skull Makeup the Right Way?
Creating an airbrush skull look involves layering color carefully to build depth, shape and realistic shadows. By following a structured process, you can transform a blank face into a striking skull design, making each feature, from eye sockets to jawline, look natural and three-dimensional. The steps below break down the process so you can achieve professional results, whether for film, photoshoots, or Halloween.
1. Prepare the Skin and Setup
Start with clean, dry skin so the makeup settles evenly. A light primer can help if the skin is oily or textured. Set up your airbrush, compressor and colors before you begin and make sure your lighting clearly shows all angles of the face.
2. Create a Soft White Base
Begin by spraying a thin white layer over the face. Work in gentle, even layers so the base does not look thick. This soft coat helps every dark shadow stand out and gives you a clean surface to work on.
3. Map Out the Skull Structure
Take a moment to visualize the skull shapes. Look at the person’s own bone structure and gently mark where the eye sockets, cheek hollows and jaw will fall. A light touch of grey can guide your shading while still keeping the shapes soft and easy to adjust.
4. Build the Main Shadows
This is where the skull begins to take shape. Instead of rushing, build the darker areas slowly so they stay soft and smooth. Begin by shaping these main areas:
- Eye Sockets: Spray dark grey or black around the eyes, deepening the edges while keeping the outer areas soft. Let the shape follow the natural curve under the brow so the sockets look sunken and real.
- Cheek Hollows: Spray lightly beneath the cheekbones, following the natural angle of the bone. Keep the top edge soft and deepen the lower side a little more to create the hollow effect.
- Nose Cavity: Outline the cavity with a fine spray, then fill it slowly. Blend the edges into the cheeks so the shape looks natural, not flat.
- Jaw and Teeth Area: Lightly spray shadows from the upper lip downward to suggest the tooth spaces. Use soft lines so the jaw looks more like bone structure and less like painted stripes.
Enroll now or book a tour to start your journey on becoming a special effects makeup expert with Cinema Makeup School in Los Angeles, CA!
5. Shape and Strengthen the Jawline
Deepen the shadows along the jaw and under the chin. Soft layers beneath the jawbone help create the illusion of separation between the skull and the neck. Keep the lines diffused so they blend naturally.
6. Add Depth Across the Face
Once the main shapes are set, go back and build more depth where needed. Areas like the inner corners of the eyes, sides of the nose and the temples benefit from slightly darker shading. Slow layering gives the skull a lifelike sense of depth.
7. Highlight the High Points
Use white to bring back light to the top areas of the face – the forehead, cheekbones, nose bridge and jaw edges. Highlights should be sprayed very softly so they merge into the shadows around them. This contrast gives the skull its three-dimensional look.
8. Add Details and Texture
This step brings character into the design. Lower the airbrush pressure and create soft cracks, thin lines, or faint textures across the forehead, jaw, or temple areas. You can add scattered speckles or uneven shading if you want the skull to feel aged or worn. These small touches add realism without overpowering the base design.
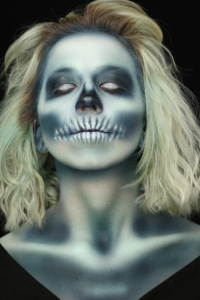
9. Extend the Makeup to the Neck or Body
If you want a complete horror look, continue the airbrush work down the neck or collarbones. Adding shadows under the bones, or hinting at ribs and spine shapes, makes the character more dramatic and complete.
10. Review and Refine Each Area
Take a step back and check the face from different angles. Airbrush work should look soft, balanced and even. Fix any uneven patches, smooth out harsh edges, or deepen any areas that look lighter than expected.
11. Set the Makeup for Long Wear
Finish with a gentle setting spray designed for airbrush makeup. Hold it at a distance so it settles lightly on the skin. This keeps the design in place through long hours of movement, sweat, or filming.
Here is the complete tutorial of PRIDE Skull Makeup!
Enroll now or book a tour to start your journey on becoming a special effects makeup expert with Cinema Makeup School in Los Angeles, CA!
Learn Airbrush Makeup at Cinema Makeup School
If you want to take your makeup skills to the next level, Cinema Makeup School offers professional training in special effects makeup. Our courses are designed for beginners and aspiring artists who want hands-on experience with real tools, materials and techniques used in the film and entertainment industry.
You will learn how to:
- Work confidently with airbrush tools and compressors
- Build realistic shadows and highlights
- Apply professional-grade airbrush makeup for long-lasting results
- Add fine details, textures and finishing touches to your designs
- Understand bone structure and facial anatomy for more realistic effects
Our expert instructors guide you through every step, ensuring you gain practical skills and confidence. Whether your goal is film, TV, photoshoots, or Halloween events, our courses provide the foundation to create professional-quality SFX makeup looks.
Enroll now or book a tour today and start mastering the art of airbrush makeup!
Related Articles:
Must-Have Special Effects Makeup Tools Every Artist Should Own
Airbrush Makeup Artist Career Roadmap
How to Create Realistic Wounds and Scars with Prosthetics?
How to Handle and Maintain Airbrush Tools?
Working with an airbrush requires patience, control and proper care. Even the best makeup designs can be affected if the tools are not handled correctly. Here’s how to get the most from your airbrush setup.
1) Holding the Airbrush
Hold the airbrush like a pen, with a comfortable grip that allows precise movement. Avoid gripping too tightly; gentle control helps you create smooth lines, soft gradients and subtle shadows. Use your other hand to steady the model’s face if needed, especially when working near delicate areas like the eyes or nose.
2) Controlling Air Pressure
Adjust the compressor pressure according to the effect you want. Lower pressure gives soft shading and fine details, while higher pressure covers larger areas quickly. Practice on paper or a test surface before applying to the skin, so you get a feel for the spray and flow.
3) Cleaning Between Colors
Clean the airbrush thoroughly when switching colors. Even a small amount of leftover paint can change the next color’s tone. Flush the system with water for water-based makeup or the recommended cleaner for alcohol-based formulas. Regular cleaning prevents clogging and keeps your lines smooth.
4) Maintaining the Equipment
At the end of each session, disassemble and clean the airbrush completely. Check the nozzle, needle and paint cup for residue. Store your compressor and airbrush in a dry, dust-free space to protect them from damage. A well-maintained airbrush lasts longer and performs more consistently.
5) Practice and Patience
Handling an airbrush takes practice. Spend time learning how different angles, distances and pressures affect the spray. The more you practice, the more confident you will become and the smoother your SFX makeup will look.
Enroll now or book a tour to start your journey on becoming a special effects makeup expert with Cinema Makeup School in Los Angeles, CA!
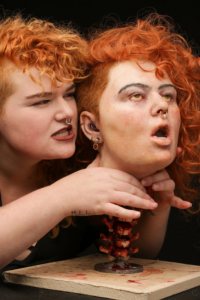
When you think of special effects makeup, your mind probably jumps straight to prosthetics, monsters, creatures and dramatic transformations. But here’s something many beginners overlook: hair and wig work.
Whether it’s crafting a rugged pirate beard, creating a futuristic cyborg hairline, building a creature’s mane, or designing era-specific hairstyles, SFX hair work brings life, personality and realism to your character. Without it, even the most stunning prosthetics can look unfinished.
If you’re an aspiring special effects makeup artist dreaming of film sets, TV productions, or creature design studios, mastering hair and wig techniques is just as important as sculpting or airbrushing. Let’s dive into how special effects hair design works, why it’s so important and how you can start building real industry-ready skills.
Tools Commonly Used in Special Effects Hair Design
- Wigs
- Wig caps
- Spirit Gum
- Pros-Aide
- Silicone adhesives
- Hair punching tools
- Crepe wool
- Ventilating needles
- Wig blocks
- Curling irons & Straighteners
- Steamers
- Heat gun
- Hair shears
- Thinning scissors
- Razors
- Strong-hold gels
- Setting sprays
- Texturizing products
- Hair dyes
- Airbrush paints
- Hair color sprays
- Mechanical grips
- Wig clips & pins
- Combs
- Teasing brushes
Hair Application Techniques Used in SFX
Hair work is one of the most transformative techniques in special effects makeup. It can instantly shift a character’s age, personality, species, or realism level. Whether you’re crafting a rugged warrior, a mythological creature, or a futuristic hybrid, mastering basic hair application methods helps bring your designs to life.
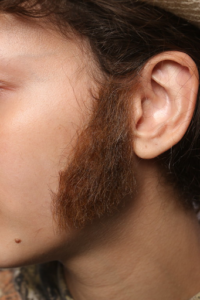
1. Hand-Laid Hair
This involves applying individual strands or small clusters directly onto the skin or prosthetics using adhesives such as Pros-Aide or Telesis. Ideal for beards, sideburns, eyebrows, or patchy creature hair, this technique gives beginners full control over texture, direction and density.

Enroll now or book a tour to start your journey on becoming a special effects makeup expert with Cinema Makeup School in Los Angeles, CA!
2. Hair Punching Into Prosthetics
Using a needle tool, hair strands are inserted one by one into silicone or foam latex prosthetic pieces. This method creates the most realistic “growing from the skin” effect and is commonly used for creatures, hyper-real wounds, or aged skin.
3. Pre-Made Hair Pieces
Lace beards, fur sections and ready-made hair appliances help cover larger areas quickly. These pieces allow beginners to focus on blending and styling rather than building everything from scratch.
4. Crepe Wool Application
Crepe wool is one of the most versatile materials used for special effects hair design. It can be straightened, curled, dyed, trimmed and manipulated to mimic almost any hair texture or style. SFX makeup artists typically apply it in layered rows, building volume and shape gradually before blending and styling it like real hair. It is affordable, easy to control and highly customizable – the go-to choice for creating beards, sideburns, creature fur and character transformations.
5. Synthetic & Specialty Fibers
Sci-fi and fantasy characters often call for metallic strands, glowing fibers, or stylized synthetic materials. These can be applied to prosthetics or integrated into wigs to create visually striking looks.
How to Do Wig Work in Special Effects Makeup?
Wig work is a core skill for any SFX makeup artist, especially when creating characters for film, television and theater. A well-applied wig blends seamlessly with the makeup, stays secure under lights and movement and helps define the character instantly.
1. Choose the Right Wig for the Character
Start by selecting a wig that fits your design:
- a) Lace-front wigs for realistic hairlines
- b) Hard-front wigs for stylized or creature characters
- c) Custom-built wigs for period looks or fantasy roles
- d) Synthetic wigs for affordable practice and bold colors
- e) Human-hair wigs for film-level realism
A good match in color, length and texture will save you hours of extra styling and blending.
2. Prep the Actor or Dummy Head
Before applying any wig, start by prepping the actor or the mannequin head, so the foundation is smooth and secure. Begin by braiding or flattening the natural hair to remove bulk, then place a wig cap to create an even surface. Clean the hairline with a small amount of alcohol to remove oils and ensure the adhesive bonds properly.
Finally, trim the lace edges carefully, avoiding over-cutting so the wig maintains its structure. Proper preparation is essential because it allows the wig to sit naturally, stay secure during long hours on set and remain comfortable for the performer.
3. Apply the Wig Using Professional Adhesives
Special effects makeup artists typically use adhesives such as Pros-Aide, Telesis, or Spirit Gum, depending on the production environment. Lightly glue along the hairline, press the lace into place and blend the edges with makeup. Beginners should start with Pros-Aide because it gives more control and is easier to clean.
4. Blend the Hairline
Blending the hairline is the step that transforms a wig from noticeable to completely believable. Start by using fine scissors to carefully trim the lace so it disappears into the skin. Apply a bit of transparent powder to cut down any unwanted shine, then lightly tint the lace with alcohol paints to match the performer’s skin tone.
To make the hairline look even more natural, gently place a few individual hair strands along the forehead using adhesive. These tiny hairs soften the edge of the wig and make it look like the hair is growing out of the skin.
5. Style the Wig to Match the Character
The final styling step is where the wig truly transforms into the character’s identity. Tailor the look based on the genre you’re working in:
- Period characters: Use rollers, setting sprays and controlled heat styling to recreate historically accurate shapes.
- Fantasy Makeup Looks: Incorporate braids, beads, horn attachments, or fur textures to bring magical elements to life.
- Sci-fi looks: Build sleek, structured silhouettes using gels, metallic sprays, or futuristic detailing.
- Creature effects: Enhance the wig with crepe wool, hand-laid sections, or weathering techniques to create texture, age, or wildness.
6. Secure Wigs for On-Set Use
Once the wig is styled, it must be reinforced so it can withstand movement, sweat and long shooting hours. Use wig pins to anchor the wig securely and apply extra adhesive on high-tension areas like the temples and nape.
Then, sew small mechanical grips inside the wig to give it additional stability during movement. Finish with flexible gels to keep flyaways under control without creating stiffness. The goal is to ensure the wig looks seamless on camera and remains secure and comfortable throughout filming.
Want to Learn Hair & Wig Work for Films & TV?
If you want to work in films or television, learning hair and wig work is extremely important. Wigs, hairlines and textures play a big role in making any character look believable – whether it’s a realistic period look, a fantasy creature, or a sci-fi design.
Getting proper special effects makeup training helps you understand how to prep, apply, style and secure wigs the right way. It also teaches you how to work safely, handle different materials and fix problems quickly on set.
At Cinema Makeup School, students get hands-on practice with real industry techniques. Here, you’ll learn step-by-step how professionals apply and style wigs for film and TV and gain the confidence to work on characters with different looks. Our instructors guide you through the same methods used on actual productions, so you’re prepared for real SFX makeup jobs in the entertainment industry.
If you want to take your SFX makeup skills to the next level, enroll now or book a tour – we’re here to help you build your skills.
Related Articles –
How to Apply Latex & Vinyl Bald Caps in Character Makeup?
Photographic Hairstyling Courses Prepare You for Editorial & Fashion Shoots
SFX Makeup Kit Checklist for Beginners
Safety & Hygiene Tips for Hair and Wig Application
- Always do a patch test to check for adhesive allergies.
- Clean and sanitize all combs, brushes and tools before use.
- Wipe the hairline to remove oils and help adhesives stick better.
- Use heat tools carefully to avoid burns and wig damage.
- Store wigs on stands to keep them clean and in shape.
- Handle lace gently to prevent tearing or irritation.
- Sanitize your hands before touching the wig or hairline.
For every aspiring special effects makeup artist, the early days are filled with excitement – mixed with a little fear. You’ve seen creatures on screen, prosthetics that move with an actor’s face and monsters that look like they crawled straight out of a nightmare. But when it comes to practicing? Most beginners freeze at the thought of applying their skills directly to a human face or body.
That’s where mannequins step in. In the SFX makeup, they’re training partners – patient, consistent and endlessly reusable.
In this blog, we will explore exactly how the mannequins help SFX makeup learners, why they’re essential and ways you can use them effectively to grow your creative and technical abilities.
Why Mannequins Are a Must-Have for New SFX Makeup Artists?
Mannequins are more than just practice heads – they’re essential tools that help beginners gain confidence, experiment freely and build foundational skills in special effects makeup. From learning basic applications to mastering prosthetics, bald caps and airbrushing, mannequins provide a safe, consistent and reusable surface for practice.

Let’s explore in detail:
1. Perfect for Learning Basic Application Techniques
Every SFX makeup artist starts by mastering the fundamentals: color application, contouring, adhesive control, blending, painting and even entry-level sculpting. Practicing these skills on a mannequin makes the process far less intimidating than working on a live actor.
Because mannequins have no sweat, oils, or pores, they offer a consistent and predictable surface that lets beginners focus entirely on improving their technique without worrying about skin irritation or discomfort. If something goes wrong, you can simply wipe it away, clean the surface and try again, turning every mistake into an instant do-over that speeds up learning.
2. Great for Practicing Prosthetic Application & Removal
Applying prosthetics is one of the most important skills in special effects makeup and mannequins make it much easier for beginners to learn proper placement, adhesive control, edge-blending and safe removal. Their stable head shape provides a firm base for attaching foam latex, silicone, or gelatin appliances without worry of movement.
You can experiment with different adhesives like Pros-Aide, Spirit Gum, or silicone adhesives and practice blending edges cleanly.
Common Prosthetic Applications You Can Learn on Mannequins:
Enroll now or book a tour to start your journey on becoming a special effects makeup expert with Cinema Makeup School in Los Angeles, CA!
- Nose extensions – practice nose shaping, positioning and blending for creature or character looks.
- Brow and forehead appliances – perfect for enhancing expressions or creating alien ridges.
- Cheek and jaw enhancements – learn to build structure for zombies, mutants, or aged characters.
- Chin pieces – great for strengthening face shapes or creating stylized silhouettes.
- Eye bag and under-eye prosthetics – ideal for subtle aging, fatigue, or creature details.
- Wound prosthetics – cuts, gashes, bullet holes, burns and trauma effects.
- Ear appliances – elf ears, faun ears, or damaged ear effects.
- Neck and throat appliances – practicing slashes, creature textures and structural builds.
- Cyborg/robotic pieces – mechanical plates, exposed machinery, or metallic enhancements.
- Silicone or gelatin pieces – great for learning heat sensitivity, softness and natural movement.
3. Helps Artists Learn Bald Cap Application Without Stress
Bald caps are a core part of almost every SFX makeup curriculum, but applying one on a real person for the first time can feel overwhelming. Practicing on a mannequin removes that pressure and gives beginners a safe space to learn the entire process at their own pace. With a mannequin, you can practice stretching and positioning the cap without worrying about someone’s comfort.
It also allows you to test heat tools like hair dryers for smoothing and shrinking the cap without the risk of burning a real scalp. Since mannequins can be reused endlessly, you can repeat the entire application as many times as needed to build confidence. Bald caps demand patience and mannequins make mastering this technique far easier for any beginner.
Learn How to Apply Latex & Vinyl Bald Caps in Character Makeup?
4. Perfect for Practicing Airbrush Makeup
Airbrushing is a major SFX skill used for gradients, skin tones, creature textures and full-body designs. Mannequins give beginners the perfect surface to master this technique. You can experiment freely with alcohol- or silicone-based paints and refine your hand movements until they feel natural.
You can:
- Learn proper air pressure and trigger control
- Practice distance and movement for smooth gradients
- Test shading, stencils and detail patterns
- Layer colors evenly without worrying about human sensitivity
- Clean and repaint repeatedly to perfect your technique
5. Helps Build Portfolio Pieces Early On
One of the biggest challenges for beginner SFX makeup artists is creating strong portfolio material before working with real models or actors. Mannequins make this process incredibly accessible. Their stable, unmoving surface allows you to take your time and craft clean, detailed character looks.
Enroll now or book a tour to start your journey on becoming a special effects makeup expert with Cinema Makeup School in Los Angeles, CA!
As mannequins don’t move or sweat, your work stays intact long enough for professional-style photos, giving you high-quality images that can impress special effects makeup schools, clients and future employers. Many beginners use mannequins to develop their first signature looks and these early portfolio pieces often become the foundation of their creative identity.
6. Allows Beginners to Work at Their Own Pace
Every artist learns differently and mannequins give beginners the freedom to practice without deadlines, pressure, or time limits. You can pause, step back, evaluate your work and return hours later without worrying about someone waiting or getting uncomfortable. This slower, self-paced approach helps artists refine blending, painting, sculpting and prosthetic techniques with patience and precision.
Want to Turn Mannequin Practice into a Career?
Practicing on mannequins is a crucial first step, but the next step is learning from experienced professionals. Cinema Makeup School offers hands-on SFX makeup courses designed to transform beginner skills into a real career.
Here, students go beyond mannequin practice to work with prosthetics, bald caps, airbrushing and full character creations under expert guidance. The courses combine practical training with industry insights, helping you gain confidence, master techniques and understand the tools used by professionals on set.
Students also build portfolio-ready work, which you can see on our YouTube channel, receive one-on-one feedback and learn professional workflows – preparing them for opportunities in film, TV and creative media.
Related Articles –
SFX Makeup Kit Checklist for Beginners
Character Makeup Skills You Need to Start a Career in SFX
Online vs In-Person SFX Makeup Course
How to Set Up a Proper Practice Space With a Mannequin?
Set Bright, Clear Lighting: Good lighting is essential for seeing details, textures and colors correctly. It helps you spot mistakes and improves blending, painting and prosthetic placement.
Stable Surface for Mannequin: Place your mannequin on a sturdy table or stand to prevent movement. Stability ensures accurate work and lets you focus on technique rather than balance.
Tools Within Easy Reach: Keep brushes, sponges, adhesives, paints and sculpting tools nearby. This saves time, maintains workflow and keeps practice sessions efficient.
Clean and Organized Workspace: Use silicone mats, paper towels, or cups to keep the area tidy. A clean workspace protects your tools, mannequin and prosthetics while promoting professional habits.
Proper Ventilation: Ensure good airflow when using adhesives, paints, or alcohol-based products. It keeps the environment safe and comfortable for longer practice sessions.
Enroll now or book a tour to start your journey on becoming a special effects makeup expert with Cinema Makeup School in Los Angeles, CA!
Creating a convincing arrow wound on screen requires more than just sticking a prop onto the skin. In professional special effects makeup, the realism comes from a combination of design planning, material choices, sculpting precision, color theory and final detailing that sells the illusion to both the camera and the audience.
This guide breaks down the complete process of creating a believable fake arrow wound, whether you’re preparing for film, TV, stage, photoshoots, or character-based creative projects.
Why Arrow Wound Makeup Is More Complex Than It Looks?
![]()
Arrow wounds are uniquely challenging because they involve more than just a puncture mark. When an arrow enters the body, it stretches, pulls and distorts the skin in a very specific way. Re-creating that distortion is technically demanding because the wound must show tension, irregular tearing and subtle swelling that all read correctly on camera.
Another layer of complexity comes from directionality. Arrows do not strike flat – they enter at an angle and the wound needs to clearly reflect that path. If the angle looks incorrect, the effect falls apart instantly. This means makeup artists must consider not only the shape of the wound but also where the arrow came from, how far it traveled and what kind of force it would realistically create.
The effect also depends heavily on achieving a convincing illusion of depth, which requires controlled color layering, carefully placed shadows and a believable transition into the surrounding skin. Any harsh edges or mismatched tones can make the wound look flat or artificial, especially in close-up shots.
Additionally, arrow-wound makeup must stay consistent under different lighting conditions, movement and camera angles. This demands strong technical understanding, precise product use and the ability to design a wound that holds up throughout filming. Enroll now or book a tour to start your journey on becoming a special effects makeup expert with Cinema Makeup School in Los Angeles, CA!
Why SFX Training Matters for Realistic Arrow-Wound Effects?
Realistic arrow wounds rely on a strong understanding of anatomy, force impact, directional injury patterns and advanced color layering. Cinema Makeup School offers a structured SFX makeup course that teaches these concepts in a step-by-step format, using professional tools and on-set techniques.
Through guided demonstrations, students learn how to design wounds that hold up in close-up shots, fast-paced action scenes and challenging lighting setups.
To gain insights into how we train aspiring special effects makeup artists, you can explore our YouTube channel, where we share student work, behind-the-scenes sessions and the collaborative environment they learn. It reflects the hands-on approach and the creative problem-solving skills that artists develop throughout the course, helping them build effects that look convincing from every angle.
Book a tour of our SFX makeup school to get started.
Anatomy of an Arrow Wound
Before applying any SFX makeup, it’s essential to understand how an arrow would realistically impact the body. This helps inform your sculpting and painting decisions.
Types of Arrow Wounds:
| Wound Type | Description | Typical Use in Scenes |
| Surface Arrow Wound | Light penetration, shallow puncture, minimal bleeding | Action sequences, grazes, comedic scenes |
| Deep Arrow Penetration | Full puncture with visible shaft or broken arrow tip | Fight scenes, dramatic moments |
| Arrow Wound Scar | Healed tissue with indentation or discoloration | Flashbacks, character backstories |
| Exit Wound | Torn tissue, wider than the entry, severe bruising | Intense combat or survival scenes |
Understanding which type you’re creating will determine the products, colors and materials you use.
Also read Why SFX Makeup Artists Should Study Human Anatomy for Sculpting Realistic Prosthetics?
Tools & Materials Used in Arrow Wound SFX Makeup
Professional special effects makeup requires materials that are safe on skin and compatible with camera lighting. While each artist will have their own preferred brands, the general categories remain the same.
Common Materials:
- Gelatin, silicone, or latex for wound creation
- Rigid collodion for surface scars
- Alcohol-activated palettes for hyper-real colors
- Pros-Aide or medical adhesive
- Sculpting tools
- Pre-made prosthetics or custom-sculpted pieces
- Blood gels and liquid blood (multiple viscosities)
- Contouring brushes and stipple sponges
Learn What Do SFX Makeup Artists Use for Fake Blood?
Step-by-Step: How to Create a Realistic Arrow Wound?
Creating a realistic arrow wound involves a sequence of controlled techniques that work together to build depth, direction and believable skin distortion. Before you begin, it helps to understand how each stage – planning, preparation, sculpting, painting and adding props – contributes to the final effect. The steps below outline the full process so both beginners and experienced artists can follow it with clarity.
1. Concept Planning
Before creating an arrow wound effect, it’s important to understand the story behind the injury. The distance of the shot, the type of arrowhead used and the stage of the injury – arrow still lodged in or already pulled out – will influence how the wound should appear.
The character’s physical condition also matters; a warrior in the middle of battle will have a very different-looking wound compared to someone struck moments ago. Taking time to map out these details helps ensure the final makeup matches the narrative, supports the scene and delivers a realistic result on camera.
2. Preparing the Skin
A strong, long-lasting arrow wound effect begins with proper skin preparation. This step ensures the prosthetics adhere well, colors blend smoothly and the makeup stays intact through movement, sweat and long shooting hours. Start by cleansing the area thoroughly so there’s no oil, residue, or leftover makeup that could interfere with adhesion.
If the look requires silicone or strong adhesives, applying a barrier spray helps protect the actor’s skin from irritation during extended wear.
Once the surface is ready, create a light guideline using a cosmetic pencil to mark the angle of penetration. This small detail keeps the wound consistent with the story’s direction of impact and makes sure every part of the makeup aligns correctly when seen from multiple camera angles. Enroll now or book a tour to start your journey on becoming a special effects makeup expert with Cinema Makeup School in Los Angeles, CA!
3. Sculpting and Applying the Pre-Made Prosthetic Wound
You can either sculpt your own wound piece or use a pre-made prosthetic, depending on time, budget and the level of realism required. Each approach has its advantages, but the key is to achieve natural-looking edges and a convincing depth.
![]()
Creating a Custom Wound:
If you’re sculpting the wound yourself, begin by preparing your material – usually gelatin or silicone. Warm the gelatin until it becomes pliable, or mix your silicone according to its instructions. Then, apply a small amount directly to the marked area on the skin.
Shape the material to form a slightly raised ring with a narrow opening in the center. This gives the illusion that the skin has stretched and lifted from the force of penetration. Keep the edges thin and smooth so they blend into the real skin seamlessly once colored. The opening should resemble a compact, irregular puncture rather than a perfect round hole.
The clearer your sculpted form is at this stage, the more realistic the final wound will appear on camera.
Check out: How to Create Realistic Wounds and Scars with Prosthetics?
Applying a Pre-Made Prosthetic:
If you’re working with a professional prosthetic, the process is simpler but still requires precision. Apply a thin layer of Pros-Aide to the skin and the back of the prosthetic. Allow both to become tacky before positioning the piece. Press it down gently, ensuring the alignment matches the marked penetration angle.
Blend the prosthetic edges with additional Pros-Aide, silicone, or a blending medium so the seam disappears into the actor’s skin. Clean transitions are crucial – any harsh line will show under film lighting.
4. Building Depth With Paint
A convincing arrow wound depends heavily on how you paint it. Professional special effects makeup often uses alcohol-activated palettes because they create realistic transparency.
Build the colors gradually:
- Start with neutral reds and purples for irritation.
- Add dark maroons and browns to create depth.
- Use minimal blacks only inside the deepest areas.
- Feather outward with yellows and greenish tones for shock bruising.
Tip: The goal is to simulate depth rather than “red circle with blood.” Subtle color transitions make the wound believable on camera.
5. Adding the Arrow Shaft (Optional)
If the scene calls for the arrow to remain lodged in the body, the prop shaft must be added carefully so it integrates naturally with the wound. Professional SFX artists often use safe, production-ready versions such as hollow shafts, silicone-tipped pieces, breakaway arrows, or magnetic designs that reduce risk during movement.
The most important detail is maintaining correct alignment; the shaft should follow the same angle as the prosthetic so it appears truly embedded rather than floating above the skin. Once positioned, it can be secured using skin-safe adhesive or, for heavier props, a small hidden harness to ensure stability throughout filming.
Enroll now or book a tour to start your journey on becoming a special effects makeup expert with Cinema Makeup School in Los Angeles, CA!
If you have ever spent hours sculpting, applying and completing a special effects makeup look, you may have experienced it melting, peeling, or lifting as the day goes on. This is common for artists at all levels, as factors like sweat, heat, movement and long wear affect how well SFX makeup holds up. The good news is that achieving long-lasting results depends on proper technique.
With the right preparation, suitable products and an effective application sequence, SFX makeup can stay intact through long shoots, bright lighting, active performers and challenging conditions. This guide outlines the essential steps for increasing the durability and wear time of special effects makeup.
Why SFX Makeup Fades or Breaks Down?
- Natural oils from the skin break down adhesives and cream products.
- Sweat, especially around the upper lip, forehead and neck, causes edges to loosen.
- Humidity and heat cause texture changes, separating pigments or softening prosthetics.
- Movement and friction from clothing, performance, or facial expressions tug the makeup.
- Incorrect product layering (e.g., using oil under silicone) can sabotage your entire application.
Longevity begins with eliminating or minimizing these triggers.
Tips for Long-Lasting Special Effects Makeup on Skin
Creating long-lasting special effects makeup requires careful preparation, the right products and a methodical application process. Factors like heat, sweat, skin type and material choice all influence how well the makeup holds up during long shoots or performances. The following tips outline practical steps you can follow to improve durability, reduce lifting and keep SFX makeup intact for extended periods.
1. Start With Clean, Oil-Free Skin
A long-lasting SFX application always begins with proper skin preparation. Removing oils, sweat and skincare residue helps adhesives and makeup bond more securely. Using a gentle cleanser or micellar water ensures the skin is clean without irritation. Avoid heavy moisturizers before starting, as they can interfere with adhesion.
If hydration is necessary, choose a lightweight, oil-free formula and allow it to fully absorb before applying any products.
2. Use the Right Adhesive for Your Materials
Selecting an appropriate adhesive is one of the most important decisions for achieving long-lasting SFX makeup. Different prosthetic materials, such as silicone, latex and foam latex, respond best to specific adhesive formulas. Products like Pros-Aide, Telesis and other silicone-based adhesives are commonly used in professional environments because they maintain their strength even in high heat or during heavy perspiration.
Matching the adhesive to both the material and the working conditions helps ensure the prosthetic stays secure throughout wear.
3. Apply Adhesive in Thin, Even Layers
Thick layers of adhesive often cause slipping, slower drying, or weak bonding. Applying thin, even coats on both the skin and the prosthetic allows the glue to reach its ideal tacky stage, which is essential for a secure hold.
Tip: Waiting until the adhesive becomes clear and tacky before attaching the piece ensures better longevity, fewer edge issues and stronger adhesion throughout wear.
4. Seal and Blend Edges Carefully
Edges are usually the first areas to lift, which makes proper sealing an important step. After attaching the prosthetic, reinforcing the edges with a small amount of adhesive or blending agent helps reduce the risk of peeling. Smoothing the edges gradually and powdering lightly after they dry ensures they stay flat and integrated with the skin, improving overall durability and realism.
5. Choose Long-Wearing Paints and Pigments
The paints and color products you use make a significant difference in longevity. Alcohol-activated paints resist sweat, water and friction far better than cream or grease-based formulas, making them ideal for long shoots and demanding scenes.

Enroll now or book a tour to start your journey on becoming a special effects makeup expert with Cinema Makeup School in Los Angeles, CA!
Silicone pigments also provide excellent durability when working with silicone appliances. Selecting the right type of paint ensures the artwork remains vibrant and intact for hours.
6. Set Each Layer Properly While Working
Ensuring that each stage of the makeup is set before proceeding to the next is crucial for achieving long-lasting results. Lightly powdering cream products or applying a setting spray between layers creates a stable base, preventing the colors or textures from shifting.
This step-by-step makeup setting approach minimizes smudging, creasing and product breakdown, especially once the performer begins moving or working under warm conditions.
7. Keep the Performer Cool Whenever Possible
Encouraging performers to stay cool before and during makeup can make a noticeable difference in how well the makeup holds. Using handheld fans, cool packs, or providing breaks away from hot lights helps control perspiration. Reducing heat on set minimizes adhesive breakdown and helps the makeup remain stable for longer periods.
8. Avoid Touching or Overworking the Makeup
Minimizing contact with the makeup after application is important for maintaining durability. Touching or repeatedly adjusting the prosthetic can loosen adhesives, transfer natural oils onto the skin and disrupt the painted surface.
Once the makeup is in place and properly set, leaving it undisturbed allows the adhesive to fully bond and helps the paint remain stable. This is especially important in areas with frequent movement, where unnecessary handling can quickly lead to lifting or separation.
9. Finish With a Strong Setting Spray or Sealer
A final sealing layer helps lock everything in place. Using a professional-grade setting spray or waterproof sealer adds an extra level of protection by reducing shine, improving durability and helping the makeup resist moisture and friction.
Note: Achieving long-lasting SFX makeup also depends on learning the right techniques, many of which come from working professionals who understand the demands of film and television production. At Cinema Makeup School, our experienced instructors teach special effects makeup with a focus on accuracy, safety and industry-standard methods.
Our training helps students build strong foundational skills and gain practical knowledge that supports long-lasting, high-quality SFX applications for real-world projects.
Click here to see how our instructors demonstrate each application with precision and how our students learn to follow these techniques effectively.
Related Articles –
SFX Makeup Kit Checklist for Beginners
Character Makeup Skills You Need to Start a Career in SFX
What Kind of Clay Is Best for SFX Sculpting?
How to Handle On-Set Touch-Ups?
Even with a well-prepared application, SFX makeup may require quick adjustments during filming, especially under hot lights, long hours, or heavy movement. Being prepared with the right tools and knowing how to address common issues helps maintain a clean, consistent look throughout the shoot. Here are key points to guide on-set touch-ups:
- Keep Essential Adhesives Ready: Carry a small bottle of Pros-Aide, Telesis, or silicone adhesive so you can immediately secure any lifting edges. Applying a tiny amount with precision prevents the problem from spreading and keeps the appliance stable.
- Use Cotton Swabs for Detailed Fixes: Cotton swabs help remove excess product, tidy adhesive spots, or clean sweat in tight areas. Their small size makes them ideal for delicate or high-movement regions such as the nose, eyes and mouth.
- Control Shine With Translucent Powder: It helps manage oil buildup and prevents unwanted shine on camera. Applying it lightly ensures the makeup stays matte without creating texture or buildup.
- Carry a Small Alcohol Palette for Quick Color Repairs: Minor scratches or smudges can be corrected with small alcohol-activated paints. These dry quickly, resist smudging and blend well with existing makeup, making them ideal for fast on-set fixes.
- Trim Any Lifted Edges With Mini Scissors: If a small edge begins to curl or wrinkle, carefully trimming the lifted portion can prevent further peeling. This technique works best when followed by a small amount of adhesive to reseal the area.
- Use Blot Papers for Sweat Management: Mattifying blot papers help remove sweat without disturbing the makeup. Pressing gently, rather than wiping, prevents movement of paint layers and adhesives.
- Speed Up Repairs With a Portable Mini Fan: A mini fan helps dry adhesives, paints, or sweat quickly so you can move ahead with the repair. This keeps downtime minimal and maintains consistency during shooting.
- Act Quickly to Maintain Continuity: The sooner you address an issue, the easier it is to fix. Quick reactions prevent larger problems like peeling appliances or smudged paint, ensuring the final look stays intact on camera.
Enroll now or book a tour to start your journey on becoming a special effects makeup expert with Cinema Makeup School in Los Angeles, CA!
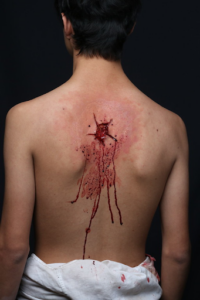
In many film and television scenes, injuries often appear only briefly, yet they must look believable enough to support the story. Among these effects, gunshot wounds are some of the most frequently used and most closely examined on camera. Whether it’s a close-up of a character collapsing or a wide shot where the injury is partially obscured, the makeup must hold up under different lighting conditions, camera angles and shooting styles.
Creating a realistic gunshot wound isn’t just about adding fake blood or a darkened spot on the skin. It involves understanding how real ballistic injuries behave, how skin reacts to penetration and how different calibers or distances affect the appearance of the wound. These details guide a special effects makeup artist in deciding what to sculpt, how to color the surrounding tissue and how to place textures that appear natural on screen.
Let’s continue by exploring how to create fake gunshot wound makeup from start to finish, using special effects makeup.
Anatomy of Gunshot Wounds
Before starting any application, it’s helpful to understand how gunshot injuries generally appear. The realism of fake bullet hole makeup depends on knowing basic anatomy, the depth of the wound and the type of weapon or impact you are trying to represent. Entry wounds are usually small, circular, or slightly uneven, with darker edges that suggest gunpowder marks.

Enroll now or book a tour to start your journey on becoming a special effects makeup expert with Cinema Makeup School in Los Angeles, CA!
They may show limited bleeding at the center but often have subtle bruising, swelling, or abrasions around the area. Exit wounds, on the other hand, are typically larger and more irregular because the force pushes outward. These wounds often show torn skin, heavier blood pooling and more visible tissue disruption.
It’s also important to remember that no two gunshot wounds look the same. Distance, angle, location on the body and even clothing can change the final appearance, so the makeup design should always match the needs of the scene or script.
Also read How to Create Realistic Wounds and Scars with Prosthetics?
Commonly Used SFX Materials for Gunshot Wound Makeup
Choosing the right materials makes the process much easier and helps the wound look more believable.
Basic Materials:
- Cream paints or alcohol-activated palettes: Used for bruising, redness and shading around the wound.
- Liquid latex: Helps create raised edges or small tears in the skin.
- Gelatin or silicone: Good for building more realistic, flexible wound shapes.
- Scar wax or modeling wax: Useful for creating quick bullet hole shapes or adding small details.
- Fake blood (thin and thick types): Adds bleeding, pooling and finishing detail.
- Stipple sponges: Help add broken skin texture or subtle bruising.
- Bruise wheels: Provides a range of colors for fresh or older injuries.
- Setting powder: Keeps everything in place during filming.
These materials help you control volume, depth, color changes and the overall appearance of the wound, making it suitable for both close-up shots and wider scenes.
Check Out: Foam Latex vs Silicone: Choosing the Right Material for SFX Prosthetics
How to Make a Gunshot Wound with Special Effects Makeup?
Creating a believable gunshot wound involves building structure, shaping depth and applying color in a way that reads naturally on camera. The goal is not only to make the wound look realistic up close, but also to ensure it holds up under different lighting conditions and movement. The steps below break down the process from skin preparation to finishing details.
Enroll now or book a tour to start your journey on becoming a special effects makeup expert with Cinema Makeup School in Los Angeles, CA!
1. Prepare the Skin
Before applying any products, make sure the skin is clean and completely dry. Remove any oils, sweat, or makeup so the materials can adhere properly. Avoid using moisturizer, as it can stop latex, wax, or silicone from sticking to the skin. If the look needs to last for a long time, you can use a barrier spray to protect the skin and improve durability.
Preparing the skin well helps prevent peeling and ensures the wound stays in place throughout filming.
2. Map the Gunshot Wound Placement
Decide where the fake bullet hole will be placed and no matter if it will serve as an entry wound, an exit wound, or both. Think about the angle of impact, the character’s movement and any clothing that might touch or cover the area. It’s also useful to consider how closely the camera will show the injury, as close-up shots usually require more detail than wider shots.
After identifying the exact spot, lightly mark the area with a nude or pale-colored pencil so you have a clear guide that won’t show through the makeup.
3. Create the Basic Wound Shape
To build the foundation of the gunshot wound, start by choosing the material you want to work with. You can use scar wax, which is simple to shape and good for basic wounds. Liquid latex mixed with a small amount of cotton or tissue is helpful when you want to create skin that looks torn or slightly lifted. Gelatin or silicone offers the most flexible and realistic results, making them ideal for shots that require more detail or close-up work.
How to Shape It:
- Place a small amount of wax, latex, or silicone on the skin to form a tiny raised area.
- Blend the edges smoothly into the skin so there are no harsh lines.
- Press a small opening in the center using a tool, cotton swab, or a fingertip dipped in petroleum jelly to prevent sticking.
- Make sure the opening clearly resembles the entry point of the wound.
4. Add Depth and Texture
Gunshot wounds don’t look like neat circles – they usually have torn, uneven edges. To create this effect, gently roughen the edges with a sculpting tool and lift small sections to make the skin look uneven. You can also add tiny breaks or lines to mimic torn tissue.
If you’re working with latex, apply several thin layers and let each one dry before adding the next. These small details help the wound look more realistic, especially in close-up shots.
5. Add Color to the Wound and Surrounding Skin
When you are doing fake gunshot wound makeup, adding the right colors is what makes the injury look believable. Begin by filling the inside of the wound with a red-brown base to create depth. Layer darker reds or burgundy to show fresh blood and use deep brown or a little charcoal in the center to show burning or trauma.
Color Theory for Gunshot Wound Makeup:
| Wound Area | Recommended Colors | Purpose |
|---|---|---|
| Outer Bruising | Purple, yellow, green | Mimic swelling + trauma |
| Entry Hole Edges | Deep brown, maroon | Simulate burned flesh |
| Inner Cavity | Black, dark red | Add depth + shadow |
| Fresh Blood | Bright red | Recent bleeding |
| Older Blood | Dark red, brown | Clotted or dried blood |
Avoid using pure black; mixed dark tones look more realistic. Blend everything outward so the wound smoothly connects with the skin.
Next, shade the surrounding skin to show bruising and swelling. Use yellows and greens for early bruising, purples and blues for deeper tissue damage and soft reds to show irritation. Build the colors slowly, using circular motions or a stipple sponge to get a natural, uneven skin texture.
6. Add Blood and Finishing Details
Start by adding blood carefully – thin blood works well for light drips or smears, while thick blood helps create pooling inside the wound. Use a darker shade in the center to add depth. Apply slowly and build it up, as it’s always easier to add more than to remove too much.
You can also flick a small amount of blood with a brush to create subtle splatter if the scene calls for it. For extra realism, enhance the area with small details: add a slight shine using glycerin or a silicone-based product to mimic moisture, sprinkle a little coffee grounds or charcoal to suggest debris and place tiny highlights along the edges with a lighter skin tone to make the skin look raised and swollen.
Learn What Do SFX Makeup Artists Use for Fake Blood?
7. Set the Makeup
After the wound looks complete, lightly powder only the areas that need to stay matte so the skin doesn’t shine on camera. Avoid powdering the blood because it will lose its natural shine. If the makeup needs to last through long hours of filming, finish by sealing the entire area with a setting spray or an alcohol-based sealer. This helps the fake gunshot wound stay in place during movement, sweat and changing temperatures.
Keep Learning:
Now, we’ve covered almost every step needed to create realistic gunshot wound makeup. However, in special effects makeup, even small tips, subtle techniques, or tiny adjustments can make a significant difference in how the final effect appears on camera. This is why ongoing practice and proper SFX makeup training are essential.
Cinema Makeup School is renowned for providing hands-on, professional courses that help aspiring artists master these advanced techniques and take their skills to the next level. Learning in a structured environment allows artists to experiment safely, receive feedback from experienced instructors and understand how small changes in color, texture, or placement can dramatically improve realism.
Continuous training also keeps artists updated on new materials, tools and methods used in the industry, ensuring their work remains professional and camera-ready for film, television, or special projects. Take a tour of our special effects makeup school to explore more techniques and continue advancing your skills.
To see how our instructors teach and how our students create realistic SFX looks, check out our YouTube channel.
Tips to Make Gunshot Wound Makeup Look Real on Camera
1) Check the wound under the actual filming lights: Once the makeup is done, place the actor under the lighting used for the scene. This helps you see whether colors look too light, too dark, or washed out.
2) Take a quick test photo or video: Cameras often pick up things the eye doesn’t catch – such as harsh lines, uneven blending, or shine. A test shot helps you see what needs fixing.
3) Make sure the makeup moves well with the skin: Ask the actor to turn, breathe deeply, or bend. If latex or wax lifts, fix it before recording begins.
4) Check how the wound looks against the contrast colors: Dark clothing can make the wound look lighter, while bright clothing can make it appear darker. Adjust color slightly to balance the contrast.
Enroll now or book a tour to start your journey on becoming a special effects makeup expert with Cinema Makeup School in Los Angeles, CA!
When it comes to creating believable monsters, aliens, or cinematic transformations, your imagination is only as powerful as the tools in your kit. Every artist, whether a beginner or a seasoned professional, knows that having the right special effects makeup tools can make all the difference in achieving a flawless look.
In this guide, we’ll explore the essential tools every SFX artist should keep in their kit for professional-quality results.
What Tools Do You Need for Special Effects Makeup?
It’s important to understand the essential tools that form the foundation of every SFX artist’s work. Each tool serves a specific purpose – from sculpting and casting to painting and prosthetic application and together they help create believable, high-quality effects seen on screen. Below is an overview of the key special effects makeup tools every artist should know and use effectively.
1. Sculpting Tools
Before any makeup is applied to the skin, most special effects designs start with sculpting. This stage helps shape the base forms for prosthetics, facial structures and other detailed effects. Sculpting tools help artists refine shapes, textures and features before moving on to molding or casting.
Common sculpting tools include:
- Metal spatulas and loop tools: Used for cutting, shaping and smoothing clay surfaces.
- Wooden modeling tools: Help refine contours and adjust details in softer materials.
- Rubber-tipped tools: Useful for blending edges, softening lines and creating skin-like transitions.
2. Mixing Palettes
Artists often use a palette to mix makeup products, paints, or prosthetic materials while keeping their work area hygienic and controlled. It allows them to test color combinations, adjust product consistency and avoid contaminating original containers.
Stainless-steel palettes are a common choice because they are durable, easy to clean and long-lasting. Having one on hand ensures accuracy and efficiency throughout the process.
3. Brushes and Sponges
Brushes and sponges are among the most frequently used tools in special effects makeup. They allow artists to apply, blend and texture products with control and precision. Different types of brushes serve specific purposes – larger ones help cover wide areas, while finer brushes are used for detailed work such as painting veins or small prosthetic edges.
Enroll now or book a tour to start your journey on becoming a special effects makeup expert with Cinema Makeup School in Los Angeles, CA!
Sponges, on the other hand, are ideal for stippling, layering colors and creating realistic textures like bruises, dirt, or skin imperfections. Keeping brushes and sponges clean and well-maintained is essential for consistent results and to prevent product buildup or contamination during special effects makeup applications.
4. Adhesives and Removers
Adhesives are essential for attaching prosthetics, appliances, or facial pieces securely to the skin. Choosing the right bonding product depends on the type of material being used, the duration of wear and the actor’s skin sensitivity. Removers are equally important to ensure safe and gentle removal without causing irritation.
Additionally, adhesive control bottles, small brushes and cotton swabs help ensure precise application and a clean finish.
5. Sculpting Clays and Casting Materials
Creating realistic prosthetics and molds requires suitable sculpting and casting materials. These materials help artists to form detailed shapes, capture fine textures and build a solid base for prosthetic design.
Common materials and tools include:
- Oil-based clays (Monster Clay, Chavant NSP): Used for sculpting prosthetic forms and creating detailed surface textures.
- Plaster bandages and alginate: Essential for life casting to make accurate facial or body molds.
- Silicone molding compounds: Provide flexible and durable molds suitable for repeated casting.
- Mixing cups and measuring tools: Help maintain correct ratios when preparing casting materials.
Also read, What Kind of Clay Is Best for SFX Sculpting?
6. Airbrushing Equipment
An airbrush gun is one of the most precise tools in special effects makeup. It helps artists apply paint evenly for realistic skin tones, creature detailing and smooth prosthetic blending. The gun connects to a compressor that regulates airflow, allowing fine control over coverage and texture.
This setup makes it easy to layer colors, create gradients and achieve professional-quality results on both prosthetics and full-body applications.
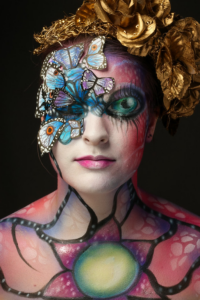
Enroll now or book a tour to start your journey on becoming a special effects makeup expert with Cinema Makeup School in Los Angeles, CA!
Check out: Water-Based vs. Alcohol-Based Airbrush Makeup
7. Blood, Gore and Wound Simulation Tools
Creating realistic injury effects requires specific tools and materials designed for controlled application and detail. These tools help artists produce convincing blood flow, surface textures and skin discolorations for film, television, or stage work.
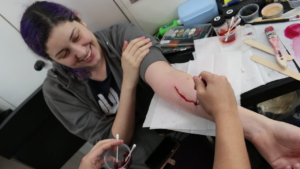
Common tools used for wound and gore effects include:
- Blood tubing and pumps: Used to simulate flowing or dripping blood in a controlled manner.
- Sponges: Applied for stippling, layering, or splattering blood products on the skin or prosthetics.
- Texturing tools: Used for shaping and defining wounds, cuts and scars in latex or silicone materials.
- Pigment brushes: Used for applying and blending colors to create bruises, burns and other injury effects.
Regular cleaning after each use is essential, as dried blood products or gelatin can damage these tools and affect their precision over time.
Related Article – How to Create Realistic Wounds and Scars with Prosthetics?
8. Safety and Hygiene Tools
Every professional SFX artist knows that maintaining proper hygiene and safety is just as important as creativity. A well-prepared kit should include gloves to shield the skin from chemicals, along with face masks and goggles when working with airbrushes or powders.
Disinfectants and brush cleaners help keep tools sanitary, while barrier sprays and creams protect the actor’s skin during applications. Clean and well-maintained tools not only ensure comfort and professionalism but also prevent cross-contamination and allergic reactions on set.
9. Digital Tools for Design and Previsualization
In today’s special effects makeup industry, digital design has become an essential part of the creative process. Software like ZBrush and Photoshop allows artists to plan their looks in detail, test color combinations and visualize how prosthetics will appear before any physical application begins.
These digital tools also support 3D modeling and prosthetic printing, saving valuable time during preproduction.
Training and Skill Development for SFX Makeup Artists
Owning a full set of tools is only valuable when paired with proper training. Learning how to use each tool safely and effectively is essential for achieving professional-quality results. At Cinema Makeup School, students gain hands-on experience with a wide range of special effects makeup tools and materials used in the industry.
Our courses focus on both the artistic and technical aspects of SFX makeup, helping aspiring artists develop the confidence and skills needed to work in film, television and entertainment.
Take a tour of our school to start your journey in special effects makeup.
How to Build and Organize Your SFX Makeup Kit?
Having the right tools is only one part of being prepared, the other is knowing how to organize them for efficiency. A well-arranged kit helps artists work faster, stay clean and remain professional on set. It’s a good idea to separate tools by their use: sculpting and molding materials in one section, painting and airbrushing tools in another and hygiene items in a dedicated compartment.
Keep liquids and adhesives in sealed containers to prevent spills and restock consumables such as wipes, gloves and cotton swabs regularly. Cleaning and disinfecting your tools after every project also extend their lifespan and ensure they’re safe for reuse. A structured, well-maintained kit not only improves workflow but also reflects your professionalism in front of clients or production teams.
Enroll now or book a tour to start your journey on becoming a special effects makeup expert with Cinema Makeup School in Los Angeles, CA!
Working with materials like latex, silicone and prosthetics is a major part of professional special effects makeup. These materials allow artists to transform faces, build realistic textures and design characters that go beyond imagination. However, as creative as the process may be, it also involves chemicals, adhesives and skin contact, so safety is essential.
Whether you’re a student, a beginner experimenting with effects, or a professional makeup artist, understanding safe handling practices protects not just your model or actor but also your own health. This guide breaks down everything you need to know about working safely with latex, silicone and prosthetics in SFX makeup.
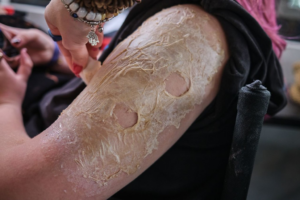
Ways to Safely Work with Latex, Silicone and Prosthetics
Working with materials like latex, silicone and prosthetics requires both creativity and caution. These substances can bring characters to life, but they can also cause serious issues if used incorrectly – rashes, poor adhesion, or even ruined prosthetics. Whether you’re crafting wounds, aging effects, or creature designs, understanding how to handle these materials safely is essential for every SFX makeup artist. Below are the best practices to keep both your clients and your creations in top condition.
1. Understanding the Materials
Before you start using any material on skin, it’s important to understand what each one is made of and how it reacts.
Latex: Liquid latex is one of the most common SFX materials. It’s flexible, affordable and used for creating skin textures, scars, wounds and old-age effects. However, latex is also a known allergen. Many people have mild to severe allergic reactions to it, ranging from itching and redness to more serious irritation.
Silicone: Silicone is known for its skin-like feel and flexibility. It’s often used for creating prosthetic appliances that look natural on camera. Unlike latex, silicone is hypoallergenic, but it requires special adhesives and sealers. Some of these products may contain strong chemicals or solvents, which can irritate if used incorrectly.
Enroll now or book a tour to start your journey on becoming a special effects makeup expert with Cinema Makeup School in Los Angeles, CA!
Also read Foam Latex vs Silicone: Choosing the Right Material for SFX Prosthetics
2. Preparing the Skin and Workspace
A clean and organized environment is essential for both professional results and safety.
- Clean the Work Area
Before starting, disinfect your workstation. Remove clutter, clean surfaces and make sure tools like brushes, spatulas and sponges are sanitized. Keep tissues, cotton swabs and wipes nearby for quick cleanup.
- Ensure Proper Ventilation
When working with liquid latex, silicone mixtures, or solvents, fumes can build up quickly. Always work in a well-ventilated room. Use a fan or an exhaust system if possible.
- Prep the Skin Properly
Proper skin preparation is essential for achieving strong adhesion and maintaining comfort throughout wear. Always begin by cleaning the skin thoroughly with a gentle cleanser to remove oils, dirt, or makeup residue. This ensures that adhesives bond correctly and the prosthetic stays in place.
Avoid applying moisturizers beforehand, as they can create a slippery surface that weakens adhesion. For long-duration applications, consider using a barrier spray or cream to form a protective layer between the skin and products, helping to minimize irritation and make removal easier later on.
- Conduct an Allergy Test
Never skip the patch test – especially when working with new materials or new models. It’s better to delay an application than to risk a reaction during the shoot.
3. Safe Techniques for Working with Latex
Liquid latex can create some of the most impressive effects in makeup, but it must be handled carefully.
Avoid applying near the eyes or mouth. Latex can pull delicate skin and cause irritation.
Protect hair and eyebrows. Coat hair with petroleum jelly or block with a bald cap before applying latex near those areas.
Apply in thin layers. Thinner coats dry faster and are easier to remove.
Let it dry completely. Applying new layers before the previous one dries can trap heat and moisture, leading to discomfort or skin irritation.
Do not use heat guns on skin. While latex can be heat-dried off skin, never use direct heat to accelerate drying on a person’s face or body.
Removal: Peel the latex gently from the edges using your fingers or a soft tool. Use warm water and mild soap to remove residue. Apply moisturizer afterward to soothe the skin.

Enroll now or book a tour to start your journey on becoming a special effects makeup expert with Cinema Makeup School in Los Angeles, CA!
4. Safe Techniques for Working with Silicone
Silicone provides more durability and realism but comes with its own handling considerations.
Mix components accurately. Most silicone products have two parts that need to be mixed at precise ratios. Incorrect mixing can result in incomplete curing or sticky finishes.
Wear gloves. Some uncured silicones contain chemicals that can irritate the skin.
Use proper adhesives. Use medical-grade silicone adhesives instead of general-purpose glues.
Seal edges carefully. After application, use a suitable blending agent to ensure edges don’t lift or irritate the skin.
Avoid solvents on the skin. Many silicone thinners or removers are not skin-safe. Always check product labels.
Removal: Use a remover specifically designed for silicone adhesives. Work slowly from the edges inward, never pulling aggressively. After removal, clean the skin gently with an oil-free cleanser.
5. Applying and Removing Prosthetics Safely
Prosthetic applications can range from small wounds to full-face appliances. The process requires patience and awareness of the skin’s tolerance.
Steps to Apply Prosthetics:
- Test Fit: Always place the prosthetic on the skin without glue first to make sure it aligns properly and fits comfortably before applying adhesives.
- Apply Adhesive Carefully: Use a thin, even coat of adhesive on both the prosthetic and the skin. Let it become tacky before pressing the pieces together.
- Blend Edges: Use a stipple sponge or brush to blend edges with liquid latex or prosthetic adhesive for seamless integration.
- Paint and Powder: Once attached, apply paints and powders that are safe for both the prosthetic material and skin.
Prosthetics Removal Steps:
- Use the Correct Remover: Always match the remover to the adhesive type. Using the wrong one can damage skin or the appliance.
- Work Slowly: Start at the outer edges and gently lift. Apply remover as you go to dissolve adhesive.
- Avoid Pulling: Never pull or tear the prosthetic off.
- Clean the Skin: Wash the area with a mild cleanser and apply a soothing moisturizer.
Pro Tip: If the prosthetic will be reused, clean and store it properly according to material type.
6. Hygiene and Material Handling
Hygiene in SFX makeup is more than just cleanliness – it’s a mark of professionalism and care for your clients’ safety. Always use clean brushes, sponges and tools to avoid contamination. Never double-dip into adhesives or shared products and make sure to dispose of single-use items like cotton swabs and sponges after each session.
Keep your adhesives, sealers and removers in clearly labeled containers and store all materials in cool, dry places away from direct sunlight to preserve their quality.
When it comes to personal protection, always wear gloves when handling uncured materials and consider using a mask when mixing powders, resins, or anything that may release fine particles. Protect your eyes from potential splashes when pouring or mixing chemicals. Maintaining strict hygiene and safe handling practices ensures both your clients’ safety and the longevity of your SFX materials.
7. Aftercare for the Skin and Prosthetics
Once the shoot or performance is over, proper aftercare ensures comfort and safety.
Skin Care: After removing all materials, cleanse the skin gently. Avoid alcohol-based toners, as they can dry or irritate skin post-removal. Follow with a hydrating moisturizer or aloe-based gel to restore the skin barrier.
Prosthetic Care: If the prosthetic is reusable, clean it with a mild soap solution or specialized cleaner. Let it air-dry completely before storing it in a cool, dark place. Label and store it flat to avoid deformation.
Common Mistakes to Avoid While Working With Latex & Silicone
- Skipping allergy tests – It might seem unnecessary, but skipping this step can cause unexpected skin irritation later.
- Using the wrong adhesive or remover – The wrong choice can harm both the skin and your carefully built prosthetic.
- Ignoring ventilation – Poor airflow means more exposure to fumes, which can affect your health and focus.
- Applying too much product – Overloading material adds weight and makes the prosthetic uncomfortable to wear.
- Not reading product labels – Each formula behaves differently; knowing your materials helps you avoid unpleasant surprises.
Join SFX Makeup Training Courses to Avoid These Mistakes
In special effects makeup, even the smallest mistake can cost you hours of work, or worse, damage a prosthetic or cause a skin reaction. That’s why learning the right techniques before applying them on a model or actor is important.
At Cinema Makeup School, students gain the skills and confidence to handle latex, silicone materials safely and effectively. You’ll receive hands-on training in prosthetic makeup, all within an environment that mirrors real production sets.
Our instructors are experienced professionals from film, TV and commercial projects, teaching you how to balance creativity with precision and safety.
Related Articles –
SFX Makeup Kit Checklist for Beginners
Advanced SFX Makeup Techniques Every Artist Should Master
Online vs In-Person SFX Makeup Course
Pro tip: Explore our official YouTube channel to see student projects, behind-the-scenes tutorials and expert tips that show real SFX techniques in action.
Enroll now or book a tour and take a step ahead in your journey to become an SFX makeup artist.