When it comes to creature design, some of the most memorable monsters, aliens and fantasy beings don’t just appear out of thin air – they’re the product of artistic imagination, rooted in a strong understanding of concept art and color theory. Whether you’re sketching your first design or refining details for the big screen, mastering these foundations can turn an average drawing into a fully realized creature that feels alive.
In this blog, we’ll break down how concept and color theory can transform your creative process, provide practical creature design ideas and explain why anatomy and visual storytelling are essential for designing creatures that stand the test of time.
Why Concept and Color Theory Matter in Creature Design?
Think about your favorite movie monster or video game beast. Chances are, the design wasn’t random. Every horn, scale and skin tone was carefully chosen to support the character’s story, environment and emotional impact.
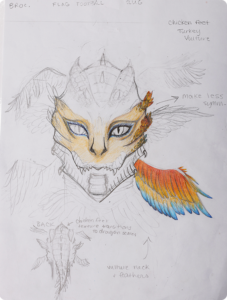
- Concept Art as the Blueprint – Concept art is where the creature first takes shape. It’s the stage where artists test anatomy, posture and exaggerated features to communicate personality. Without strong concept work, your design risks looking flat or generic.
- Color Theory as Emotional Language – Colors shape how audiences feel about your creature. Red might suggest danger or aggression, while muted blues and greys can make a monster look ancient or mysterious. By controlling color choices, you control how your creature communicates before it even moves.
Together, these two pillars form the science of creature design, allowing artists to create believable hybrids of imagination and biology.
Enroll now or book a tour to start your journey on becoming a special effects makeup expert!
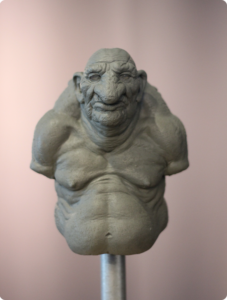
Science of Creature Design: Understanding Animal Anatomy
Before diving into color palettes and mood boards, creature designers often start with real-world references. Anatomy plays a crucial role because, even when you’re inventing something fantastical, the audience must believe the creature could exist.
Animal Hybrids: Many iconic monsters borrow anatomy from multiple species. A dragon, for example, may combine the wings of a bat, the scales of a reptile and the muscular build of a lion.
Functionality Matters: Adding extra limbs or jaws might look interesting on paper, but asking “how would this creature walk, breathe, or eat?” keeps the design grounded.
Dynamic Posing: Studying how animals move in the wild can help you sketch natural, powerful stances that bring your creature to life.
For those new to the process, many artists rely on a creature design book or visual anatomy guides to practice breaking down real-world forms before blending them into something new.
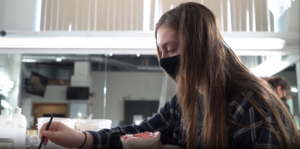
Take a behind-the-scenes look at how our students bring creatures to life:
Enroll now or book a tour to start your journey on becoming a special effects makeup expert!
Level Up Your Creature Design Skills with Cinema Makeup School
Now that we have learned why concept, color theory and anatomy matter for designing creatures. But where do you master these skills from? Cinema Makeup School is your go-to.
Located in Los Angeles, California, USA, we offer special effects makeup courses in different niches like prosthetic design, character design, creature design and more. The topic we are focusing on here is designing creatures through Concept and Color Theory.
This one-week, 35-hour intensive program dives deep into the foundations of creature creation. You’ll start by mastering the core principles of anatomy and color theory, then move into sketching expressions, adding monstrous details, experimenting with custom palettes and practicing painting methods that bring your designs to life.
The best part? No prerequisites are required. Whether you’re a complete beginner with a passion for creatures or an advanced student looking to refine your craft, this course is open to all.
Course Fee: $1,000 total ($850 tuition + $150 materials).
Location: Cinema Makeup School, Los Angeles, California.
Skills You Will Learn in Our Concept & Color Course:
By the end of the training, you’ll have a clear understanding of how to transform raw ideas into fully developed, visually striking creatures. Key skills include:
1. You’ll Learn Anatomy and Structure for Creature Design
You will learn to build a believable base by understanding skeletal and muscular forms, even when creating fantastical beings.
2. Master Color Theory for Storytelling
Once the anatomy and structure of your creature are established, color becomes the most powerful storytelling tool in your design arsenal. Audiences respond to color on a subconscious level and the right palette can instantly communicate danger, mystery, beauty, or otherworldliness without a single word spoken.
- Hue & Emotion: Warm hues, like reds, oranges and yellows, instantly suggest energy, danger and vitality. Think of fiery demons or molten monsters that radiate heat. On the other hand, cool hues – blues, greens and purples – evoke calm, mystery, or an unsettling chill, perfect for designing deep-sea predators or spectral beings.
- Value & Contrast: A creature’s lightness or darkness affects how audiences perceive it. A dark, low-contrast palette makes a beast feel stealthy and predatory, lurking in the shadows. Meanwhile, a bright, high-contrast scheme can create a bold, striking figure where focal points – like glowing eyes, bioluminescent markings, or razor-sharp claws – pop dramatically on screen.
- Environment-Based Palettes: Successful creature designs often reflect their habitat. A desert predator may blend with sandy browns and ochres, while a swamp dweller thrives in murky greens and earthy tones.
For aquatic or alien beings, shimmering iridescent blues, silvers, or greens tie them visually to water or otherworldly atmospheres. By connecting palette to environment, you add a layer of believability that grounds even the most fantastical creations.
- Symbolism in Color: Different shades carry cultural and psychological meaning. Red often signals blood, rage, or primal aggression. Green can represent toxicity, decay, or alien biology. Black is the language of death, power, or evil. Using symbolic cues not only makes your creature visually striking but also taps into deep-rooted audience associations.
When you master these relationships, you’re not just “painting a monster”- you’re building emotional impact through color. A creature’s palette can make audiences recoil in fear, marvel at its beauty, or feel uneasy without ever fully knowing why. That’s the silent power of color theory in creature design.
3. Concept Art Detailing and Development
This stage focuses on capturing a wide range of expressions, manipulating proportions to achieve exaggerated or realistic forms and integrating distinct features, such as bone ridges, fangs, or scales, into final concept designs.
4. Boost Your Skills in Paint Application
Here, the emphasis is on bringing sketches and models to life with color. You’ll practice layering paint to build depth, blending tones for smooth transitions and mixing custom shades that mimic lifelike skin, scales, or fantasy textures. The result is artwork that feels three-dimensional and production-ready.
Worth Reading These Blogs:
What Kind of Clay Is Best for SFX Sculpting?
How Much Do Special Effects Makeup Artists Make? A 2025 Insight
Online vs In-Person SFX Makeup Course
Creature Design Ideas You Can Experiment With
When ideas don’t come easily, exploring themed approaches can help unlock your creativity. Here are a few directions worth trying:
- Elemental Beings
Imagine a creature born of fire, water, earth, or air. A fire entity might have molten cracks glowing beneath its skin, while an ice creature could appear crystalline, with shards jutting out like armor. - Flora-Fauna Hybrids
Combine plant life with animal forms to produce unique silhouettes. Picture a wolf with moss growing along its back, or a stag whose antlers twist into flowering vines. - Otherworldly Aliens
Study the anatomy of insects or deep-sea creatures and push it into the unfamiliar. Translucent wings, oversized eyes, or segmented exoskeletons can give your designs a convincing alien quality. - Modern Mythology
Take a well-known folklore monster and reimagine it for today’s audience. A siren could have bioluminescent patterns for deep-sea camouflage, while a dragon might evolve scales that resemble modern body armor.
Start each concept by sketching loose shapes to explore silhouettes, then experiment with color variations. Over time, one version will emerge as the most compelling path forward.
Ready to bring your creative visions to life? Enroll now or book a tour and experience how we turn imagination into reality.
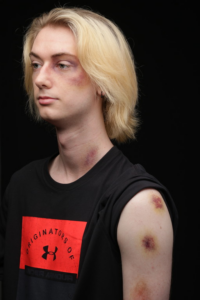
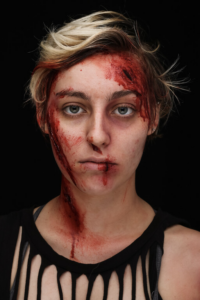
When you see an actor take a punch in a movie and walk away with a swollen, bruised eye, you’re witnessing the magic of SFX black eye makeup – not the result of a real hit. Special effects makeup artists are experts at crafting convincing injuries without risking anyone’s safety. A well-executed fake black eye can sell the drama of a fight scene, making the audience believe every blow.
In this guide, we’ll explore the artistry behind creating realistic bruises and black eyes, the techniques professionals use and how aspiring makeup artists can learn to master this essential skill.
Why Realistic Black Eye Makeup Matters in Film and TV
Fight scenes lose their impact if the injuries look fake. A poorly done bruise can distract viewers, while a realistic black eye makeup effect can heighten emotion, tension and authenticity. Makeup artists must consider not just the appearance of swelling and discoloration, but also how bruises evolve.
Black eyes aren’t static. They change in color and shape as they heal – something makeup artists must replicate depending on the scene. For example:
- Fresh black eye: Redness and swelling appear first.
- One day later: Purples and deep blues dominate.
- Healing phase: Greens, yellows and faded browns spread outward.
This progression is what makes the work of a skilled artist so convincing.
Enroll now or book a tour to start your journey on becoming a special effects makeup expert!
Step-by-Step Black Eye Makeup Tutorial for Fight Scenes
Creating a convincing fake black eye isn’t about randomly dabbing on purple shadow; it’s about understanding how trauma develops and heals. Professional makeup artists carefully layer colors and textures to mimic the life cycle of a bruise. Here’s how they do it on set:
Step 1: Prepping the Skin
Before any color goes on, the skin around the eye is cleansed and lightly moisturized. This helps the makeup blend seamlessly and stay intact under intense lighting.
Step 2: Building the Trauma Base
Every bruise starts with broken capillaries. Makeup Artists apply a sheer layer of red tones to mimic fresh irritation and swelling. This step lays down the base that every other layer will build upon.
Learn How to Create Realistic Wounds and Scars with Prosthetics?
Step 3: Adding Depth with Darker Colors
Purples, deep blues and touches of black are added next. These shades represent pooled blood under the skin. Instead of solid patches, artists stipple and feather the colors for that soft, uneven bruise edge audiences subconsciously recognize as “real.”
Enroll now or book a tour to start your journey on becoming a special effects makeup expert!
Step 4: Blending for Realism
Using stipple sponges and soft brushes, the colors are blended outward to create the illusion of blood spreading beneath the skin. This blending stage is what prevents the makeup from looking like face paint.
Get to know: What Do SFX Makeup Artists Use for Fake Blood?
Step 5: Staging the Bruise Timeline
This is where SFX artistry shines – the bruise changes depending on the timeline of the scene.
- Day 1 (Fresh Injury): Reds and purples dominate with visible swelling.
- Day 3 (Peak Bruise): Dark purples and blues deepen, with puffy, uneven edges.
- Day 5 (Healing): Faded yellow-greens start appearing at the bruise’s outer edges.
- Final Healing Stage: Browns and soft yellows take over as the bruise fades.
By carefully layering these evolving colors, makeup artists can seamlessly transition between scenes filmed days apart while maintaining consistent injuries.
Step 6: Finishing Touches
To sell the illusion, a dusting of translucent powder keeps everything locked in for hours. Additional contouring can suggest swelling or puffiness, while silicone appliances may be added under the eye in HD productions to replicate real tissue distortion.
Using Silicone Appliances for Added Realism
In high-definition filming, cameras capture every pore, wrinkle and fine detail, meaning a painted bruise alone may not be sufficient. That’s where silicone prosthetics come in. These thin, flexible prosthetics are custom-sculpted to fit the actor’s facial contours and can mimic the subtle bulge of swelling beneath the eye. When adding silicone appliances under the eye, SFX makeup artists gain several advantages that elevate the illusion from good to truly cinematic:
- Silicone blends seamlessly with natural skin, helping avoid the flat, painted look that makeup alone can sometimes create.
- Unlike simple paint effects, silicone pieces are highly durable, allowing them to last through long shooting days, harsh lighting conditions and repeated takes without breaking down.
- They also flex with the actor’s natural expressions, ensuring the injury looks authentic and never stiff or artificial, even during squints, smiles, or subtle movements.
By combining painted layers of fake black eye makeup with the dimensional realism of silicone, SFX artists ensure the injury holds up under even the closest close-up shots.
Curious about the techniques and challenges behind legendary SFX work? Tune in to our latest episodes of Talking Shop: an SFX Podcast.
Black Eye Makeup for Stage vs. Film
Creating a fake black eye isn’t a one-size-fits-all process. The techniques used for theater are very different from those used for film and television.
On stage, bruises need to be bold and exaggerated, with stronger colors, larger strokes and dramatic contrasts that remain visible to audiences even from the back row.
In contrast, SFX makeup in film calls for a more subtle approach. Close-up cameras capture every detail, so artists rely on soft blending, layered tones and delicate shading to make the injury look believable under high-definition scrutiny.
Being able to adjust techniques depending on the medium is a core skill that professional SFX makeup programs emphasize, ensuring artists are prepared for both theatrical and on-screen demands.
Check Out: What is the Difference Between Movie and Stage Makeup?
Worth Noting: For students eager to master both theatrical and on-screen techniques, Cinema Makeup School is the ultimate destination for real-world SFX training. Our Special Effects Makeup Program goes beyond teaching how to create bruises, cuts and injuries – students learn how lighting, camera angles and an actor’s performance can completely change the way makeup reads on stage and on screen.
Through hands-on practice in bold, exaggerated theater effects as well as subtle, high-definition film techniques, graduates gain the versatility and confidence to thrive in any production environment.
Real-World Spotlight: Black Eye Makeup in Cinema
Think of Martin Scorsese’s Raging Bull, where Robert De Niro’s transformation into boxer Jake LaMotta remains one of cinema’s most striking examples of realistic fight aftermaths. The makeup team meticulously crafted every black eye, bruise and swollen feature to capture the brutality of life inside the ring.
Without those convincing injuries, the film’s raw emotional power and sense of authenticity would not have hit nearly as hard.
Curious what it feels like to study SFX makeup in Los Angeles, USA? Take a tour of our campus and see for yourself or apply now.
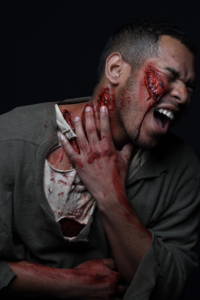
Special effects makeup can captivate audiences by creating moments that shock, excite, and leave lasting impressions on screen. Among the most jaw-dropping illusions is the slit throat makeup effect, a gruesome yet essential skill for SFX artists working in horror, thriller and action genres. Whether it’s a chilling slasher film or a realistic crime drama, the art of creating the illusion of a slashed throat with makeup is the mark of a true professional.
In this guide, we’ll dive deep into slit throat makeup techniques used by professional SFX artists, exploring everything from products and application methods to pro-level secrets that ensure your effect looks terrifyingly real on screen.
Why Slit Throat Makeup Is a Staple in SFX?
A slashed throat makeup effect is more than just gore; it’s storytelling. The illusion instantly raises tension and builds emotional impact. Filmmakers rely on skilled makeup artists to make these effects believable, especially in close-up shots.
Professional SFX artists master throat cut makeup:
- To enhance realism: The audience must believe the wound is authentic, even under HD cameras.
- To highlight technical artistry: A slit throat makeup look reveals an artist’s ability to sculpt wounds, merge prosthetics seamlessly, and paint realistic skin textures.
- To match character arcs: Injuries often define pivotal plot moments and emotional shifts.
Essential Materials for Slit Throat Makeup
Before attempting a realistic throat cut makeup look, artists need the right toolkit. Here are the essentials professionals swear by:
1) Liquid Latex or Silicone: For building realistic skin textures and prosthetic wounds.
2) Gelatin or Wax: Useful for sculpting quick wound effects.
3) Pre-Made Prosthetics: Silicone appliances shaped like slashed throats.
4) Fake Blood (Multiple Types): Thick blood for clotting, runny blood for fresh wounds and darker tones for dried blood.
Read on to learn the insider secrets SFX makeup artists use when making fake blood look real.
5) Grease Paints or Alcohol-Activated Palettes: For bruising, shading and depth.
6) Adhesives (Pros-Aide, Spirit Gum): To secure prosthetics in place.
7) Makeup Sponges & Brushes: For blending edges and applying layers.
Having high-quality materials ensures your makeup holds up on camera, under lighting and during long shooting hours.
Step-by-Step Guide to Creating Slit Throat Makeup
Creating a believable slit throat makeup effect takes more than just fake blood, it’s a process that blends technique, materials and artistry. Professional SFX artists follow a series of careful steps, from prepping the skin and sculpting the wound to coloring, adding blood effects and finishing with final details.
Enroll now or book a tour to start your journey on becoming a special effects makeup expert!
Below is a complete step-by-step guide that walks you through how these realistic slashed throat illusions are built from start to finish.
Step 1: Start with prepping the Skin
Clean the skin around the neck to remove oils and dirt. Apply a barrier spray if the actor has sensitive skin, ensuring that latex or adhesives won’t irritate.
Step 2: Mapping the Wound
Decide the placement and direction of the cut. Will it be a shallow scratch or a deep slash? Outline the cut gently with a makeup pencil to mark where the effect will be built.
Step 3: Building the Base
Apply liquid latex, wax, or silicone to the area, depending on the effect you want to achieve. Liquid latex works well for flexible, layered wounds on a budget, while wax is useful for sculpting shallow cuts or creating quick effects.
For hyper-realistic results that can withstand hot lights and long shooting hours, professional SFX artists often prefer silicone. No matter which material is chosen, layering is key and building texture ensures the slit looks dimensional rather than flat.
Step 4: Sculpting the Slash
With a spatula or sculpting tool, carve a slit into the latex, wax, or silicone base. Widen the wound slightly to mimic torn skin. For more advanced setups, pre-made silicone prosthetics can be applied for a dramatic and durable gash.
Step 5: Coloring for Realism
This is the point where real creativity shows. To create depth, professional artists apply deep reds and blacks inside the wound, mimicking the look of torn tissue and dried blood.
Around the edges, purples, greens and yellows are layered to replicate the bruising and trauma that naturally accompany such an injury. Finally, the wound is blended with the skin so it looks natural and becomes part of the actor’s real skin.
Step 6: Adding Blood Effects
A slit throat effect only looks convincing when the blood appears realistic. Artists rely on a mix of blood types to capture different stages of injury. Thin fake blood is applied so it trickles down the neck, amplifying the realism of a fresh injury.
Thick, clotted blood is packed inside the gash to build texture and depth, while darker, drying blood is layered around the edges to suggest an older or partially healed injury. By combining these variations, the effect achieves the perfect balance of freshness, detail and authenticity.
Step 7: Final Touches
Blend the edges with a sponge, then check how it looks under different lights and camera angles. For live performances, add extra sealing sprays to prevent smudging.
Where Do You Master These Techniques From?
A short answer is: Learn from a well-known, results-driven special effects makeup school. That’s exactly what Cinema Makeup School is all about. We don’t just say this, our graduates do and you can check out their reviews yourself!
Let’s be clear, you want to learn special effects makeup skills that can open doors to a well-paying career and recognition in the industry, right? Got it! Now, head over to our website to see what we offer and how you’ll learn directly from industry professionals.
You can also explore our YouTube channel to see tutorials and learn how professionals create these effects.
More Helpful Guides:
How Much Do Special Effects Makeup Artists Make? A 2025 Insight
SFX Burn Makeup Techniques Every Artist Should Know
How to Make a Face Cast That Fits Perfectly for Prosthetic Makeup?
Safety Considerations When Creating Slit Throat Makeup
When applying slashed throat makeup, safety must always come first:
- Use skin-safe adhesives to prevent allergic reactions.
- Test fake blood for staining and sensitivity.
- Avoid restricting the throat area to ensure the actor can breathe and move comfortably.
- Communicate with performers – check in during long shoots to make sure they’re comfortable.
Schedule a tour of our SFX makeup school campus in Los Angeles, California or apply now and start your journey today.
If you’re passionate about the art of transformation, character creation and the magic of movies, special effects (SFX) makeup could be the career path for you. However, before diving into prosthetics, latex and creature design, it’s crucial to understand what SFX makeup school costs entail and how to plan for them.
Whether you’re considering a diploma in SFX makeup, a certificate course, or short workshops, understanding the expenses and how to manage them is the first step in launching your career.
Why Join Special Effects Makeup School?
Becoming a professional SFX makeup artist goes beyond DIY YouTube tutorials. Professional schools for SFX makeup offer structured, hands-on training from experienced artists and educators. You’ll learn how to sculpt prosthetics, design creatures, simulate wounds and master airbrush techniques – all skills that are in high demand in film, TV, theatre and game development.
Attending a top SFX makeup school gives you:
- Industry-recognized diplomas or certificates
- Access to specialized materials and tools
- Guidance from the best SFX makeup instructors
- Portfolio development
- Career placement support
At Cinema Makeup School, we offer professional SFX makeup education through three distinct categories:
1) Diploma Programs – full-length, career-focused training
2) Certificate Courses – short-term skill-specific learning
3) Workshops & Summer Camps – hands-on creative experiences for beginners and enthusiasts
Each of these comes with its own cost structure based on program length, materials and specialization. Let’s take a closer look at the tuition fees, what’s included and how each program offers value for your investment in a career in special effects makeup.
Enroll now or book a tour to start your journey on becoming a special effects makeup expert!
(All prices marked with * are subject to change.)
1. Diploma Programs
Diploma tracks are comprehensive special effects makeup programs combining multiple areas of makeup artistry. These tracks are best suited for beginners who want to develop a well-rounded portfolio or for experienced artists looking to expand into special effects.
Here’s a breakdown of some of the top diploma programs in SFX makeup:
A. Complete Track Diploma
- Duration: 28 Weeks
- Clock Hours: 1,030
- Total Cost: $31,020*
Best for: Students who want a complete education in beauty, fashion, character and creature design. The Complete Track includes advanced and concept courses in special effects, airbrush makeup, ZBrush, digital FX and more.
B. FX Track Diploma
- Duration: 25 Weeks
- Clock Hours: 910
- Total Cost: $27,640*
Best for: Aspiring SFX artists who want a streamlined, focused program covering prosthetics, creature sculpting, digital FX and core makeup techniques.
C. Master Makeup Program
- Duration: 18 Weeks
- Clock Hours: 630
- Total Cost: $17,340*
Best for: Those looking for a mid-length intensive course covering all essential beauty and SFX skills, without as many advanced extras.
2. Certificate Courses
Certificate programs are shorter (usually 3–4 weeks) and focus on specialized areas. These are ideal for professionals upgrading their skills or students who want to explore a specific niche in SFX makeup.
A. Character Makeup Certificate
- Duration: 4 Weeks
- Total Cost: $5,090*
Master techniques like ageing, facial hair application, bald caps and theatrical looks used in stage and screen performances.
B. Prosthetic Makeup Certificate
- Duration: 4 Weeks
- Total Cost: $5,510*
Get hands-on with sculpting, molding and applying prosthetics using foam latex and silicone materials.
C. Special Effects Makeup Certificate
- Duration: 4 Weeks
- Total Cost: $5,410*
Learn to create realistic injuries, wounds and special effects that bring horror and sci-fi scenes to life.

Enroll now or book a tour to start your journey on becoming a special effects makeup expert!
D. Advanced Lab Techniques
- Duration: 4 Weeks
- Total Cost: $7,300*
Dive deep into complex lab work, including multi-piece molds, encapsulated silicone and professional-grade prosthetic creation.
E. Advanced Beauty Theory
- Duration: 3 Weeks
- Total Cost: $3,310*
Enhance your beauty skills with editorial and HD makeup techniques, focusing on lighting, skin tone and high-fashion looks.
3. Workshop & Bootcamp Costs
Workshops and bootcamps offer flexible, short-term learning opportunities for students looking to upgrade their skills quickly or explore new specialities before committing to a full diploma track.
A. Workshops
Workshops are typically one-week intensive classes, often included as part of a diploma or certificate program – though many students choose to take them individually to sharpen their skills in specific areas of interest.
Popular Workshops and Their Costs:
- Airbrush Makeup Techniques – $3,000*
- Photographic Hairstyling – $6,432*
- ZBrush (3D Digital Sculpting) – $1,000*
- Creature Maquette Sculpting – $1,000*
- Concept & Color Theory – $1,000*
- Digital FX (Photoshop-based) – $1,000*
B. Bootcamps
Bootcamps are fast-paced, intensive courses designed for maximum impact in minimal time. These are excellent for students who need to quickly develop job-ready skills for upcoming projects or industry opportunities.
While exact pricing for bootcamps may vary depending on the topic and duration, they are generally more affordable and time-efficient without compromising on hands-on training.
Check out our YouTube channel to get a glimpse of special effects makeup creations by our students.
How to Afford Your SFX Makeup School Education?
Wondering how to pay for your dream program at Cinema Makeup School? Here are some smart, proven ways students cover their tuition:
1. Scholarships & Grants
Some students qualify for merit-based or need-based aid. Check with our admissions team to see what’s available and apply early!
2. Flexible Payment Plans
We offer in-house payment plans that break your total cost into manageable monthly payments, with zero prepayment penalty. You’ll need an initial down payment and repayment periods range from 3 to 36 months.
3. Private Education Loans
If you’re exploring loans, look into options from trusted financing providers like Eve Financing and Paramount Capital Group. These allow you to apply instantly, access low-cost plans and pay as you go.
4. Part-Time Work or Freelance Gigs
Many students freelance as makeup artists or stylists during their education, building income and experience side by side.
5. Crowdfunding & Social Media
Don’t underestimate the power of your community. Use platforms like GoFundMe or share your journey on TikTok and Instagram. Passionate stories often attract real support.
Get more info on financing options available at Cinema Makeup School.
Choosing the Right Track Based on Your Goals
| Goal | Suggested Track | Duration | Cost |
| Become a full-time SFX artist | Complete Track | 28 weeks | $31,020* |
| Specializes in special effects makeup only | FX Track | 25 weeks | $27,640* |
| Learn core makeup skills + SFX effects | Master Makeup Track | 18 weeks | $17,340* |
| Get targeted training | Certificate Courses | 3–4 weeks | ~$5,000* |
| Refine a specific technique | Workshops | 1 week | ~$1,000* |
Book a tour now of our SFX Makeup School, located in Los Angeles, USA or apply now and see what we offer.
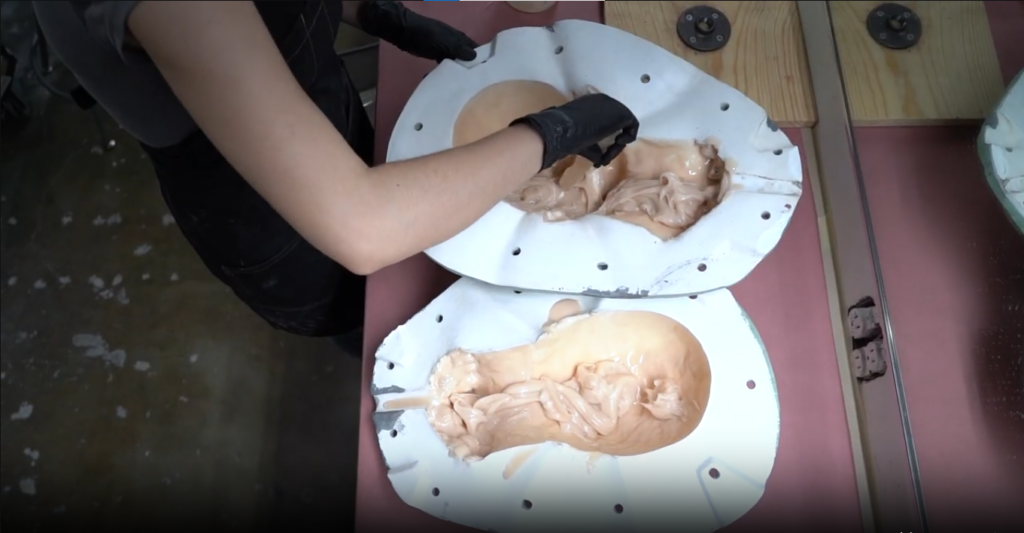
In special effects makeup, certain props have the power to leave audiences both mesmerized and unsettled. One of the most iconic examples is the silicone severed head – a prop that, when done well, is indistinguishable from reality. Whether it’s for a high-budget film, a gritty TV crime drama, or a hyper-realistic haunted attraction, crafting a photo-realistic silicone head requires a combination of artistry, technical skill and attention to detail.
In this guide, we’ll break down the process step-by-step, from initial life casting to final detailing, so you can create a severed head prop that holds up under the scrutiny of close-up cameras.
Why is Silicone the Preferred Material for Creating Realistic Props?
Before diving into the process, it’s important to understand why silicone is preferred for creating life-like props over other materials like latex or foam.
- Silicone’s translucency mimics human skin in a way that no other medium can.
- A silicone head can withstand heavy handling on set without tearing or losing shape.
- Specialized silicone paints allow for subtle, layered coloring that makes skin tones look natural.
- Silicone retains its shape but can also be manipulated for expressions or subtle posing.
For productions that require head severed props up-close and under HD lighting, silicone is the material of choice.
Related Article – Foam Latex vs Silicone: Choosing the Right Material for SFX Prosthetics
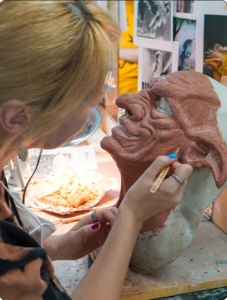
How to Create Silicone Severed Heads?
Creating a hyper-realistic silicone severed head involves careful planning, detailed sculpting and expert molding techniques to ensure lifelike texture, color and form. Let’s go through in depth details:
Step 1: Life Casting the Subject
To create a photo-realistic molded head, the process starts with making an exact life cast of the subject’s head and shoulders, capturing every contour, proportion and facial detail with precision. Using skin-safe alginate or platinum-cure silicone, the mold material is applied evenly over the subject’s face, ears and head, with hair or bald caps in place to protect hair and maintain clean edges.
Plaster bandages are then layered over the mold to create a rigid shell for stability during casting. If casting the full face, straws are positioned for breathing throughout the process. Once the molding material has fully set, the shell and mold are carefully removed, preserving an exact impression of the subject for the sculpting and casting stages that follow.
Pro Tip: If the severed head prop needs an open mouth or specific facial expression, sculpt adjustments can be made later in the clay stage.
Learn What Kind of Clay Is Best for SFX Sculpting?
Step 2: Sculpting and Refining the Mold
With the life cast in hand, the next step is refining it for silicone casting.
- Clean up imperfections: Remove bubbles, mold lines and any deformities.
- Add injury details: For a decapitated head prop, you’ll need to sculpt the neck wound. This can include ragged flesh, exposed vertebrae, or coagulated blood textures, depending on the production’s needs.
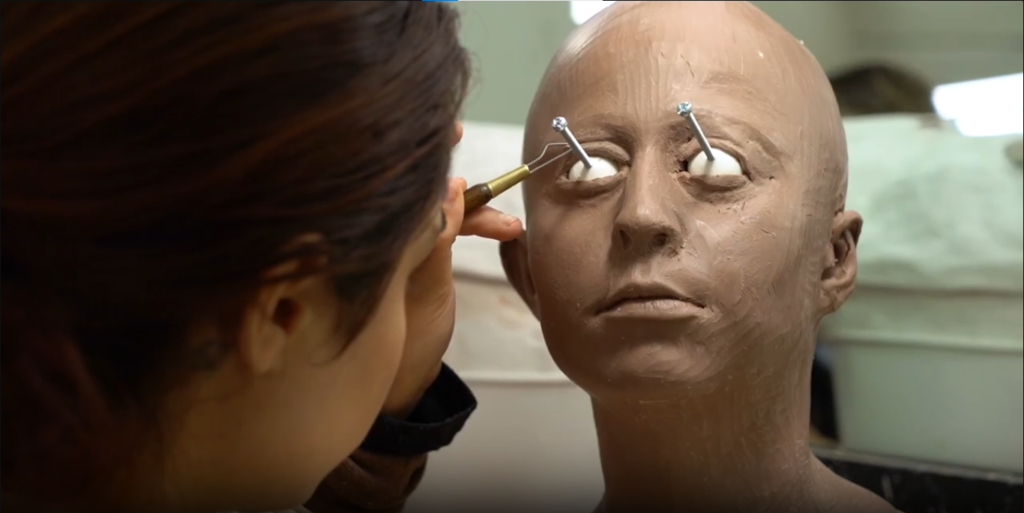
- Expression adjustments: Modify the position of the brows, lips, or eyes to convey the desired emotion.
Step 3: Creating the Production Mold
To cast in silicone, you’ll need a two-part epoxy or fiberglass mold of your sculpture.
Why Epoxy or Fiberglass?
- These materials hold fine details perfectly.
B. They are strong enough to withstand multiple castings.
C. They resist the heat generated by curing silicone.
Molding Steps:
The molding process begins by building a clay parting wall around the sculpt to define the separation between the mold halves. Once the wall is in place, mold release agents are applied to ensure that the materials don’t stick to the sculpt or each other.
Then, epoxy or fiberglass is carefully laid up to create the first half of the mold, ensuring full coverage and strength. After this half has cured, the process is repeated for the second half, resulting in a complete, durable mold ready for casting.
Tip: If you want to learn epoxy mold making, explore our beauty makeup course.
Step 4: Casting the Silicone Head
This is where the magic happens.
Choosing the Right Silicone:
- Use platinum-cure silicone for the most realistic skin translucency and durability.
- Consider gel-filled silicone for weight and softness closer to a real human head.
Casting Process:
- Mix silicone with pigment to create a base skin tone.
2. Brush a thin layer into the mold to capture detail.
3. Fill the rest using a slush casting or roto casting method.
4. Allow to cure fully before demolding.
Step 5: Seaming and Patching
After demolding, you’ll notice seam lines where the mold halves joined. Carefully trim away any flashing with a scalpel, then fill and smooth the seams using matching silicone mixed with a thixotropic agent.
Use silicone solvent to soften and blend the edges for a smooth finish. Fill in any air bubbles or casting flaws so the silicone head appears seamless and ready for even the closest camera angles.
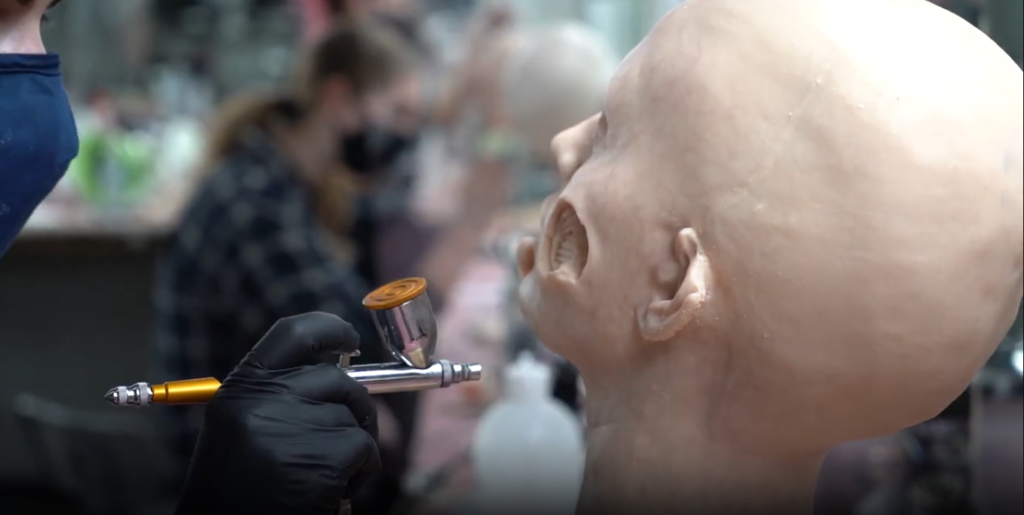
Step 6: Painting for Realism
Raw silicone may look like skin, but without paint, it won’t pass for real. Let’s explore various airbrushing and hand-painting methods to add lifelike color and dimension to your sculpture.
- Use silicone-based paints for maximum adhesion.
- Layer washes of reds, blues and yellows to mimic skin depth.
- Add freckles, veins and subtle blemishes for authenticity.
- Darken and bruise areas around the wound if making a head Halloween prop or horror effect.
Get to know: How to Create Realistic Wounds and Scars with Prosthetics?
Step 7: Adding Hair, Eyes and Teeth
These finishing details make the difference between a “good” and a “jaw-dropping” severed head prop.
Below are the key stages involved in the molding process:
1) Hair Punching: Insert strands of hair one at a time for a natural hairline. Synthetic or real human hair can be used.
2) Eyes: Install acrylic or glass eyes, matching the iris color to the subject.
3) Teeth: Denture-grade acrylic teeth or cast replicas can be placed if the mouth is open.
Enroll now or book a tour to start your journey on becoming a special effects makeup expert!
Step 8: Wound Detailing and Gore Effects
For horror and crime scenes, the neck wound often becomes the central point of attention, so start by building up realistic tissue using tinted silicone gel. To enhance the effect, create depth with darker reds and purples for fresh wounds, while incorporating browns and blacks to suggest older injuries.
Finish the look by applying coagulated blood gel for a wet, glossy texture that catches the light. This combination of layers and color variation ensures your decapitated head prop doesn’t just look real, it provokes the exact shock and unease you’re aiming for.
Curious about how these techniques come to life in a professional setting? Watch this behind-the-scenes video from our high-fashion makeup program to see students bringing creativity and precision together on set and imagine what you could accomplish with the right training.
Step 9: Caring for Your Severed Head Prop
Once your silicone severed head prop is complete, you’ll want to make sure it lasts for many projects to come. While silicone is tough and resistant to damage, neglect or poor storage can still shorten its lifespan. By following a few simple care steps, you can keep your prop looking as realistic and pristine as the day you made it.
- Store in a cool, dust-free environment.
- Wrap in soft cloth during transport to avoid surface scratches.
- Clean with isopropyl alcohol and a soft brush if needed.
Important Note: If you want to take your skills to the next level, learning directly from industry experts can help you refine your craft and push the limits of what’s possible in special effects makeup. Cinema Makeup School stands out as one of the top SFX makeup schools in Los Angeles, USA. We invite you to Enroll now or book a tour and take the first step toward becoming a professional SFX makeup artist.
Mastering the art of making a realistic silicone severed head is about combining creativity, precision and the right techniques to achieve a prop that captivates and convinces. From sculpting and molding to painting and finishing, each stage plays a vital role in bringing your vision to life.
With practice, patience and attention to detail, you can craft professional-quality severed head props that stand out in films, haunted attractions, or even personal collections.
In the glamorous realm of fashion and beauty, every strand of hair matters. From the voluminous waves seen in luxury campaigns to the edgy, sculpted looks gracing high fashion runways, the right hairstyle can define an entire photoshoot. While makeup may take the spotlight, hairstyling often completes the vision.
For those aiming to break into fashion, editorial, or on-set beauty work, mastering photoshoot hairstyles is no longer optional – it’s essential. That’s why learning professional hairstyling techniques is a smart move for anyone serious about making an impact in fashion and editorial shoots.
A Photographic Hairstyling Course can give you the skills to create camera-ready looks that meet the high standards of editorial photoshoots, high fashion campaigns and beauty brand lookbooks, where artists who can handle both makeup and hair are highly sought after. Let’s dive deeper into the techniques and career advantages this course offers.

Why Hairstyling Matters in Editorial & Fashion Shoots?
In editorial and fashion shoots, every visual element works together to tell a story and hair plays a leading role in that narrative. A flawless hairstyle doesn’t just complement the makeup; it sets the tone, mood and personality of the entire image. Whether it’s a sleek chignon for a minimalist beauty spread or a wild, textured mane for an avant-garde feature, hair styling helps define the artistic direction of the shoot.
Editorial photoshoots demand looks that are designed specifically for the camera. Hairstyles must withstand the heat of studio lights, maintain their shape for hours of shooting and photograph beautifully from every angle. Even the smallest detail – like the way a curl catches the light – can influence the impact of the final image.
In high-fashion settings, hairstyling is often used as a dramatic focal point. Bold textures, exaggerated shapes and historical or futuristic inspirations are common. These styles not only enhance the model’s look but also elevate the designer’s vision, making the hair an integral part of the overall creative statement.
Simply put, in editorial and fashion shoots, hair isn’t just an accessory; it’s a storytelling tool that can make the difference between a good photo and an unforgettable one.
That’s where Cinema Makeup School comes in. We’ve designed our Photographic Hairstyling Course to give aspiring beauty professionals the skills, techniques and confidence to create camera-ready looks that stand out in editorial and high-fashion photoshoots. Enroll now or book a tour to start your journey on becoming a special effects makeup expert!
Skills You’ll Learn to Create Stunning Hairstyles for Photoshoots
When it comes to creating hairstyles for photoshoots, there’s a big difference between everyday styling and editorial work. Editorial hairstyling is bold, structured and often avant-garde. It’s about telling a story through texture, shape and silhouette. Here’s what you’ll master in the course:
1. You’ll Begin by Learning Proper Sanitation and Professional Set Etiquette
This is a critical skill when working with models and clients. Clean tools and hygienic practices not only protect your clients but also demonstrate professionalism, which is crucial on any editorial set.
2. Master the Art of Hot Tools and Blowouts
Mastering hot tools is non-negotiable in fashion hairstyling. You’ll practice curling irons, straighteners and blow dryers to create styles that hold up through long shoot days and harsh lighting. You’ll also learn how to craft salon-quality blowouts that add volume and polish to any look.
3. Create Perfect Curls, Waves and Texture
From soft vintage curls to modern beach waves, you’ll learn the art of working with different textures and creating hairstyles that photograph beautifully from every angle.
4. Perfect Braids, Buns and Updos for Editorial Impact
Braids and updos are the foundation of many photoshoot hairstyles. From sleek high buns to messy editorial braids, you’ll learn how to structure, secure and style updos that can withstand movement and intense studio lighting.
5. Experiment with Historical and Avant-Garde Styling
One of the highlights of the course is diving into historical hairstyling – think victory rolls, bouffants and retro waves. You’ll also experiment with avant-garde styles that push the boundaries of creativity and are perfect for editorial makeup photoshoots.
6. Gain Expertise in Hair Anatomy and Styling Lift Techniques
Understanding the anatomy of hair, how it behaves, responds to products and holds shape is key to mastering photographic styling. You’ll learn how to tease, sculpt and set the hair for dramatic results on camera.
Photographic Hairstyling Course Overview:
Our Course is compact, practical and built for aspiring editorial and fashion artists who want to master essential skills quickly.
Duration & Schedule:
Length: 1 Week | Monday to Friday, 9:00 AM – 4:00 PM | 40 total clock hours
Cost Breakdown:
- Tuition: $850
- Lab Fee: $50
- Materials: $90
Total: $990 (includes all fees and materials)
Prerequisites: No prior hairstyling experience required – just bring your creativity and enthusiasm.
Important Note: If you want to expand your beauty skills alongside our Photographic Hairstyling Course, consider enrolling in our Special Effects Makeup Course. You’ll learn to create prosthetics, design creatures and characters, master airbrush makeup and explore 3D sculpting with software like ZBrush and more.
Related Articles:
How Cinema Makeup School’s Bootcamps and Workshops Empower You to Master SFX Makeup?
How Cinema Makeup School’s SFX Makeup Course Brings Seasonal Characters to Life?
Diploma vs Certificate in SFX Makeup Course: Which Path Should You Choose?
Who Should Learn These Photoshoot Hairstyling Techniques?
If you see yourself styling models for glossy magazine covers, working backstage at fashion week, or crafting bold beauty looks for high-end brand campaigns, this course is your gateway. It’s perfect for:
- Aspiring editorial and fashion makeup artists who want to expand their skill set and become versatile enough to handle both hair and makeup for shoots.
- Makeup artists who want to master hairstyling techniques that elevate their work in photoshoots and make them indispensable on set.
- Beginners with zero hairstyling experience who are ready to learn from the ground up in a focused, professional setting.
- Beauty school graduates aiming to specialize in fashion-forward and camera-ready hairstyling that stands out in editorial work.
- Freelance artists who want to attract more clients, command higher rates and deliver complete hair-and-makeup packages.
In editorial and fashion shoots, hair is far more than a finishing touch; it’s a creative force that shapes the entire visual story. Mastering photoshoot hairstyling means you can craft looks that are durable under studio lights, visually striking from every angle and aligned with the artistic vision of the shoot.
Ready to make your mark in fashion and editorial beauty? Take a tour of our campus, located in Los Angeles, USA.
Airbrush makeup has revolutionized the beauty and special effects makeup industry. With its ability to deliver flawless finishes, blend seamlessly and hold up under harsh conditions, it has become a go-to technique for professionals working in fashion, film, bridal and SFX.
But not all airbrush makeup formulas are created equal. Among the most commonly used types are water-based and alcohol-based airbrush makeup, each with its own distinct characteristics, strengths and use cases.
Whether you’re creating a glowing bridal look or crafting a rugged SFX character for film, knowing when and how to use each formulation is essential. This guide examines the differences between water-based and alcohol-based airbrush makeup, their ideal applications and key considerations when selecting between the two.
Having covered the basics of airbrush makeup, we can now explore how different formulas function within special effects.
Water-Based Airbrush Makeup
Water-based airbrush makeup is formulated using water as the main solvent, suspending pigments in a light, breathable liquid. In special effects makeup, this formula is especially useful for creating lightweight fantasy characters, face-painted creatures, or translucent alien skin textures where a softer finish is preferred over heavy opacity.
It dries down to a smooth, matte appearance and is excellent for high-definition filming, creature close-ups, or long application sessions where the actor’s comfort is key. Since it’s gentle on the skin, many SFX artists rely on it when working with performers who have sensitive or breakout-prone complexions. It’s also ideal for makeup applications on children or those with low tolerance to alcohol-based products.
Enroll now or book a tour to start your journey on becoming a special effects makeup expert!
Benefits of Water-Based Airbrush Makeup for SFX
- Water-based makeup feels breathable and light, making it ideal for layering subtle textures like light veining, aging effects, or translucent skin looks.
- It creates a soft, matte finish that looks realistic on camera, especially useful for HD film and character close-ups.
- The formula is comfortable to wear for long hours, which is helpful when working on set without prosthetics.
- It can be cleaned off quickly with just water or a gentle cleanser, making it easy to switch between looks during the day.
- Since it’s free from alcohol and harsh ingredients, it’s gentle enough for frequent use on sensitive or acne-prone skin.
- The minimal scent makes it a practical choice for enclosed workspaces like trailers or makeup rooms.
Cautions:
To get the best results from water-based airbrush makeup, it’s important to understand how and where it performs best. While the formula is breathable and gentle, it may need extra support, like setting sprays or sealers, when used in high-humidity conditions or during high-energy scenes.
Learn How to Create Creature Design Using Latex, Silicone & Prosthetics?
Alcohol-Based Airbrush Makeup
Alcohol-based airbrush makeup is a staple in special effects artistry, known for its extreme durability and ability to adhere to both skin and prosthetic materials. This formula is made with isopropyl alcohol as the primary solvent, allowing pigments to bond tightly to surfaces, making it ideal for demanding environments like film sets, live performances and outdoor shoots.
It’s commonly used in SFX work to create detailed character paints, waterproof injury simulations and realistic skin discoloration. Whether you’re painting over silicone prosthetics for a creature transformation or airbrushing trauma effects for a stunt scene, alcohol-based makeup ensures the results stay intact through long hours, sweat, water and physical movement.
Once applied, the makeup dries quickly and forms a smudge-resistant finish that requires little to no touch-up. It’s especially effective when covering large surface areas or blending prosthetics seamlessly into the skin.

Enroll now or book a tour to start your journey on becoming a special effects makeup expert!
Benefits of Alcohol-Based Airbrush Makeup
- This formula is long-lasting and waterproof, holding up against sweat, water, friction and heat – ideal for high-intensity or outdoor environments.
- It adheres effectively to silicone, latex and foam latex, making it highly reliable for prosthetic work, creature makeup and FX appliances.
- The high pigment load allows for detailed layering when creating tattoos, burns, bruises, veins, or complex fantasy skin tones.
- Once it dries, the makeup is smudge- and transfer-resistant, reducing the need for touch-ups during long production days.
- It dries quickly, helping artists stay efficient and meet tight timelines on busy sets.
- The finished look is camera-ready and highly professional, delivering results that stand up to 4K filming and theatrical lighting.
Cautions to Keep in Mind:
Because of its alcohol content, this formula can be drying or irritating on sensitive skin if not prepped properly. It’s recommended to apply a barrier spray or moisturizer before use, especially around delicate areas like the face and neck. Adequate ventilation is important during application, as the scent can be strong in enclosed spaces.
Get insights on: Foam Latex vs Silicone: Choosing the Right Material for SFX Prosthetics
Quick Comparison:
| Feature | Water-Based Airbrush Makeup | Alcohol-Based Airbrush Makeup |
| Base Solvent | Water | Isopropyl Alcohol |
| Best Use in | Face painting, fantasy creatures, age makeup, light veining | Prosthetic painting, trauma FX, tattoos, body art, waterproof work |
| Durability | Medium (can be sealed for longer wear) | Very High (12–24+ hours wear) |
| Waterproof | No (unless sealed) | Yes |
| Skin Comfort | Gentle, ideal for sensitive or acne-prone skin | Can be drying; requires skin prep |
| Prosthetic Compatibility | Limited (best on bare skin or foam latex) | Excellent on silicone, latex and foam appliances |
| Removal Process | Easy (soap and water or gentle cleanser) | Requires alcohol-based or specialized removers |
| Drying Time | Moderate (buildable layers) | Fast-drying |
| Odor | Low to none | Stronger alcohol scent; needs ventilation |
| Ideal Environments | Indoor sets, short-to-mid wear, comfort-focused work | Action scenes, stunts, humid conditions, underwater shoots |
Even with solid theoretical knowledge, applying airbrush makeup correctly can be challenging, especially when you’re trying to learn it all on your own. Instead of struggling with the DIY route, why not train with industry professionals?
At Cinema Makeup School, we offer dedicated airbrush makeup training as part of our Special Effects Makeup Course. You’ll gain hands-on experience learning how to apply both water-based and alcohol-based formulas with accuracy and confidence, just like our students do every day.
Enroll now or book a tour and take the first step toward becoming a professional SFX artist.
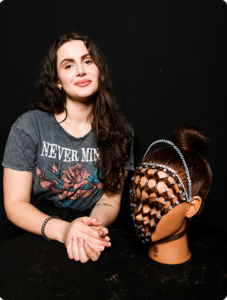
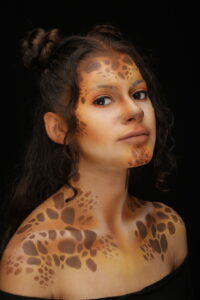
Have a look at airbrush makeup looks created by our talented students:
Frequently Asked Questions
Q 1: Which type is more beginner-friendly?
Water-based makeup is generally easier to work with for beginners due to its skin-friendliness and ease of removal.
Q 2: Do I need different airbrush guns for each type?
Not necessarily, but thorough cleaning is crucial between uses. Many professionals prefer separate airbrushes to avoid residue or reaction between formulas.
Q 3. Is there a difference between single-action and dual-action airbrush guns?
Yes. Single-action airbrushes release both air and makeup with one motion – simpler for beginners. Dual-action guns allow you to control air and pigment flow separately, offering more control and precision, which is preferred by SFX artists for detailed layering.
Q 4. How do you avoid overspray or uneven texture when airbrushing?
Technique and distance matter. Keep the airbrush 4–6 inches from the surface, use light passes and work in layers. Always test spray on paper or skin-safe surfaces first to check the flow. Proper PSI settings also help maintain a fine, even mist.
Enroll now or book a tour to start your journey on becoming a special effects makeup expert!
In film, television and live attractions, the realism of characters and creatures depends heavily on the artist’s skill in special effects makeup. For makeup artists ready to move beyond basic bruises and latex scars, mastering advanced SFX makeup techniques is essential.
Whether you’re designing a silicone severed head, building a lifelike replica of a face, or sculpting detailed prosthetic pieces, high-level artistry and technical ability are what separate amateurs from professionals.
In this blog, we’ll explore the must-know SFX makeup techniques that take your skills to the next level.
Why Makeup Artists Must Learn Advanced SFX Makeup Techniques?
Learning advanced SFX makeup techniques has become essential for makeup artists who want to stay competitive and meet the demands of high-end productions. As productions aim for more ambitious visuals and hyper-realistic characters, the demand for artists who can go beyond the basics is rapidly growing.
Let’s explore why advancing your special effects makeup skill set is critical for career growth in today’s makeup industry.
-
It Develops the Skills That Set You Apart From Basic-Level Artists
If you’re tired of sticking to basic wounds and latex scars, it’s time to level up. High-end productions need effects that hold up under studio lights and 4K close-ups. Mastering advanced special effects makeup techniques gets you there.
-
Studios Expect Lab-Ready Artists, Not Just Creativity
Studios, SFX labs and production houses expect more than raw talent; they need precision, consistency and experience with industry materials. That’s where advanced techniques prepare you to meet those high expectations.
Check out: Career Options for Special Effects Makeup Artists
-
To Build a Portfolio That Attracts High-End Productions
The jobs you want, on feature films, streaming hits and theme park projects – don’t go to beginners. They go to artists who can show serious skills in their portfolios. Advanced training gives you access to opportunities that beginner-level skills simply can’t unlock.
-
Advanced Training Unlocks Full Character Creation Freedom
Learning higher-level SFX makeup techniques gives you the ability to create full characters from start to finish. From sculpting and casting to painting and adding final details, you’ll be able to build everything yourself. You’re not just applying effects made by others, you’re creating them from the ground up.
See what our students have to say on their Final Day after completing the Advanced Lab Techniques program –
Enroll now or book a tour to start your journey on becoming a special effects makeup expert!
Course Breakdown: Advanced Special Effects Makeup Training
In the previous section, we explored why learning advanced SFX makeup techniques is so important for any serious artist. But now the big question is – how do you actually master these skills?
And that’s where the Cinema Makeup School’s Advanced Lab Techniques program makes all the difference.
This 4-week, 140-hour intensive course is built for artists who have completed the core training in Prosthetic Makeup and Special Effects Makeup, or those approved through a portfolio review.
Throughout the program, you’ll work on sculpting, casting and painting realistic prosthetic designs, like faces, heads and detailed character parts, that mirror the demands of high-end productions.
1. Learn Full-Head Life Casting
The process starts by creating a detailed replica of a model’s head using high-grade molding materials such as silicone. The resulting cast becomes the base for sculpting detailed character designs or prosthetic applications. It’s an essential step for creating custom-fit prosthetics and provides an accurate foundation for building lifelike busts or unique character builds that require precise anatomical structure.
2. Master Sculpting Facial Likeness
Once the cast is complete, artists sculpt directly onto it to recreate facial features, ranging from realistic human expressions to fantasy creatures and stylized designs. This process demands a strong understanding of facial symmetry, structure and proportion. It also helps sharpen skills in texture mapping, detail enhancement and turning a reference or likeness into a believable sculpted character.
3. Build Durable Epoxy Molds
Epoxy molds offer greater strength and longevity than standard plaster molds, making them ideal for capturing fine sculptural details and repeated use. Students learn how to layer and reinforce molds properly, apply release agents and seal surfaces to prepare for repeated casting. This technique is foundational for producing high-quality, long-lasting molds used in professional settings.
Related Article: Why Every Serious Makeup Artist Should Learn Mold-Making Techniques
4. Create Lightweight Forms with Roto Casting
Roto casting is the technique of filling a mold with silicone or resin while continuously rotating it to ensure the material spreads evenly along the inside surface.
This technique produces hollow, lightweight pieces ideal for wearable designs like full-head masks, helmets, or props. It’s a go-to method in the special effects makeup industry for saving material while maintaining structural integrity and fine surface detail.
5. Cast Realistic Silicone Prosthetics
Silicone casting is one of the most advanced parts of the program and is essential for achieving realistic skin textures and movement. You’ll learn how to mix and pigment silicone for natural-looking effects, pour or inject it into detailed molds and safely remove the finished cast without tearing or warping. The outcome is a flexible, lifelike piece that’s ready for final detailing and finishing.
Enroll now or book a tour to start your journey on becoming a special effects makeup expert!
Get insights on: How to Make a Face Cast That Fits Perfectly for Prosthetic Makeup?
6. Learn Seam Removal and Surface Patching
Even with precise molding, silicone casts often have visible seam lines. This part of the training teaches students how to smooth and hide those seams using professional solvents, fillers and retexturing tools. You’ll also practice blending patched areas with surrounding textures and matching paintwork, ensuring the final piece looks seamless on camera.
7. Develop Hair Punching Precision
Hair punching is the technique of inserting individual strands of hair into silicone using a fine needle, a time-consuming but critical process for realism. This is how you add believable eyebrows, facial hair and scalp coverage to characters. You’ll learn to control direction, spacing and hair density, which are key factors in achieving natural-looking results.
8. Airbrush Silicone Like a Pro
Silicone doesn’t behave like foam latex or other materials, so it requires unique painting methods. You’ll be taught to use pigments specifically made to bond with silicone and how to layer colors to create realistic skin tones, veins, mottling and depth. The focus here is on building highlights, shadows and lifelike texture that won’t peel or flake.
Enroll now or book a tour to start your journey on becoming a special effects makeup expert!
9. Craft Realistic Eyes from Scratch
Creating realistic eyes involves several steps, starting with sculpting the eye shape and adding painted detail to create depth and expression. A glossy finish is then applied to give them a lifelike, wet look. Once completed, these eyes are carefully installed into character busts with accurate positioning. Though often subtle, well-crafted eyes add dramatic realism and can instantly elevate the impact of any prosthetic piece.
10. Install Final Details: Teeth and Prosthetic Eyes
The final details, like adding teeth and prosthetic eyes, can take a sculpture from good to jaw-dropping. These elements add realism, character and expression to your work. They’re especially important in display pieces, film-ready busts and body doubles and they significantly increase the professional value of your portfolio.
Ready to take your special effects makeup skills to the next level? Schedule a tour of our campus in Los Angeles, USA or apply now and see where your creativity can take you.
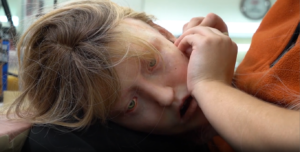
When an actor walks on set with a prosthetic so lifelike that it moves, creases, and blends seamlessly into their skin, you’re witnessing more than just talent – you’re seeing anatomy at work.
For SFX makeup artists, learning human anatomy is not just an add-on skill – it’s foundational. Especially in prosthetic makeup, understanding what’s beneath the surface allows you to build effects that are not only believable but visually striking and functionally sound.
In this blog, we’ll explore why anatomy matters in special effects makeup, how it influences your sculpting and prosthetic work, and how you can start integrating anatomical knowledge into your creative process.
Why Anatomy Isn’t Just for Doctors?
When we think of anatomy, we usually picture doctors and medical students, but in special effects makeup, understanding human anatomy is just as important.
Why?
Because SFX makeup artists work with the human face and body as their canvas, especially when designing and applying prosthetics.
To make a prosthetic look realistic, it has to follow the natural shapes beneath the skin, like bones, muscles, and fat pads. Without knowing where these structures are or how they move, the final effect can look fake or stiff.
So, while doctors study anatomy to heal the body, makeup artists study it to recreate it, believably and artistically. From aged characters to monsters and trauma injuries, knowing anatomy helps bring every illusion to life on screen.
Common Mistakes Artists Make Without Anatomical Knowledge
Skipping anatomy study can lead to several issues in prosthetic makeup, many of which might not be obvious until you see the final result on camera. Here are some common mistakes that happen when artists don’t understand the structure beneath the skin:
1) Aspiring Artists Often Sculpt Floating Prosthetics
When a prosthetic doesn’t follow the natural curves of the face or body, it can look like it’s just sitting on top, almost like a sticker. This happens because the artist didn’t shape it to match the underlying bones and muscles. This leads to edges that lift away from the skin, catch unwanted shadows, and appear fake on camera.
2) Many Beginners Accidentally Block Facial Movement
If a prosthetic is placed over an area with lots of facial movement, like the eyebrows or mouth, without considering which muscles are involved, it can block the actor’s ability to express emotions. This makes the character feel stiff or lifeless.
3) Facial Sculpts Can Appear Bloated or Lifeless Without Anatomical Reference
When the foundation of a sculpture isn’t built on real bone structure, like the zygomatic arch, jawline, or brow ridge, the result often looks swollen, flat, or cartoonish. Even with great texture work, a lack of form beneath the surface makes the entire piece feel unnatural on camera.
4) Incorrect Injury Placement
Real injuries follow certain lines based on how the skin stretches and where muscles move. If a cut or bruise is placed in the wrong direction or spot, it won’t look believable. For example, a slash that goes against the grain of the skin might look more like a painted line than a real wound.
5) Ignoring Structure Makes Creature Makeup Look Rigid
Even fantasy creatures need to feel real. If you ignore anatomy completely while designing a creature, it may look too cartoonish or plastic. Good creature designs are often based loosely on real human or animal anatomy so that they can move, bend, and stretch in a way that makes sense.
Enroll now or book a tour to start your journey on becoming a special effects makeup expert!
How Different Layers of Anatomy Shape Your Sculpting Work?
In special effects prosthetic sculpting, anatomy is the blueprint for everything you build. Understanding how the body is layered helps you sculpt prosthetics that move realistically, fit naturally, and hold up on camera. Each layer – bones, muscles, fat pads, and skin- plays a different role in making your work believable.
A. Bones define the form and proportions of the face and body
When sculpting a prosthetic, especially one that covers large areas like the cheek or forehead, bone landmarks such as the zygomatic arch (cheekbone), mandible (jawline), and brow ridge become your sculpting guides.
Ignoring them often results in prosthetics that look flat, unbalanced, or simply “off” under lighting.
B. Muscles give your prosthetic work motion and structure.
They affect surface contours and control how the face or body moves during performance. For example, covering the orbicularis oris (mouth area) or orbicularis oculi (around the eyes) without sculpting for movement can lead to restricted expressions or stiffness.
When you understand the underlying muscle groups, your prosthetics move naturally with the actor’s expressions, essential for realism in both emotional and action-heavy scenes.
C. Fat pads add volume and softness to the face.
They vary by age, gender, and even individual features, which makes them crucial for sculpting age transitions or body-type transformations.
Missing this layer often leads to prosthetics that look overly sharp, hollow, or unnaturally smooth, lacking the organic fullness of real human features. When done right, fat distribution gives your sculpts the subtle dimension needed to make characters feel lifelike, not artificial.
D. Skin and Tendons
The skin is the final layer your sculpt needs to mimic, but what happens beneath it – like tendons and tension lines- determines how that surface behaves. Skin doesn’t just stretch randomly. It folds, wrinkles, and responds to movement in very specific ways.
Understanding skin flow and tendon pull is essential when designing scars, burns, or stretched skin effects. Without this knowledge, your details may look misplaced or behave unnaturally once the actor moves.
Each of these layers is connected, and knowing how they interact is what separates average work from professional-grade prosthetics. As you grow as a makeup artist, learning anatomy gives you the creative control to sculpt smarter, faster, and more believably.
See How Movie Makeup Comes To Life At Cinema Makeup School –
How Anatomy Strengthens 3D and Digital Sculpting in SFX?
Digital sculpting tools like ZBrush give artists incredible freedom to create complex prosthetics, maquettes, and character designs. But no matter how advanced the software is, strong results still depend on a solid understanding of anatomy for 3D sculpting.
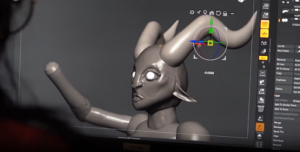
When artists ignore anatomical structure, even highly detailed digital models can look unnatural. Features may seem overinflated, stiff, or disconnected from real movement. This becomes especially obvious during close-up shots or animation, where a lack of muscle flow or bone reference breaks the illusion.
What makes anatomy so important in the digital process is how it allows the artist to sculpt with intention. Instead of guessing where forms should sit or how they should flow, artists with anatomical knowledge can make confident design decisions from the very first stroke.
This not only speeds up the sculpting workflow but also reduces the amount of cleanup, revisions, or re-topology needed later. When a digital model is built on real anatomical landmarks, it holds up better during mold-making, fitting, and even animation retargeting.
Important Note: Many aspiring special effects makeup artists wonder if they can learn human anatomy for sculpting prosthetics on their own, but the truth is, professional guidance makes all the difference. At Cinema Makeup School, we don’t just teach SFX makeup; we help you master the anatomy behind it so your prosthetics look and move realistically.
As one of the most respected SFX makeup schools, we’re proud of what our students say about us. Just take a look at our Google Maps reviews to see why so many artists choose to train here.
Keep Learning With These Guides:
What Are Prosthetic Masks in Special Effects Makeup?
Essential Special Effects Techniques for Aging Makeup
How 3D Printed Prosthetics Are Revolutionizing Movie Makeup?
Career Benefits of Learning Anatomy
Understanding anatomy isn’t just a creative advantage; it’s a career booster.
- Stand out to employers by delivering realistic work that needs minimal adjustments.
- Collaborate more effectively with directors, costume, and lighting teams.
- Expand your creative range with believable trauma, age, and creature effects.
- Work faster and smarter with reduced material waste and stronger first-time results.
Interested in joining us? Enroll now or book a tour to start your journey on becoming a special effects makeup expert! We’re here to help you take the next step in your makeup career – with skill, structure, and confidence.
From monstrous creatures and hyper-realistic wounds to intricately crafted prosthetics, SFX sculpting starts with choosing the right clay. But with so many materials available, how do you know which one fits your project best?
Whether you’re designing a prosthetic appliance, sculpting a maquette, or prepping for a character bust mold, this guide will break down the various sculpting clay types, their ideal uses and how to avoid common sculpting issues like cracking or sagging along the way.
Get ready to dive in and shape something extraordinary.
Why Clay Matters in Special Effects Makeup?
In special effects makeup, clay plays a critical role in bringing concepts to life. Before any prosthetic is molded, painted, or applied to an actor, it begins with a sculpt and that sculpt depends entirely on the quality of clay. This material isn’t just a surface to work on, it’s the base that shapes every fine detail, texture and form used in film, television, or stage productions.
Choosing the right clay for sculpting impacts everything from how realistic your design looks to how successfully it can be molded. If your clay lacks strength, flexibility, or detail retention, your entire sculpture can suffer, leading to lost texture, warping, or failure during the mold-making process. On a professional set, that means wasted time, materials and opportunity.
The value of clay also lies in how well it responds to tools and techniques. High-end sculpting clay allows for sharp lines, skin textures and anatomical accuracy that are essential for believable prosthetic work. On the other hand, using low-grade or incorrect clay can cause cracks, slumping, or poor mold release.
Enroll now or book a tour to start your journey on becoming a special effects makeup expert!
Main Categories of Sculpting Clay for Special Effects Makeup
All sculpting clays fall into a few main categories. Here’s a breakdown:
| Clay Type | Base Type | Reusable | Mold Friendly | Best For |
| Monster Clay® | Oil-Based | ✅ Yes | ✅ Excellent | Detailed prosthetics, busts |
| Chavant NSP | Oil-Based | ✅ Yes | ✅ Excellent | Character design, lifelike textures |
| Plastilina | Oil-Based | ✅ Yes | ✅ Good | Body parts, general SFX sculpting |
| WED Clay | Water-Based | ❌ No | ⚠️ Needs sealing | Life-size busts, fast concept sculpts |
| Air-Dry Clay | Water-Based | ❌ No | ❌ Poor | Quick textures, lightweight props |
| Polymer Clay (e.g., Sculpey) | Polymer | ❌ No | ❌ Not ideal | Miniature models, baked props |
Different sculpting clays offer different benefits. Monster Clay and Chavant NSP are top choices for detailed SFX work. Plastilina clay is great for practice and larger builds. WED clay suits fast, large sculpts. Polymer clay works for miniatures and tools, while Air-Dry clay is ideal for quick concepts. Let’s explore which types of sculpting clay best suit your next creation.
1. Monster Clay
Monster Clay is considered the gold standard in SFX sculpting. This oil-based clay is smooth, easy to work with and holds fine detail remarkably well.
Key Benefits:
- Reusable and Sulfur-Free: Safe for all molding materials.
- Temperature Sensitive: Softens when heated, hardens when cooled.
- Making a mold from Monster Clay is highly preferred in special effects makeup, as the clay captures fine textures accurately and ensures a smooth release during the molding process.
Use Case: Sculpting prosthetic appliances, creature faces and full busts.
Monster Clay is often the clay of choice in professional FX workshops and schools due to its performance and reliability.
2. Chavant NSP
Chavant NSP (Non-Sulfurated Plasteline) is another high-end, oil-based clay known for holding ultra-fine detail and being non-toxic.
Pros:
- Great for precision detail
- Comes in soft, medium and hard grades
- Won’t inhibit silicone molds
Use Case: Perfect for character design and hyper-detailed creature builds.
Caution: Due to its firmer consistency compared to Monster Clay, Chavant NSP can be harder to manipulate at room temperature and may need pre-warming with heat tools to avoid strain or loss of sculpting control.
3. Plastilina
Plastilina clay is a time-tested, oil-based clay for sculpting that has remained a staple in both SFX makeup and traditional sculpting industries for decades. Its non-drying, reusable nature makes it a practical choice for artists working on long-term projects or larger maquettes.
Pros:
- Easily Accessible: Available in most art supply stores and widely used in educational and professional settings.
- Budget-Friendly: More affordable than many high-end sculpting clays, making it ideal for large-scale builds or repeated practice.
- Good Working Time: Holds its shape without drying out, allowing for extended sculpting sessions without time pressure.
- Great for Bulk Forms: Performs well when blocking out larger shapes or body forms before detailing.
Caution: Some types of Plastilina clay may contain sulfur, which can react negatively with silicone mold materials. Always check the clay’s label before use. It can also become overly soft or oily in warmer temperatures, which may reduce sculpting precision.
Use Case: Best for practice sculptures, full-body creature builds and educational projects where cost, availability and long working time are key priorities.
4. WED Clay
WED (Walter E. Disney) clay is a water-based sculpting clay used primarily for large sculptures and fast turnaround times.
Why Artists Love It:
- Sculptures can be completed quickly
- Great for creating texture and expression
- Can be smoothed with water
Caution: WED clay dries quickly and can crack easily.
Wondering how to prevent clay from cracking when using WED? Always cover your sculpture with plastic and a damp cloth between sessions. Use a spray bottle to keep it hydrated.
Use Case: Ideal for theatrical busts, life-sized sculptures and rough drafts.
5. Polymer Clay
Polymer clay isn’t typically used in traditional SFX prosthetic work, but it still serves a useful role in certain aspects of the workflow, especially when creating miniatures, rigid props, or texture tools.
Why Use It:
- Perfect for Miniatures and Models: Polymer clay is excellent for small-scale figures, teeth sculpts, or character maquettes that don’t require molding.
- Hardens Permanently: Once baked, it cures into a hard, plastic-like finish that holds its shape and fine detail.
- Great for Props and Tools: Often used to create rigid components, texture stamps, or sculpting aids used in broader SFX workflows.
Caution: While useful in some applications, polymer clay molds are not recommended for SFX prosthetics. Once baked, the clay becomes brittle and lacks the flexibility needed for molding processes or wearable effects.
Use Case: Best for miniature sculpts, rigid prop elements, or custom texturing tools – not for flexible or skin-safe prosthetic applications.
6. Air-Dry Clay
Air-dry clay is a lightweight, beginner-friendly sculpting material that doesn’t require baking or special equipment.
Pros:
- No Heat Required: Dries on its own without the need for an oven or kiln.
- Good for Simple Projects: Useful for creating lightweight mock-ups, quick concept props, or non-flexible display pieces.
Caution: Air-dry clay is not mold-safe and lacks the flexibility and durability required for SFX-grade prosthetics. It’s also highly prone to cracking, especially when drying too quickly or applied in thick layers.
Use Case: Best suited for non-molded mock-ups, student practice, or concept design—not for wearable or moldable effects in professional settings.
FAQ: How Do You Keep Air-Dry Clay from Cracking?
To keep air-dry clay from cracking, start by kneading it well to remove air bubbles and ensure a smooth texture. Apply the clay in thin layers rather than thick sections, which helps it dry more evenly.
Let your sculpture dry slowly in a cool, shaded area, avoiding direct sunlight or heaters. Lightly misting the surface during sculpting can maintain moisture and prevent surface stress. Cracking often happens due to uneven drying or overworking, so handle the clay gently and allow time for each section to set properly.
Enroll now or book a tour to start your journey on becoming a special effects makeup expert!
Don’t miss these guides:
How to Create Creature Design Using Latex, Silicone & Prosthetics?
Foam Latex vs Silicone: Choosing the Right Material for SFX Prosthetics
How to Apply Latex & Vinyl Bald Caps in Character Makeup?
Oil-Based vs. Water-Based Clay – Which One Should You Use?
| Feature / Property | Oil-Based Clay | Water-Based Clay |
| Composition | Made with waxes, oils and fillers | Made with natural clay and water |
| Drying Time | Does not dry out; reusable indefinitely | Dries out over time (can be rehydrated temporarily) |
| Detail Retention | Excellent for fine detail; perfect for prosthetics and maquettes | Good for general sculpting, less ideal for high detail |
| Tool Compatibility | Works well with metal and heated sculpting tools | Can be used with traditional clay tools and brushes |
| Mold Compatibility | Ideal for silicone mold-making (if sulfur-free) | May not be compatible with all molding materials |
| Working Time | Unlimited; does not dry or cure unless intentionally heated | Limited working time before drying starts |
| Texture & Feel | Smooth, dense and waxy | Softer, more pliable; similar to ceramic clay |
| Reuse | Fully reusable | Partially reusable, can degrade over time |
| Best For | Professional SFX sculpts, prosthetics and maquettes | Practice busts, quick concept sculpting and educational use |
| Caution | Some types contain sulfur—check before mold-making | Tends to crack if dried unevenly or layered too thick |
Check out our YouTube channel to see how our students create jaw-dropping looks!
Deciding between oil-based and water-based clay comes down to the type of sculpture you’re making. If your project demands high detail, long working time and mold-readiness, such as prosthetics, creature busts, or character maquettes, oil-based clay is the better fit.
For quicker builds like practice busts, classroom models, or large-scale mockups where drying time and fine detailing aren’t as critical, water-based clay offers more flexibility and ease of use.
Read This: Need guidance on how to sculpt with clay? Look no further than Cinema Makeup School. Located in Los Angeles, California, USA, we’re proud to be one of the top special effects makeup schools, equipping students with hands-on experience and real-world projects guided by industry experts.
Interested in joining us? Enroll now or book a tour to start your journey on becoming a special effects makeup expert!
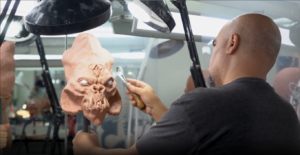
Essential Clay Sculpting Tools Every SFX Artist Should Own
No matter how skilled you are, your results will always reflect the quality of the clay sculpting tools you use. From building rough forms to refining skin textures, the right tools help you bring your creative vision to life with precision.
- Loop Tools: Essential for carving, shaping and removing clay while maintaining control over your forms.
- Rake Tools: Great for smoothing larger surfaces and creating subtle muscle transitions or volume shifts.
- Metal Spatulas: Used for fine detailing—perfect for adding scars, pores, wrinkles and skin folds.
- Heat Gun or Warming Tray: Must-haves when working with oil-based clays like Monster Clay or Chavant NSP, making the sculpting process smoother and more efficient.
- Spray Bottle (for water-based clay): Keeps your piece moist and workable, preventing cracking during long sculpting sessions.
Looking for professional clay or clay sculpting tools? Enroll today or book a tour at Cinema Makeup School to learn these skills hand-on!